174
6
Cleaning
1.
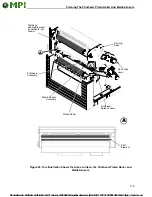
Rotate the deck lock lever counterclockwise to open the pivoting deck
and remove any media and ribbon (if loaded) to gain access to the
printhead heating elements area.
2.
Gently rub a cotton swab with Isopropyl alcohol across the printhead
heating elements (light brown area).
3.
Allow the printhead to dry for one minute before reloading the media and
ribbon.
4.
Clean the platen roller.
5.
Clean the media sensors with a soft cloth.
Cutter Option Cleaning
The cutter requires only periodic cleaning.
Perform the following procedure whenever too much dust or debris is visible.
1.
Set the printer power switch to O (Off).
2.
Rotate the deck lock lever fully counterclockwise until the pivoting deck
swings upward.
3.
Open the cutter cover by sliding the cutter cover release lever to the right.
4.
Use a cloth with a light amount of WD-40 oil to clean adhesive from the
cutter guides. Adhesive oil must be cleaned from the guides with a dry
cloth to prevent dust attraction.
5.
Loosen the thumbscrew on the right side of the front panel and swing it
open.
6.
Use a vacuum or can of compressed air with a nozzle around the area of
the cutter blade to remove any dust or debris.
7.
Use a cloth with a light amount of WD-40 oil to clean adhesive from the
cutter blade. Adhesive oil must be cleaned from the blade and guides with
a dry cloth to prevent dust attraction.
ATTENTION
Do not use isopropyl alcohol to clean the cutter blade – it dissolves oils
required for lubrication.
8.
Close the front panel and tighten the screw.
9.
Properly route the media through the printer and cutter.
10. Close the cutter cover.
11. Close the pivoting deck by rotating the deck lock lever fully clockwise.
12. Set the printer power switch to | (On).
13. Test the printer cutting operation by selecting one of the test patterns to
print. Select Printer Tests in the DIAGNOSTICS menu
(see “DIAGNOSTICS Menu” on page 144).
Keep your fingers away from the cutter blade. It is sharp.
CAUTION

