Quick Reference Guide PP 3034
2
1.3 Installing the Image Cartridge
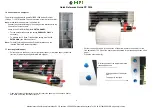
– Open the top cover.
– Unpack the Image Cartridge (1) and shake it
slowly.
– Remove both lock stripes (2) of the Image
Cartridge (1)
– Put the Image Cartridge (1) into the left and right guiding (3) and slide it to the bottom.
Note:
The Image Cartridge is very
light sensitive. Do not expose
the Image Cartridge (1) to room
lighting or sunlight any longer
than necessary.
– Close the top cover.
1.4 Mounting the tear off bar
– Remove the two screws (7) on the back side of the printer.
– Position the tear off bar (4) as shown on the photo below and fix it with the included longer
screws.
1.5 Power ON/OFF Switch
– Make sure that the power switch of the printer is placed in the
O
(OFF) (2) position.
– Connect the printer to the mains using the power cord (1).


