background image

Capacity

Tyre pressure

Engine oil

Including filter [l]

Between MIN and MAX [l]

Tyres 225/45 R 18 95W

[bar] ([psi]) Front : 2.2 bar / 32 psi

Rear : 2.1 bar / 30 psi

Spare wheel 2.2 bar / 32 psi

Technical characteristics

74

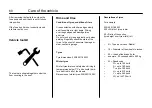
Summary of Contents for Erelis 2018

Page 1: ...MPM Motors ERELIS 2018 User Manual ENG...

Page 2: ...Activating the alarm 16 Deactivating the alarm 17 Key radio frequency remote control failure 17 Starting prevention device 17 Boot 17 Exterior wing mirrorss 18 Electric windows 18 Child locks on rear...

Page 3: ...ivating starting prevention device 45 Manual handbrake 46 Fuel 46 Fuel consumption 46 CO2 emissions 48 Care of your vehicle 49 Vehicle checks 50 Bonnet 50 Replacing bulbs 54 Electrical circuit 58 Vehi...

Page 4: ...Introduction Fuel Weight Tyre inflation pressure Fitting front rear Engine oil Description Viscosity Base model unladen weight Summer tyres Winter tyres Quality Total weight authorised Introduction 4...

Page 5: ...h as left right forwards and backwards are always given as if you are facing the front of the vehicle Approved MPM Repairers offer a first rate service at a reasonable rate Their experienced staff tra...

Page 6: ...or injury Ignoring this information could lead to a risk of injury Danger Warning Attention In brief Adjustement of seats Seat position Pull the handle move the seat and release the handle Allow the s...

Page 7: ...at belt must not be twisted and must be worn close to the body The seat back must not be tilted too far back approximately 25 maximum To unfasten the seat belt press the red Button on Adjustment of re...

Page 8: ...our direc tions to make the adjustments Replace switch A in a central position Ensure that the vehicle is stopped before adjusting the mirrors Danger Adjustment of the steering wheel Release the lever...

Page 9: ...9 In Brief Overview of the dashboard 1 6 10 13 13 12 11 14 7 9 8 2 22 15 3 16 17 18 4 5 20 21 23 24...

Page 10: ...oning 9 Gear lever 10 Horn 11 Driver airbag 12 Cupholder Storage 13 Fuse box 14 Steering wheel adjustment 15 Exterior lighting control 16 Front windscreen wipers Front windscreen wash 17 Ignition lock...

Page 11: ...ights pull out the first notch see picture A Rear fog lights pull out at the second notch to add the rear fog lights see picture B Indicators switched on as a visual alert to warn other road users in...

Page 12: ...e Front windscreen washer Heating and air conditioning Pull the windscreen wiper stalk towards you The windscreen wash and wipers will operatesimultaneously Temperature To adjust the temperature turn...

Page 13: ...nsation may then form which then results in water dripping from under the vehicle If you do not want the air cooled or dried switch off the air conditioning in order to save fuel Air conditioning Gear...

Page 14: ...tion 3 and release it Parking Always apply the handbrake Apply the handbrake without pushing in the locking button When on a slope or a hill apply it as tightly as possible Push the brake pedal in at...

Page 15: ...following causes Out of range Battery voltage too low Frequent and repeated use of the remote control while the vehicle is out of range this requires the device to be reprogrammed Central locking over...

Page 16: ...on 2 As a security messure passengers on board never leave the vehicle without the key even for a short time Warning To unlock the vehicle press button 1 With the remote control Activating the alarm T...

Page 17: ...er s door manually by turning The back up key in the lock Boot Manual opening and closing To open the boot press the button below left of the steering wheel The tailgate is shut manually Alternatively...

Page 18: ...the exterior door mirrors Place switch A to the right or to the left to select the corresponding rearview mirror Move switch B in all four directions to adjust the position Bring switch A back to the...

Page 19: ...cking the rear windows Sun visor The sun visors can be lowered and pivoted laterally to avoid glare If the sun visors are fitted with vanity mirrors their covers must be closed whilst driving Always r...

Page 20: ...of the seat bask so that you can reach the steering wheel with your arms slightly bent When turning the steering wheel your shoulders should keep touching the seat back Do not tilt your seat too far...

Page 21: ...em to ensure that they are working correctly and that they are not damaged Replace dammaged parts After an accident have the seat belts changed by a garage Pull the handle move the seat and release th...

Page 22: ...belt is fastened Do not pass the seat belt over hard or fragile objects in clothes pockets Attention Three point seat belt Pull the seat belt from the winding mechanism guide it around the body witho...

Page 23: ...nto the lock identified with a black button then guide the strap over the body without twisting it and insert the interme diate buckle into the lock on the other side For the outboard side seats relea...

Page 24: ...that the child seat to be fitted is compatible with the type of vehicle Ensure the fitting position of the child seat is correct Only allow children to get in and out of the vehicle on the opposite s...

Page 25: ...oor opening Fit the ISOFIX safety system homologated for the vehicle to the three ISOFIX fixing brackets Two of the brackets are found at the bottom the third at the top identified with the symbol The...

Page 26: ...13 kg or around 2 years Group I from 9 to 18 kg or from around 8 mois to 4 yrs Group II 15 to 25 kg or from around 3 to 7 yrs Group III 22 to 36 kg or from around 6 to 12 yrs X U X X U X X U X X U X X...

Page 27: ...a vehicle limited use or semi universal categories X ISOFIX position not suitable for ISOFIX child restraining devices in this weight group and or height group Authorised fitting options for an ISOFI...

Page 28: ...cing CRD B ISO F2 reduced height forward facing CRD B1 ISO F2X Restraining device for young children forward facing and of reduced height C ISO R3 tall height rear facing CRD D ISO R2 reduced height r...

Page 29: ...rs In the front and the rear Glove box Cup holders Placed under the facia it is equipped with a lid with a handle which is raised to open When driving the glove compartment must remain closed The cup...

Page 30: ...not leave any items which are not secured inside the passenger compartment Do not drive with th boot open Place heavy objects in the boot against the rear seats Should you need to stack items place th...

Page 31: ...eel when the vehicle is stopped and the steering lock is off To warn of immediate danger or to alert another motorist sound the horn by pushing Instruments and controls Controls 31 Horn 31 Front winds...

Page 32: ...ll the handle towards you The wins creen wash is sprayed onto the screen and the wipers will carry out one cycle of wiping A 12 V outlet is present between the passenger seat and the driver seat The m...

Page 33: ...last reset Trip2 mode can be used to calculate another distance at the same time To reset press and hold the reset button situated close to the lower right corner of the speedometer The daily odometer...

Page 34: ...ng light comes on Fill the tank without delay Never drive until the tank is empty The maximum authorised engine speed is exceeded if the needle reached the red warning zone Danger for the engine If th...

Page 35: ...Instruments and controls 35 Instrument panel warning lights...

Page 36: ...tor Driver s seat belt reminder Airbag Charging system The light comes on or flashes in yellow It lights up when the ignition is started and goes out shortly after the engine starts If it lights up wh...

Page 37: ...ntilock Brake System ABS Have the cause of the fault repaired immediately by a garage Attention The light comes on in green The dipped headlights are on The light comes on in blue It comes on when the...

Page 38: ...ps The daytime running lights increase the visibility of the vehicle during the day They Switching from dipped to full beam head lights Push the stalk forwards Return to dipped headlights Pull the sta...

Page 39: ...ont fog lights pull out the first notch Indicators for direction or lane change Stalk up right indicator Stalk down left indicator Rear fog lights Rear fog lights pull out at the second notch to add t...

Page 40: ...en the driver s door is open automatic switching ON and OFF when getting into and out of the vehicle and will go off after a short time front interior light ON Front interior light Rear interior light...

Page 41: ...the temperature for your comfort The heating is only really effective once the engine has reached its normal running temperature Air flow level To adjust the air flow turn the air flow swit hc C to po...

Page 42: ...n mists up on the outside switch on the front wipers Briefly open the windows to rapidly Get rid of warm air Recycled air switched on Turn the temperature dial to the coolest setting Turn air flow lev...

Page 43: ...vents Risk of damage and of injury in the event of an accident Attention Normal functioning of the air conditioning Service Air intake The windscreen bay must not be cluttered If so remove the leaves...

Page 44: ...ot essential During the first journey smoke may form because of wax and oil evaporating from the exhaust system Park the vehicle in the open air for a period after the first trip and avoid breathing i...

Page 45: ...pedal Starting a vehicle in low temperatures Starting the engine without additional warming up is possible up to 30 C for petrol engines It is simply necessary to choose an engine oil with suitable vi...

Page 46: ...anganes based additives The use of fuel which does not comply with EN 228 or E DIN 51626 1 or all other identical specification may lead to deposits increased wear dam mage to the engine and may effec...

Page 47: ...ong type of fuel do not switch on the ignition Warning Before filling up with fuel shut off the engine and the exterior heating with combustion chambers Switch off mobile phones When filling the tank...

Page 48: ...and CO2 emission data are determined according to the R EC N 715 2007 directive the respectively applicable version taking into account the weight of the vehicle in wor king conditions as specified b...

Page 49: ...Have the wax protection of the engine compartment and the underbody checked Clean and protect the rubber sealing joints Fill up with fuel Change the engine oil Empty the windscreen wash reservoir Che...

Page 50: ...er the bonnet allow it to drop into the lock Check it is locked Manually check the engine oil level at regular intervals in order to avoid dammage to the engine Take care that the oil used respects th...

Page 51: ...y of engine oil as that used at your last oil change The engine oil level must not be above the MAX level of the gauge Replace the cap straight and tighten it The cooling liquid offers protection agai...

Page 52: ...e screenwash container If the brake lining reaches minimal thickness a grinding noise can be heard when braking You may continue your journey but you must have the brake linings replaced as soon as po...

Page 53: ...ve terminal If an air hole is open in this area it must be filled with a cap and the ventilsation near the negative terminal must be opened Only use batteries which allow the fuse box to be fitted ove...

Page 54: ...bulb from its holder and replace the bulb 4 Insert the bulb holder by pushing the two pins into the reflectors and fix it in place by turning clockwise Front wiper blades Turn off the ignition and de...

Page 55: ...and replace it 4 Push the socket into the reflector Put the cap in place and turn it clockwise 3 Move the wire bow spring by removing it from its fastener and tip it downwards 4 Remove the bulb from...

Page 56: ...Connector by pushing in the retaining tab 3 Remove and replace the bulb socket with the new bulb fitted 4 Connect the connector 5 Insert the bulb socket into the reflector 6 Turn the bulb socket in a...

Page 57: ...b casing two cases are present with each bulb 2 Remove the bulb housing from below taking care not to pull on the cable 3 Remove the bulb from the socket And replace it 4 Reconnect the sleeve onto the...

Page 58: ...RELAY 25 HEAD LAMP HI RELAY Fuses The writing on the new fuse must match the writing on the faulty fuse The vehicle is fitted with two fuse boxes At the front left of the engine bay Inside left hand...

Page 59: ...10A 15 ING COIL 15A 16 FUEL PUMP 15A 17 STARTER 20A 18 STOP LP 15A 19 FAT FOG 15A 20 DIAGNOSIS 10A 21 BCM 10A 22 CLUSTER 10A 23 CLUSTER 10A 24 HAZARD 7 5A 25 AIRBAG 10A 26 RADIO 10A 27 O S MRR 10A 28...

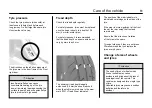
Page 60: ...nsions 225 45 R 18 95W Winter tyres Winter tyres improve safety when driving in temperatures below 7 C and should there fore be fitted to all of the wheels Dimensions of winter tyres 225 45 R 18 95V D...

Page 61: ...ure that the direction of rotation of the tyres is the same Tyres get old even if they are not driven We recommend that you replace the tyres every 6 years The minimum tread depth leagally authorised...

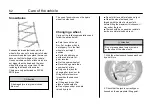
Page 62: ...front wheels to a straight position Put the handbrake on put the vehicle into 1st gear reverse Get the spare wheel out Never change more than one wheel at a time Only use the jack for changing flat t...

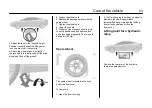
Page 63: ...hydraulic ramp at underbody level 3 Adjust the jack to the required height Position it directly under the lifting point in such a way that it cannot slip 4 Attach the wheel wrench correctly the jack...

Page 64: ...and the battery of another vehicle Do not have naked flames or sparks close to the battery A flat battery can freeze at a termperature of 0 C Thaw the frozen battery before connecting the jump start c...

Page 65: ...tach the other end of the black cable to a grounding point on the vehicle such as the engine block or an engine fixing bolt Attach it as far from the flat battery as possible at least 60 cm away in an...

Page 66: ...recycle air system and close the windows in order to avoid fumes entering from the exhaust of the towing vehicle Locks The locks are lubricated in the factory using a high quality grease for lock bar...

Page 67: ...e of plastic Do not use abrasive or corrosive products nor scrapers and do not clean when dry Polishing and shining Shine the vehicle regularly until there are no more drops of water Otherwise the pai...

Page 68: ...remove stains use a fabric cleaning product It may be that fabrics are not colourfast This may cause visible discolourations especially on light coloured fabric trims Remove stains and discolouration...

Page 69: ...ith the stamp of the garage which has carried out the service Ensure that the service logbook and the warranty are correctly filled in as the proof of service history is essential if the warranty is t...

Page 70: ...second figure the viscosity at hifh temperature MPM Motors recommends that you use engine oil type 0W 30 Cooling liquid and antifreeze Use only long life LLC antifreeze for cooling liquid without sili...

Page 71: ...g 7 Maximum load authorised on the rear axle in kg 8 Information specific to the vehicle or the country for example AM model year The load on the front and the load on the rear axles must not exceed t...

Page 72: ...99 9 Engine power kW 96 at a rate of 5500 rpm Torque Nm 230 Nm at a rate of 1750 rpm Type of fuel Petrol RON octane index SP95 Recommended SP95 Authorised SP95 SP95 E10 Fuel consumption Combined fuel...

Page 73: ...d of 200 kg Some options may reduce the indicated maximum speed ERELIS 2018 Empty weight 1240 kg Unladen weight entry model with no optional equipment Length mm 4684 Width including rear view mirrors...

Page 74: ...apacity Tyre pressure Engine oil Including filter l Between MIN and MAX l Tyres 225 45 R 18 95W bar psi Front 2 2 bar 32 psi Rear 2 1 bar 30 psi Spare wheel 2 2 bar 32 psi Technical characteristics 74...

Page 75: ...Aftersales Contact sav mpm motors com T 33 0 1 39 38 96 37 Contact 75...

Page 76: ...orrespond to the situation indicated MPM Motors reserves the right to make technical changes the equipment and the shape of the vehicle in relation to the indications contained in this publication as...

Reviews: