22
EN
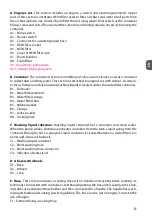
WARNING! Do not ever vacuum wet floors with your vacuum cleaner (in dry cleanning mode)
Using the equipment described above you can clean:
-
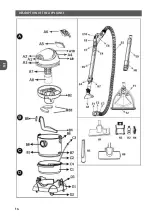
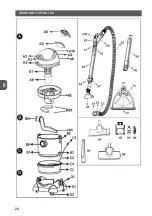
Floor and carpet head (H1)
– used to remove dust from carpets, rugs and hard
floor surfaces. It is equipped with rings allowing easier handling and a button. After
pressing the button you can adjust the head for hoovering hard surfaces, for exam-
ple floors, parquets.
-
Narrow attachment (H5)
– used to clean places that are not easily accessible.
-
Turbo brush (H6)
– for cleaning carpets, fitted carpets.
-
szczotka zintegrowana (H7)
– dzięki umieszczeniu jej na rurze ssącej pozwala na
błyskawiczny dostęp i oszczędność czasu. Aby jej użyć, zdemontuj z końca rury ak-
tualne wyposażenie po czym obróć szczotkę o 180o do zadziałania blokady.
UWAGA! W celu rozłączenia rur ssących oraz wyposażenia wciśnij przycisk blokady rury (E4) znajdujący się na
rurze ssącej i/lub uchwycie.
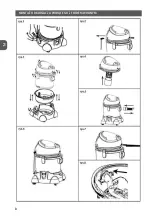
WET WASHING AND CLEANING
1.
Make sure that the device is disconnected from mains.
2.
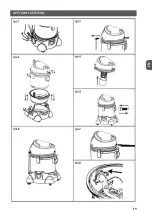
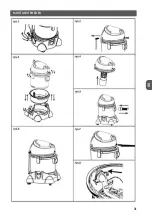
Lift an engine’s set above the container. Make sure that a filter (A8) is mounted.
3.
Lift water filter element (B2) and container (B1).
4.
Take water filter tube off (B4), because its presence during wet cleaning may lead to froth
production.
5.
Pour clean water into the washing liquid container (in order to check its level use the indi-
cator of water level (C4) and shampoo (quantity of a shampoo has been given on a bottle).
ATTENTION! When using a function of surface washing do not put water into the water filter container (B1).
6.
Zamontuj ponownie pojemnik (B1) w ten sposób aby wlot ssący (B8) znajdował się po przeci-
wnej stronie co gniazdo krótkiego węża piorącego w zbiorniku na płyn piorący. Następnie
zablokuj zamki (D3), w pojemniku (B1) zamontuj korpus (B2). Zamontuj zespół silnikowy i
zablokuj zamki (B6).
7.
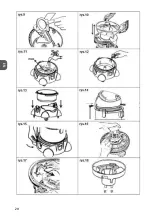
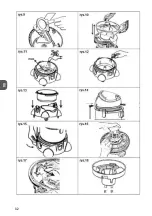
Connect a short washing hose (C2) to washing liquid tank (C1) (PIC. 15) and to the connector
at the back of engine’s set (PIC.14).
8.
Connect sucking hose (E5) to sucking inlet (B8) and sucking tubes (E9).
9.
Connect fixing element (E2) to connector for a washing liquid hose (A3)
10.
Connect washing tip (F1) to sucking tubes or directly to the handle. A tip for delicate cleaning
(G1) can be connected only to the handle. To wash carpets, rugs and to wash a floor use a
normal tip. To wash armchairs, sofas, curtains, car upholstery etc. use a tip for delicate wet
cleaning, attaching it directly to the handle.
11.
Connect the device to the mains.
12.
In order to switch on a pump press a pump switch (A1).
13.
Press liquid feeder lever (E6). Water and shampoo (washing liquid) are pumped from a liquid
container with a pump and sprayed on cleaned surface with a tip. The liquid gets into fibres
and dissolve even permanent dirt. Wait at least three minutes to let shampoo to be absorbed.
14.
Switch off the pump with a switch (A1).
15.
Press a vacuum cleaner switch (A2) in order to start sucking function and move the tip on
the floor surface. When washing upholstery, suction of dirty water and spraying of a liquid
mixture may take place at the same time.
Summary of Contents for MOD-22
Page 5: ...5 P L OPIS URZ DZENIA...
Page 8: ...8 P L MONTA ODKURZACZA PIOR CEGO Z FILTREM WODNYM...
Page 9: ...9 P L...
Page 16: ...16 E N DESCRIPTION OF THE APPLIANCE...
Page 19: ...19 E N APPLIANCE ASSEMBLY...
Page 20: ...20 E N...
Page 25: ...25 R U...
Page 26: ...26 R U 600C 8 8...
Page 27: ...27 R U...
Page 28: ...28 R U...
Page 31: ...31 R U...
Page 32: ...32 R U...
Page 35: ...35 R U 12 E6 E10 13 A1 14 A2 15 B1 C1 H4 B1 16 E5 E8 E3 17 F1 F2 F1 HEPA HEPA 2 1 2 3 B1 C1...
Page 39: ...39 D E GER TEBESCHREIBUNG...
Page 42: ...42 D E MONTAGE DES NASS STAUBSAUGERS MIT WASSERFILTER...
Page 43: ...43 D E...
Page 50: ...50 E S DESCRIPCI N DEL EQUIPO...
Page 53: ...53 E S MONTAJE DE LA ASPIRADORA LAVA ALFOMBRAS CON FILTRO DE AGUA...
Page 54: ...54 E S...
Page 59: ......

