background image

13

GB

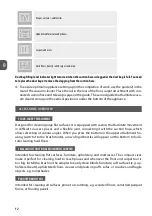
SLIDE-OUT CREVICE TOOL

Used for cleaning difficult to access areas, such as in room corners, by and below pieces of 
furniture and in bends and slits. It is also perfect for cleaning computer keyboards, drawers, 
radiators or window frames.

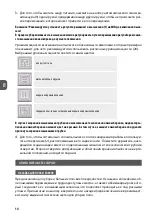
REPLACING THE DUST BAG 

To replace the dust bag, disconnect the appliance from the power supply, detach the suc-
tion hose (19), press the button (7) to open the upper cover (6), slide out the dust bag, while 
holding the flange with the inlet opening directed upwards. Install new dust bag. You can 
purchase spare dust bags.

AIR FILTER CLEANING AND REPLACEMENT 

Normal use of the vacuum cleaner requires periodical replacement or cleaning of the air filter, 
which protects the motor from the side of the dust bag, and the air outlet filter. For this purpo-
se, disconnect the appliance from the power supply and detach the suction pipe.

1. 

Remove the air discharge filters (12, 13, 14) from the vacuum cleaner by pressing the latch 
buttons (15). Next, remove the filters. 

2. 

Remove the motor filter (17). You will access the filter by lifting the cover (6) and removing 
the dust bag (16). Pull the handle to move the grill aside and remove the filter element (17).

3. 

Clean the HEPA filter element (13) of dust. The HEPA filter element must be perfectly dry be-
fore installing it again. Before closing the cover (11), make sure that the HEPA filter element is 
aligned. Do not wash the HEPA filter element.  

4. 

Wash filter cartridges (12,14 i 17) under running and cool water. Dry the filters thoroughly 
after washing.

5. 

Cartridges should be cleaned every month or more frequently (depending on the usage). If a 
cartridge is too contaminated or damaged, replace it with a new one.

6. 

When installing the filter elements, carefully align them in the housing and the vacuum 
cleaner. 


CAUTION: The filter cartridge being mounted must be completely dry. Mounting a wet filter may cause an 
electric shock.

CLEANING AND MAINTENANCE 

1. 

Periodically clean the vacuum cleaner housing and other external elements with a damp 
cloth. This will allow maintaining good appearance of the appliance.

2. 

For this purpose, do not use sharp objects or any strong detergents (e.g. solvents), as this will 
cause permanent damage to the vacuum cleaner housing.

3. 

For air filters and dust bag, follow the above instructions.

Summary of Contents for MOD-23

Page 1: ...PRZED PIERWSZYM UŻYCIEM ZAPOZNAJ SIĘ Z INSTRUKCJĄ OBSŁUGI INSTRUKCJA OBSŁUGI ODKURZACZ MOD 23 Vacuum cleaner Пылесос Staubsauger ...

Page 2: ...INSTRUKCJA OBSŁUGI 3 USER MANUAL 9 ИНСТРУКЦИЯ ПО ОБСЛУЖИВАНИЮ 15 BEDIENUNGSANLEITUNG 21 GB RU DE PL ...

Page 3: ... dzenie urządzenia obrażenia ciała lub pożar Zachowaj szczególną ostrożność podczas pracy z odkurzaczem na schodach Nie zanurzaj urządzenia przewodu i wtyczki w wodzie lub w innych płynach przewód sieciowy i wtyczka muszą być zawsze suche Nie używaj odkurzacza do zbierania łatwopalnych i korozyjnych płynów rozpusz czalników zapałek popiołu niedopałkówpapierosów olejów ostrychprzedmiotów itp Może t...

Page 4: ... ich uszkodzenia Sprawdzaj wąż ssący rury i ssawki znajdujące się wewnątrz nich śmieci usuń Odkurzaczaużywajjedyniewewnątrzpomieszczeńi tylkodo odkurzaniasuchych powierzchni Dywany wyczyszczone na mokro przed odkurzaniem wysusz Dla bezpieczeństwa dzieci proszę nie zostawiać swobodnie dostępnych części opakowania torby plastikowe kartony styropian itp OSTRZEŻENIE Nie pozwalaj dzieciom bawić się fol...

Page 5: ...inimalizowania tego zjawiska zaleca się rozładowanie urządzenia poprzez częste dotykanie rurą metalowych obiektów w pokoju zwiększenie wilgotności powietrza w pomieszczeniu stosowanie ogólnodostępnych środków antyelektrostatycznych MONTAŻ URZĄDZENIA 1 Naciśnij dwa zatrzaski znajdujące się w pierścieniu mocującym wąż ssący 20 po czym włóż pierścień do otworu 8 i zwolnij zatrzaski W celu zdemontowan...

Page 6: ...ki podłogowo dywanowej wraz z podłączonym wężem ssącym oraz rurą telesko pową na prowadnicy Druga prowadnica ułatwiająca przechowywanie odkurzacza w pozy cji pionowej znajduje się pod spodem urządzenia OPIS AKCESORIÓW PRZYSTAWKA PODŁOGOWO DYWANOWA Przeznaczona jest do sprzątania dużych płaskich powierzchni Wyposażona została w kółka ułatwiające poruszanie się w trudno dostępnych miejscach oraz ela...

Page 7: ...a wymaga co jakiś czas wymiany lub oczyszczenia filtra osłaniającego silnik od strony worka na kurz oraz filtra przy wylocie powietrza W tym celu należy odłączyć urządzenie od źródła prądu wypiąć rurę ssącą 1 Zdemontuj filtry wylotowe 12 13 14 z odkurzacza poprzez naciśnięcie przycisków bloka dy 15 a następnie wyjmij wkłady 2 Zdemontuj filtr silnika 17 Dostęp do filtra uzyskasz po podniesieniu pok...

Page 8: ...wymień worek na kurz lub opróżnij worek tekstylny zapchany wąż lub rura przedłużająca usuń wszelkie przedmioty zapychające wąż lub rurę DANE TECHNICZNE Parametry techniczne podane są na tabliczce znamionowej produktu Długość przewodu sieciowego 7 m Zasięg odkurzacza 10m Uwaga Firma MPM agd S A zastrzega sobie możliwość zmian technicznych PRAWIDŁOWE USUWANIE PRODUKTU zużyty sprzęt elektryczny i ele...

Page 9: ...its cord and plug in water or any other liquids keep it dry at all times Donotusethevacuumcleanertocollectflammableandcorrosiveliquids solvents matches ash cigarette ends oil sharp items etc It can cause damage or even fire Do not vacuum clean near flammable liquids and substances Because of the vacuum cleaner plastic housing keep the appliance away from any heat sources heaters stoves etc Do not ...

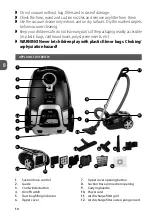
Page 10: ...plastic bags cardboard boxes polystyrene inserts etc WARNING Never let children play with plastic film or bags Choking asphyxiation hazard APPLIANCE OVERVIEW 9 8 5 6 28 4 27 10 14 13 12 11 25 24 23 26 17 16 15 19 7 22 18 1 2 3 21 20 1 Suction force control 2 Guide 3 Cord winder button 4 On off switch 5 Dust bag filling indicator 6 Upper cover 7 Upper cover opening button 8 Suction hose connection ...

Page 11: ...opening 8 and release the latches To disassemble press the latches again and remove the ring 20 from the opening 8 2 Connect the wand 18 to the handle 21 on the other end of the suction 19 Install one of the tools 22 23 24 or 25 on the end of the wand USING THE APPLIANCE 1 Before turning on the vacuum cleaner unwind the power cord 10 to a suitable length and plug it into the mains socket The yello...

Page 12: ...r cleaning large flat surfaces It is equipped with castors that facilitate movement in difficult to access places and a flexible joint connecting it with the suction hose which allows directing at various angles When you press the button on the upper attachment ho using switch it to the brush mode a row of rigid bristles will appear on the bottom to facili tate cleaning hard floors SMALL MULTIFUNC...

Page 13: ... filter by lifting the cover 6 and removing the dust bag 16 Pull the handle to move the grill aside and remove the filter element 17 3 Clean the HEPA filter element 13 of dust The HEPA filter element must be perfectly dry be fore installing it again Before closing the cover 11 make sure that the HEPA filter element is aligned Do not wash the HEPA filter element 4 Wash filter cartridges 12 14 i 17 ...

Page 14: ...ameters are indicated on the product nameplate Length of power cord 7 m Reach of vacuum cleaner 10m Note MPM agd S A reserves its right to modify the technical data PROPER DISPOSAL OF THE PRODUCT waste electrical and electronic equipment Thissymbolontheproductindicatesthattheproduct afteritslifetime shouldnotbedisposedwithother householdwastes Toavoidharmfulinfluenceontheenvironmentandhumanhealthd...

Page 15: ...ей нерекомендованныхизготовителем может привести к повреждению оборудования пожару или травмам Будьте особенно осторожны при использовании пылесоса на лестницах Не погружайте устройство шнур и вилку в воду или другие жидкости се тевой шнур и вилка всегда должны быть сухими Не используйте пылесос для сбора легковоспламеняющихся и едких жид костей растворителей спичек пепла окурков масел острых пред...

Page 16: ...е их по вреждения Проверяйтевсасывающийшланг трубыинасадки удалитемусорвнутриних Пылесос используйте только внутри помещений и только для уборки сухих поверхностей Ковры после влажной чистки перед чисткой пылесосом следует высушить Для безопасности детей пожалуйста не оставляйте свободно доступные части упаковки пластиковые мешки картонные коробки полистирол и т д ОСТОРОЖНО Не разрешайте детям игр...

Page 17: ...поверхностей в условиях низкой влажности воздуха может привести к небольшой электризации устройства Это естественное явление оно не по вреждает прибор и не является его недостатком Для уменьшения этого явления рекомендуется разрядка устройства путем частого прикосновения трубой к металлическим предметам в комнате повышение влажности воздуха в помещении применение общедоступных антиэлектростатическ...

Page 18: ...овые покрытия В случае засорения всасывающей трубки или максимального заполнения пылесборника индикатор за полнения пылесборника изменит цвет на красный В этом случае замените пылесборник или удалите причину засорения всасывающей трубки 4 Для того чтобы оптимально сложить пылесос после завершения работы воспользуй тесь отверстиемe 2 расположенным в его задней части Поместите держатель нахо дящийся...

Page 19: ...ость покупки дополнительных бумажных мешков для пылесоса ОЧИСТКА И ЗАМЕНА ВОЗДУШНЫХ ФИЛЬТРОВ Нормальная эксплуатация пылесоса требует время от времени замены или очистки фильтра защищающего двигатель со стороны мешка для пыли и фильтра на выходе воздуха Для этого необходимо отключить пылесос от источника питания отсоединить всасывающую трубу 1 Выньте выходные фильтры 12 13 14 из пылесоса путем наж...

Page 20: ... загрязненные фильтры очистите или замените фильтры мешок для пыли заполнен замените мешок для сбора пыли или очистите текстильный мешок забитый шланг или телескопическая труба длительная удалите все предметы засоряющие шланг или трубу ТЕХНИЧЕСКИЕ ДАННЫЕ Технические характеристики приведены на паспортной табличке изделия Длина сетевого шнура 7 м Диапазон пылесоса 10 м Внимание Компания MPM agd S A...

Page 21: ...s Gerät bei einer autorisierten Fachwerkstatt zu reparieren Benutzen Sie das Gerät nicht wenn Sie technische Beschädigungen vermuten AnwendungvomGeräteherstellernichtempfohlenenZubehörskannGeräteschäden Körperverletzungen oder Brand verursachen Beim Staubsaugen auf der Treppe ist besondere Vorsicht geboten Tauchen Sie weder das Gerät das Kabel noch den Stecker in Wasser oder anderen Flüssigkeiten ...

Page 22: ...alle mit der Bedienung zusammenhängenden Gefahren für diese Personen verständlich sind Das Gerät darf von Kindern ohne Aufsicht weder gereinigt noch gewartet werden Das Gerät und das Versorgungskabel fern von Kindern unterhalb von 8 Jahren aufbewahren Kinder dürfen mit dem Gerät nicht spielen Nicht im Freien verwenden Aus Sicherheitsgründen sind lose Verpackungsteile Kunststoffbeutel Kartons Styro...

Page 23: ...t dem Rohr zu entladen die Luftfeuchtigkeit im Raum zu erhöhen allgemein gängige antistatische Mittel anzuwenden GERÄTEMONTAGE 1 Zwei Schnappverschlüsse am Befestigungsring des Saugschlauchs 20 drücken Ring in die Öffnung 8 schieben und die Schnappverschlüsse freigeben Zum Abbauen dieser Elemente Schnappverschlüsse drücken und den Ring 20 aus der Öffnung 8 herausnehmen 2 Saugrohr 18 am Griff 21 an...

Page 24: ... leichteren Aufbewahrung des Staubsaugers in vertikaler Lage und befindet sich an der Unterseite des Gerätes BESCHREIBUNG DES ZUBEHÖRS FUSSBODEN UND TEPPICHDÜSE Dient zum Saubermachen großer glatter Flächen Für erleichtertes Fortbewegen an schwer zugänglichen Stellen wurde sie mit Rollen und einem flexiblen Gelenk zur Verbindung mit dem Saugschlauch ausgestattet wodurch sie unter unterschiedlichen...

Page 25: ...auen 1 Durch Andrücken der Arretierungstasten 15 Ablassfilter 12 13 14 vom Staubsauger abbau en Einsätze herausnehmen 2 Motorfilter 17 abbauen NachdemderStaubsaugerdeckel 6 angehobenundderStaubsack 16 abgebaut wird kann der Filter frei erreicht werden Am Griff ziehen Gitter anheben und Filtereinsatz 17 herausnehmen 3 Aufgesammelten Staub vom HEPA Filtereinsatz 13 entfernen Beachten dass der HEPA F...

Page 26: ...el ist voll Staubbeutel austauschen oder Textilbeuten entleeren Saugschlauch oder Teleskoprohr ist verstopft Alle Gegenstände aus dem Saugschlauch oder dem Teleskoprohr entfernen TECHNISCHE DATEN Technische Parameter des Geräts sind vom Typenschild zu entnehmen Länge des Netzkabels 7 m Reichweite des Staubsaugers 10 m ACHTUNG Firma MPM agd S A behält sich das Recht auf technische Änderungen vor OR...

Page 27: ......

Page 28: ... other appliances Желаем получить удовольствие от использования нашего продукта и приглашаем воспользоваться широким коммерческим предложением компании Wir wünschen Ihnen Zufriedenheit bei der Benutzung unseres Produkts und wir ermutigen Sie das breitgefächerte Handelsangebot der Firma zu nutzen MPM agd S A ul Brzozowa 3 05 822 Milanówek Polska tel 22 3805234 fax 22 3805272 BDO 000027599 www mpm p...

Reviews: