background image

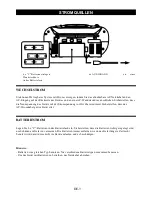
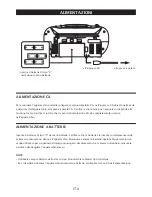
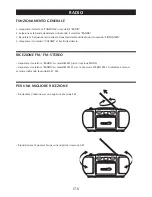
Per accendere lʼapparecchio portatile collegare la spina amovibile CA, nellʼingresso CA ubicato nella parte 
posteriore dellʼapparecchio, alla presa a parete CA. Verificare che la tensione nominale corrisponda alla 
tensione locale. Verificare inoltre che il cavo di alimentazione CA sia completamente inserito 
nellʼapparecchio.

Inserire 6 batterie di tipo “C” nel vano batterie. Verificare che le batterie sia inserite correttamente onde 
evitare di provocare un danno allʼapparecchio. Rimuovere sempre le batterie qualora lʼapparecchio non 
venga utilizzato per un periodo di tempo prolungato, dal momento che le stesse potrebbero provocare 
perdite e danneggiare lʼapparecchio stesso.

NOTE:

- Utilizzare sempre batterie dello stesso tipo. Non mischiare diversi tipi di batterie.
- Se si desidera utilizzare lʼapparecchio alimentato a batterie, scollegare il cavo CA dallʼalimentazione.

allʼingresso CA

alla presa a parete

ALIMENTAZIONE A BATTERIE

ALIMENTAZIONE CA

Inserire 6 batterie di tipo “C” 

nellʼapposito vano batterie.

ALIMENTAZIONI

IT-3

Summary of Contents for CSD 18

Page 1: ...CSD 18 INSTRUCTION MANUAL...

Page 2: ...that a specific component shall be replaced only by the component specified in that documentation for safety reason The following label has been affixed to the unit listing the proper procedure for w...

Page 3: ...nding means of an appliance is not defeated 10 POWER CORD PROTECTION Power supply cords should be routed so that they are not likely to be walked on or pinched by items placed upon or against them 11...

Page 4: ...f the same type Never use different types of batteries together To use the appliance with batteries disconnect the AC power cord from it POWER SOURCES E 3 AC POWER You can power your portable system b...

Page 5: ...SE SKIP SKIP STOP MODE ALBUM BAND SELECTOR FUNCTION SELECTOR VOLUME CONTROL CD DOOR FM ANTENNA TUNING CONTROL OPEN CLOSE CASSETTE DOOR TAPE BUTTONS PAUSE STOP EJECT FAST FORWARD REWIND PLAY RECORD LCD...

Page 6: ...control 4 Adjust the VOLUME control to the desired level FM FM STEREO RECEPTION Set the BAND selector to FM mode for MONO reception Set the BAND selector to FM ST mode for FM STEREO reception The Ste...

Page 7: ...nd insert your tape 3 Close the cassette door 4 Press the PLAY button to start playing tape 5 Adjust the VOLUME control to the desired level 6 Press the PAUSE button when you want to stop playing tape...

Page 8: ...track SKIP Press and hold while playing until you find the point of the sound STOP Press to stop all CD MP3 operation PLAYBACK 1 Set the FUNCTION selector to CD MP3 mode 2 Open the CD door and place a...

Page 9: ...CD MP3 OPERATION E 8 PROGRAM Up to 20 tracks can be programmed for disc play in any order Be sure to press the STOP button before use 1 Press the MODE button the display will show P01 and flashing 2...

Page 10: ...CSD 18 MODE D EMPLOI...

Page 11: ...RAT LUOKEN 1 LAISERLAITE KLASSE 1 LASER PRODUKT L tiquette est plac e l int rieur de l appareil comme illustr ici Avertissement concernant les mesures suppl mentaires sur l appareil L appareil contien...

Page 12: ...ON DU CORDON D ALIMENTATION Les cordons d alimentation doivent tre agenc s de mani re ne pas tre pi tin s ou coinc s par des objets plac s sur ou contre ceux ci 11 LIGNE D NERGIE LECTRIQUE Si vous uti...

Page 13: ...cteur local Assurez vous que le cordon d alimentation est correctement connect l appareil Ins rez 6 piles de type C dans le compartiment pr vu cet effet Assurez vous que les piles sont plac es correct...

Page 14: ...UTON STOP BOUTON MODE BOUTON ALBUM S LECTEUR DE BANDE S LECTEUR DE FONCTION R GLAGE DU VOLUME CLAPET DU LECTEUR CD ANTENNE FM BOUTON TUNING OUVRIR FERMER TIROIR CASETTE TOUCHES DU RADIOCASSETTE PAUSE...

Page 15: ...4 R glez le volume l aide de la molette VOLUME R CEPTION FM FM STEREO Placez le s lecteur de bande en mode FM pour une r ception MONO Placez le s lecteur de bande en mode FM ST pour une r ception FM...

Page 16: ...ins rez la cassette 3 Fermez le compartiment cassette 4 Appuyez sur la touche PLAY pour commencer la lecture 5 R glez le volume l aide de la molette VOLUME 6 Appuyez sur la touche PAUSE lorsque vous...

Page 17: ...e touche pour arr ter la lecture du disque CD MP3 PLAYBACK 3 Fermez le clapet du lecteur CD 5 Appuyez sur la touche PLAY PAUSE pour lire le disque CD MP3 Vous pouvez s lectionner le dossier de votre c...

Page 18: ...ANDOM FONCTIONNEMENT DU CD MP3 FR 8 www mpmaneurope com PROGRAMME Vous pouvez programmer la lecture de 20 plages d un disque dans l ordre que vous souhaitez Appuyez avant tout sur la touche STOP 1 App...

Page 19: ...CSD 18 BEDIENUNGSANLEITUNG...

Page 20: ...nutzer auf gef hrliche nicht isolierte Spannung im Ger tegeh use hin die hoch genug sein kann um einen Stromschlag bei Personen zu verursachen AUSRUFEZEICHEN in einem gleichschenkligen Dreieck Weist d...

Page 21: ...ine Au enantenne muss entfernt von Elektrizit tsleitungen platziert werden 12 EINDRINGEN VON GEGENST NDEN UND FL SSIGKEIT Es ist darauf zu achten dass keine Gegenst nde durch die Geh use ffnungen in d...

Page 22: ...nnspannung des Ger ts mit der Stromspannung vor Ort bereinstimmt Sicherstellen dass das AC Stromkabel gut im Ger t sitzt Legen Sie 6 x C Batterien in das Batteriefach ein Sicherstellen dass die Batter...

Page 23: ...GEN SPRINGEN STOPP MODUS ALBUM BANDW HLER FUNKTIONS W HLER LAUTST RKE REGLER CD LADE FM ANTENNE TUNING REGLER AUF ZU KASSETTENLADE BANDTASTEN PAUSE STOPP AUSWERFEN SCHNELLER VORLAUF R CKLAUF WIEDERGAB...

Page 24: ...gler f r LAUTST RKE auf die gew nschte Stufe einstellen FM FM STEREOEMPFANG Am Wahlelement BAND den FM Modus f r Monoempfang einstellen Am Wahlelement BAND den FM ST Modus f r Stereoempfang einstellen...

Page 25: ...ffnen und das Band einzulegen 3 Die Kassettenlade schlie en 4 Die Taste WIEDERGABE dr cken um die Bandwiedergabe zu starten 5 Den Regler f r LAUTST RKE auf die gew nschte Stufe einstellen 6 Die Taste...

Page 26: ...FUNKTION den Modus CD MP3 einstellen 2 Die CD Lade ffnen und eine CD oder MP3 Disc mit dem Etikett nach oben in das CD Fach einlegen 3 Die CD Lade schlie en 4 Nach dem Einlegen der Disc erfolgt die F...

Page 27: ...Wiedergabe in beliebiger Reihenfolge programmiert werden Vor Verwendung dieser Funktion die Taste STOPP dr cken 1 Die Taste MODE dr cken Das Display zeigt P01 an und blinkt 2 Den gew nschten Song mith...

Page 28: ...CSD 18 MANUALE D USO...

Page 29: ...are estrema attenzione a causa della presenza di tensione non isolata interna all involucro dell apparecchio di potenza sufficiente per costituire rischio di scossa elettrica per le persone PUNTO ESCL...

Page 30: ...CONNESSIONE A MASSA importante prendere le precauzioni necessarie ad assicurare che il collegamento a massa dell apparecchio non sia difettoso 10 PROTEZIONE CAVO ALIMENTAZIONE I cavi dell alimentazio...

Page 31: ...correttamente onde evitare di provocare un danno all apparecchio Rimuovere sempre le batterie qualora l apparecchio non venga utilizzato per un periodo di tempo prolungato dal momento che le stesse p...

Page 32: ...NTENNA FM APRI CHIUDI INDICATORE FREQUENZA SPORTELLINO CASSETTA TASTI CASSETTA PAUSA STOP ESPULSIONE AVANTI VELOCE RIAVVOLGI RIPRODUCI REGISTRA DISPLAY LCD RIPRODUCI PAUSA INDICATORE STEREO FM ALBUM M...

Page 33: ...e BANDA su modalit FM ST per la ricezione STEREO FM L indicatore Stereo si accende indicando la modalit ST FM 1 Impostare il selettore FUNZIONE in modalit RADIO 2 Selezionare la banda desiderata utili...

Page 34: ...rtellino cassetta e inserire il nastro 3 Chiudere lo sportellino 4 Premere il tasto RIPRODUCI per iniziare la riproduzione 5 Impostare il comando VOLUME al livello desiderato 6 Premere PAUSA per arres...

Page 35: ...3 2 Aprire lo sportellino CD e posizionare il disco CD MP3 con l etichetta rivolta verso l alto 3 Chiudere lo sportellino CD 4 All inserimento del disco la ricerca della funzione viene eseguita Per CD...

Page 36: ...cui composta l apparecchiatura Lo smaltimento abusivo del prodotto da parte dell utente comporta l applicazione delle sanzioni amministrative di cui al D Lgs n 22 1997 articolo 50 e seguenti del D Lgs...

Reviews: