background image

TRANSFERRING FILES


Connect the DAP by using the supplied USB cable to the computer.  If the unit is not On, then 
press the   button to turn the player ON.  The following will be displayed on the display of 
your DAP: 


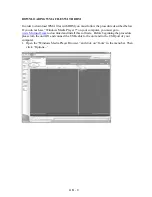
A “Removable Disk” will be added in My Computer.  Open the “Removable Disk” folder: 


Locate the files you wish to copy from your computer to your player.  Drag and drop MP3, 
WMA or WAV files on your computer into the “Removable Disk” folder.  These files will 
now be copied into your DAP. 
 
Note:  When you are finished transferring files, use the Safely Remove Hardware procedure 
before disconnecting your player. (Please see the next section for detailed instructions.)


8


GB  - 

Summary of Contents for MP-HD2

Page 1: ...MP HD2 User s Guide Before operating this product please read these instructions completely www mpmaneurope com...

Page 2: ...this manual carefully before using this product for the first time KEY FEATURES Multi format player supports MP3 WMA WMA w DRM and WAV files Windows Plug Play support for Windows ME 2000 and XP and Ma...

Page 3: ...to the previous Menu Push upward to increase the volume Push and hold upward to increase the volume rapidly Push downward to decrease the volume Push and hold downward to decrease the volume rapidly S...

Page 4: ...to select the previous file Push and hold on to the left to fast rewind within the files Push downward to stop playback II Push upward to start playback During playback push upward to pause playback...

Page 5: ...tailed instructions in this section to activate the USB mass storage function so you will be able to transfer files from your computer to your player Installation Procedures for the Player Software Fo...

Page 6: ...2 Follow the on screen instruction to install the software Click Yes to accept the License Agreement 5 GB...

Page 7: ...Please install the software under the directory as prompted Warning DO NOT change the installation path Otherwise the Player driver may not run properly Click Next as prompted 6 GB...

Page 8: ...er successfully installing the driver software please click Finish to complete the installation 4 When the installation is completed the new program will be added to your Program menu in the computer...

Page 9: ...be added in My Computer Open the Removable Disk folder Locate the files you wish to copy from your computer to your player Drag and drop MP3 WMA or WAV files on your computer into the Removable Disk f...

Page 10: ...ndows Media Player 9 on your computer you must go to www Microsoft com to download and install this software Before beginning the procedure please turn the unit ON and connect the USB cable to the uni...

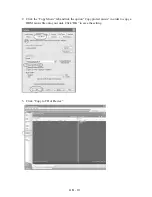
Page 11: ...2 Click the Copy Music tab and tick the option Copy protect music in order to copy a DRM music file onto your unit Click OK to save the setting 3 Click Copy to CD or Device 10 GB...

Page 12: ...e box next to the files 5 Select the Portable Device you want to copy to from the Items on Device drop down menu Click Copy to start transferring the DRM files onto your unit 6 After you have download...

Page 13: ...e Stop a Hardware Device window will pop up as shown 3 Click OK A Safe to Remove Hardware window will pop up Now it is safe to remove the USB Cable and the DAP from the computer Remarks If the Safely...

Page 14: ...ss the MODE button to access the MAIN MENU The following menu will be displayed on the display Push or until your desired selection is highlighted and press the MODE button to confirm the selection Pr...

Page 15: ...e E T C Press the EQ bu background Keep pressing the EQ button repeatedly to select one of the six equalizer modes Stop pressing the EQ button when your desired selection is di splayed with a blue bac...

Page 16: ...r the Voice Recorder mode Recording a Voice Message s soon as the Record mode is entered Recording will begin a Press the II button to pause recording Press the button to stop recording The recorded f...

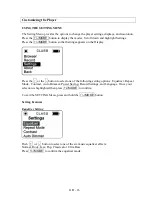
Page 17: ...splay Press the or the button to select one of the following setting options Equalizer Repeat Mode Contrast Auto Dimmer Power Saving Record Settings and Language Once your selection is highlighted the...

Page 18: ...o confirm the selection Contrast Setting Press the or the button to adjust the contrast level Press MODE to confirm the contrast level Auto Dimmer Setting Press the or the button to choose between Aut...

Page 19: ...ection The DAP will turn off after the selected amount of time if playback is suspended in order to save power Record Settings Push or to scroll down to the Rate Then press MODE to change the voice re...

Page 20: ...essive dust or sand moisture or rain On Headphones and Earphones Road Safety o Do not use the headphones earphones while driving cycling or operating any motorized vehicle It may create a traffic haza...

Page 21: ...operating the unit This unit should be positioned so that it is properly ventilated Avoid placing it for example close to curtains on the carpet or in a built in installation such as a bookcase Do not...

Page 22: ...tery Recharge the battery is exhausted Check whether the earphones Clean the earphones jack jack is contaminated or oxidized Corrupted MP3 or WMA file Download the files again Failed to Download The b...

Page 23: ...ag Info ID3 Tag Dimension 80 4 x 55 0 x 22 0 mm Weight Approx 68 g without battery Battery Li polymer Battery Display OLED USB USB 2 0 Built in Memory 1 5 GB Max Playtime Approx 10 hours 128kps MP3 Su...

Page 24: ...me temperatures or moisture Do not use chemical agents or liquids to clean the unit as they may damage the plastic Please Retain this Information for Future Reference The manufacturer reserves the rig...

Reviews: