background image

DCA20SPXU2D 60 HZ GENERATOR • OPERATION AND PARTS MANUAL — REV. #1 (03/25/11) — PAGE 29

BATTERY 

This unit is of negative ground 

DO NOT

 connect in reverse. 

Always maintain battery fl uid level between the specifi ed 
marks. Battery life will be shortened, if the fl uid level are 
not properly maintained. Add only distilled water when 
replenishment is necessary. 

DO NOT

 over fill. Check to see whether the battery 

cables are loose. Poor contact may result in poor starting 
or malfunctions. 

Always

 keep the terminals firmly 

tightened. Coating the terminals with an approved battery 
terminal treatment compound. Replace battery with only 
recommended type battery. 

The battery is suffi ciently charged if the specifi c gravity 
of the battery fl uid is 1.28 (at 68° F). If the specifi c gravity 
should fall to 1.245 or lower, it indicates that the battery is 
dead and needs to be recharged or replaced.

Before charging the battery with an external electric source, 
be sure to disconnect the battery cables.

Battery Cable Installation

ALWAYS

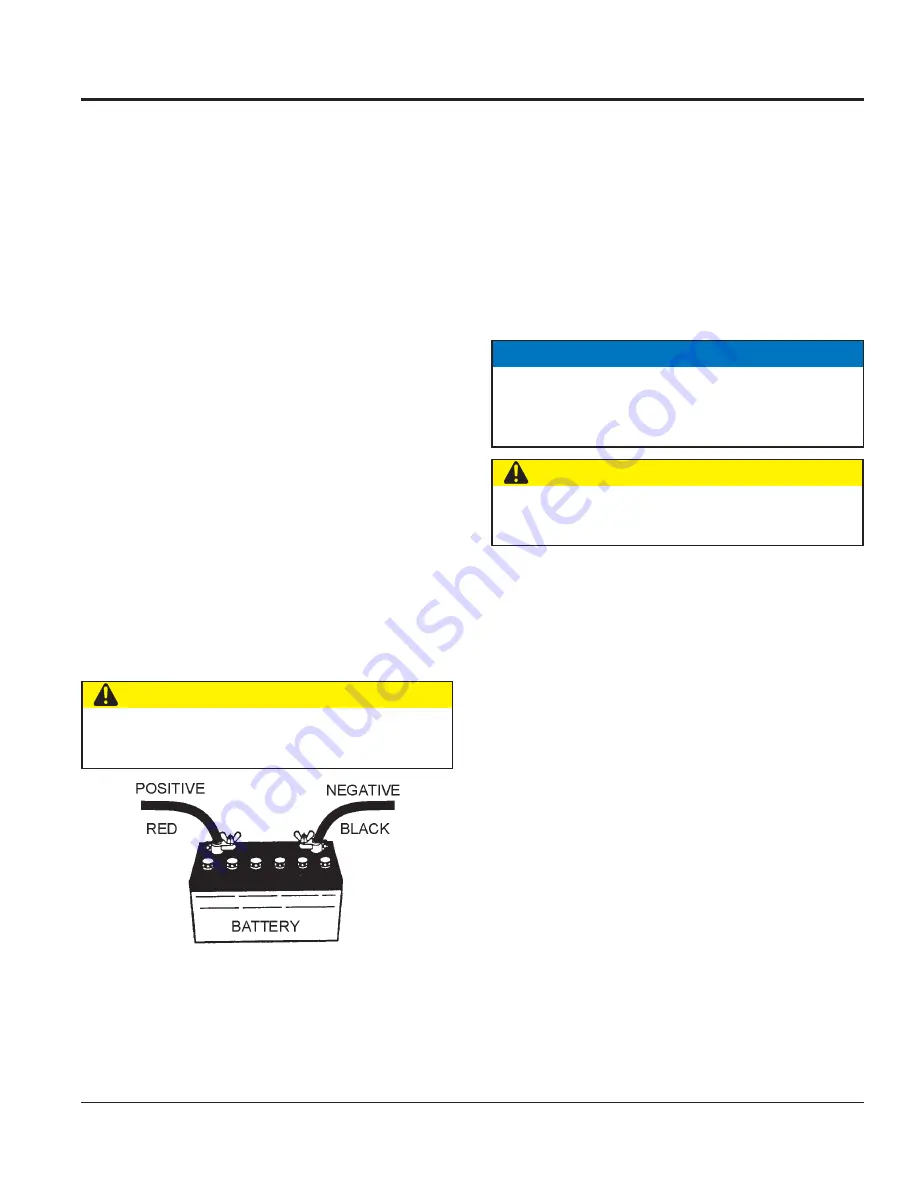
 be sure the battery cables (Figure 24) are 

properly connected to the battery terminals as shown below. 
The 

red cable

 is connected to the positive terminal of the 

battery, and the 

black cable

 is connected to the negative 

terminal of the battery.

Figure 24.  Battery Connections

  CAUTION

ALWAYS

 disconnect the negative terminal 

FIRST

 and 

reconnect negative terminal 

LAST

.

When connecting battery do the following:

1. 

NEVER

 connect the battery cables to the battery 

terminals when the 

Control Power Switch

 is in either 

the 

ON

 position. 

ALWAYS

 make sure that the 

Control  

Power Switch

 is in the 

OFF

 position when connecting 

the battery.

2.  Place a small amount of battery terminal treatment 

compound around both battery terminals. This will 
ensure a good connection and will help prevent 
corrosion around the battery terminals.

ALTERNATOR 

The polarity of the alternator is negative grounding type. 
When an inverted circuit connection takes place, the 
circuit will be in short circuit instantaneously resulting the 
alternator failure.

DO NOT

 put water directly on the alternator. Entry of water 

into the alternator can cause corrosion and damage the 
alternator.

WIRING

Inspect the entire generator for bad or worn electrical wiring 
or connections. If any wiring or connections are exposed 
(insulation missing) replace wiring immediately.

PIPING AND HOSE CONNECTION

Inspect all piping, oil hose, and fuel hose connections for 
wear and tightness. Tighten all hose clamps and check 
hoses for leaks.

If any hose (

fuel or oil

) lines are defective replace them 

immediately. 

NOTICE

If the battery cable is connected incorrectly, electrical 
damage to the generator will occur. Pay close attention to 
the polarity of the battery when connecting the battery.

  CAUTION

Inadequate battery connections may cause poor 
starting of the generator, and create other malfunctions.

INSPECTION/SETUP

Summary of Contents for DCA20SPXU2

Page 1: ...o find the latest revision of this publication visit our website at www mqpower com Revision 1 03 25 11 OPERATION AND PARTS MANUAL WHISPERWATT SERIES MODEL DCA20SPXU2 DIGITAL CONTROLLER 60HZ GENERATOR...

Page 2: ...PAGE 2 DCA20SPXU2D 60 HZ GENERATOR OPERATION AND PARTS MANUAL REV 1 03 25 11 PROPOSITION 65 WARNING Diesel engine exhaust and some of...

Page 3: ...ay open an investigation and if it finds that a safety defect exists in a group of vehicles it may order a recall and remedy campaign However NHTSA cannot become involved in individual problems betwee...

Page 4: ...tput Terminal Panel Connections 25 Inspection Setup 26 29 Generator Start Up Procedure Manual 30 Generator Start Up Procedure Auto 31 Generator Shut Down Procedures 32 Maintenance 33 36 Trailer Mainte...

Page 5: ...site View Parts Diagrams Order Parts Print Speci cation Information Note Discounts Are Subject To Change Goto www multiquip com and click on Order Parts to log in and save Use the internet and qualify...

Page 6: ...safety messages specifically address the level of exposure to the operator and are preceded by one of four words DANGER WARNING CAUTION or NOTICE SAFETY SYMBOLS DANGER Indicates a hazardous situation...

Page 7: ...not recommended by MQ Power for this equipment Damage to the equipment and or injury to user may result ALWAYS know the location of the nearest fire extinguisher ALWAYS know the location of the neares...

Page 8: ...tion NEVER tamper with the factory settings of the engine or engine governor Damage to the engine or equipment can result if operating in speed ranges above the maximum allowable Wet stacking is a com...

Page 9: ...operating condition ALWAYS shutdown engine before transporting Make sure the hitch and coupling of the towing vehicle are rated equal to or greater than the trailer gross vehicle weight rating ALWAYS...

Page 10: ...pplicable laws and electrical codes Failure to do so could result in electrical shock or burn causing serious injury or even death Power Cord Cable Safety DANGER NEVER let power cords or cables lay in...

Page 11: ...tery in a well ventilated environmenttoavoidtheriskofadangerousconcentration of combustible gasses If the battery liquid dilute sulfuric acid comes into contact with clothing or skin rinse skin or clo...

Page 12: ...7 meters 63 Weight No Fuel 1 412 lbs 640 kg Weight Fuel 1 563 lbs 709 kg Table 2 Engine Specifications Model ISUZU BV 4LE2 Interim Tier 4 Type 4 cycle water cooled direct injection No of Cylinders 4...

Page 13: ...AGE 13 DIMENSIONS Figure 1 Dimensions Table 3 Dimensions Reference Letter Dimension in mm Reference Letter Dimension in mm A 21 06 in 535 mm F 72 83 in 1 850 mm B 21 06 in 535 mm G 39 37 in 1 000 mm C...

Page 14: ...PAGE 14 DCA20SPXU2D 60 HZ GENERATOR OPERATION AND PARTS MANUAL REV 1 03 25 11 INSTALLATION Figure 2 Typical Generator Grounding Application...

Page 15: ...isolate vibration of the generator when it is running The generator must set at least 6 inches above the floor or grade level in accordance to NFPA 110 Chapter 5 4 1 DO NOT remove the metal skids on t...

Page 16: ...current for the exciter section When a heavy load such as a motor starting or a short circuit occurs the automatic voltage regulator AVR switches the configuration of the open delta to the series conn...

Page 17: ...or Components Table 4 Generator Major Components ITEM NO DESCRIPTION 1 Output Terminal Assembly 2 Auxiliary Receptacles Assembly 3 Muffler Assembly 4 Air Filter Assembly 5 Battery Assembly 6 Generator...

Page 18: ...Control Allows 15 manual adjustment of the generator s output voltage 2 Panel Light Normally used in dark areas or at night time When activated panel lights will illuminate When the generator is not...

Page 19: ...his pushbutton to place the Digital Controller in the off mode The red off mode LED will light when the Digital Controller is in the off mode 9 Run Pushbutton and Mode Indicator Press this pushbutton...

Page 20: ...read a little higher but after the engine warms up the oil pressure should return to the correct pressure range 6 FUEL Indicates the percent of fuel remaining in the fuel tank 7 TEMP Duringnormalopera...

Page 21: ...al Panel Figure 7 is provided with the following Two 120 240V output receptacles 50 amp Two Circuit Breakers 50 amps Two 120V GFCI receptacles 20 amp Two GFCI Circuit Breakers 20 amps Four Output Term...

Page 22: ...ary twist lock CS 6369 receptacles Figure 9 provided on the output terminal panel Figure 9 120 240V Twist Lock Auxiliary Receptacles Each auxiliary receptacle is protected by a 50 amp circuit breaker...

Page 23: ...ALL circuit breakers to the OFF position prior to starting the engine Figure 12 Connecting Loads Over Current Relay An over current relay Figure 13 is connected to the main circuit breaker In the eve...

Page 24: ...age Table 5 Power Factor By Load Type of Load Power Factor Single phase induction motors 0 4 0 75 Electric heaters incandescent lamps 1 0 Fluorescent lamps mercury lamps 0 4 0 9 Electronic devices com...

Page 25: ...voltage regulator knob Figure 15 clockwise to increase voltage output turn counterclockwise to decrease voltage output Use voltage regulator adjustment knob whenever fine tuning of the output voltage...

Page 26: ...th the specified amount of oil as outlined in the ISUZU Engine Owner s Manual Oil should be warm before draining Other types of motor oils may be substituted if they meet the following requirements AP...

Page 27: ...WAYS place trailer on firm level ground before refueling to prevent spilling and maximize the amount of fuel that can be pumped into the tank NOTICE ONLY use 2 diesel fuel when refueling 2 Open cabine...

Page 28: ...ns Table 9 Coolant Capacity Engine and Radiator 1 74 gal 6 58 liters Reserve Tank 0 26 gal 1 liter Table 10 Anti Freeze OperatingTemperatures Vol Anti Freeze Freezing Point Boiling Point C F C F 50 37...

Page 29: ...FIRST and reconnect negative terminal LAST When connecting battery do the following 1 NEVER connect the battery cables to the battery terminals when the Control Power Switch is in either the ON positi...

Page 30: ...ting Direct exhaust away from nearby personnel WARNING NEVER manually start the engine with the main GFCI or auxiliary circuit breakers in the ON closed position INCORRECT CORRECT STARTING MANUAL 1 Pl...

Page 31: ...e 30 on the controller places the Digital Controller in the auto mode This mode allows the controller to monitor the remote start contacts Closure of the remote start contacts will begin engine cranki...

Page 32: ...y running it at low speed for 3 5 minutes with no load applied 3 Press the OFF button Figure 32 on the Digital Controller to shutdown the engine Figure 32 OFF Button 4 Place the control power switch o...

Page 33: ...Check all Hoses and Clamps 4 X Clean Inside of Fuel Tank X Generator Measure Insulation Resistance Over 3M ohms X Check Rotor Rear Support Bearing X MAINTENANCE GENERAL INSPECTION Prior to each use th...

Page 34: ...posits or debris that have accumulated inside the fuel tank Figure 35 Fuel Tank Cleaning FUELTANK INSPECTION In addition to cleaning the fuel tank the following components should be inspected for wear...

Page 35: ...nufacturer Close radiator cap tightly Flush the radiator by running clean tap water through radiator until signs of rust and dirt are removed DO NOT clean radiator core with any objects such as a scre...

Page 36: ...hen using the generator inhot climates there is no reason to apply power to jacket water heater However if the generator will be used in cold climates it is always a good idea to apply power to the ja...

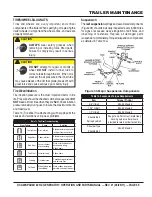
Page 37: ...ort device with maximum pound requirement from the tongue of the trailer 7 Coupler Type of hitch used on the trailer for towing 8 Tire Size Indicates the diameter of the tire in inches 10 12 14 etc an...

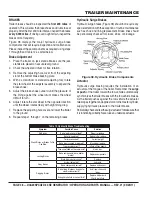
Page 38: ...surge brakes Figure 38 should not require any special attention with the exception of routine maintenance such as shoe and lining replacement Brake lines should be periodically checked for cracks kink...

Page 39: ...th great force and cause serious eye or bodily injury Table 13 Tire WearTroubleshooting Wear Pattern Cause Solution Center Wear Over inflation Adjust pressure to particular load per tire manufacturer...

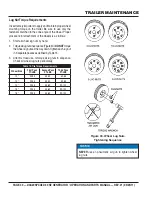
Page 40: ...uts by hand 2 Torquealllugnutsinsequence Figure40 DONOTtorque the wheel lug nuts all the way down Tighten each lug nut in 3 separate passes as defined byTable 15 3 After first road use retorque all lu...

Page 41: ...DCA20SPXU2D 60 HZ GENERATOR OPERATION AND PARTS MANUAL REV 1 03 25 11 PAGE 41 TRAILER WIRING DIAGRAM Figure 41 Trailer Towing Vehicle Wiring Diagram...

Page 42: ...PAGE 42 DCA20SPXU2D 60 HZ GENERATOR OPERATION AND PARTS MANUAL REV 1 03 25 11 GENERATOR WIRING DIAGRAM Figure 42 Generator Wiring Diagram...

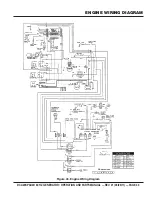
Page 43: ...DCA20SPXU2D 60 HZ GENERATOR OPERATION AND PARTS MANUAL REV 1 03 25 11 PAGE 43 ENGINE WIRING DIAGRAM Figure 43 Engine Wiring Diagram...

Page 44: ...Rectifier Check and replace Defective Exciter Field Check for approximately 17 3 ohms across J K on CN1 Is wiring connections loose Check wiring and repair Defective AVR Replace if necessary High Vol...

Page 45: ...al Controller Place all circuit breakers in the OFF position and allow sufficient time for adequate cooling Table 17 Protective Devices PARAMETER MAIN BREAKER STOP ENGINE DIGITAL CONTROLLER DISPLAY SE...

Page 46: ...es not guarantee the availability of the parts listed NOTICE When ordering a part that has more than one item number listed check the remarks column for help in determining the proper part to order QT...

Page 47: ...80374810 FILTER FUEL CARTRIDGE 6 8944370220 FILTER FUEL FUEL PUMP 6 8943142633 FILTER OIL CARTRIDGE 3 0602046321 FILTER AIR ELEMENT 1 0601870440 CIRCUIT BREAKER 1P 120V 20A 1 0601870441 CIRCUIT BREAKE...

Page 48: ...PAGE 48 DCA20SPXU2D 60 HZ GENERATOR OPERATION AND PARTS MANUAL REV 1 03 25 11 GENERATOR ASSY...

Page 49: ...906308 BEARING 1 2 0012308035 HEX HEAD BOLT 6 2A 0040080000 WASHER LOCK 6 2B 0041208000 WASHER FLAT 6 3 0070506803 BEARING 1 4 B1130001503 STATOR ASSY 1 4 1 0845041904 GROMMET 1 5 B113700103 FIELD ASS...

Page 50: ...PAGE 50 DCA20SPXU2D 60 HZ GENERATOR OPERATION AND PARTS MANUAL REV 1 03 25 11 CONTROL BOX ASSY...

Page 51: ...656 17A PTF08A BASE 1 REPLACES P N 0601823109 17B PYCA1 CLIP 1 REPLACES P N 0601824400 18 0027104020 MACHINE SCREW 6 19 8973259120 ENGINE CONTROLLER 1 REPLACES P N 0602202523 20 0016906016 HEX HEAD BO...

Page 52: ...PAGE 52 DCA20SPXU2D 60 HZ GENERATOR OPERATION AND PARTS MANUAL REV 1 03 25 11 ENGINE AND RADIATOR ASSY...

Page 53: ...G 1 10 M9312200104 RUBBER MOUNT 2 11 0016908040 HEX HEAD BOLT 2 12 0207008000 HEX NUT 2 13 B1312500403 RADIATOR HOSE UPPER 1 REPLACES P N M1310500803 14 B1312500503 RADIATOR HOSE LOWER 1 REPLACES P N...

Page 54: ...PAGE 54 DCA20SPXU2D 60 HZ GENERATOR OPERATION AND PARTS MANUAL REV 1 03 25 11 ENGINE AND RADIATOR ASSY CONTINUED...

Page 55: ...20 HEX HEAD BOLT 2 42 0199900600 DRAIN HOSE 1 43 0199900500 DRAIN HOSE 1 44 0605515106 HOSE BAND 4 45 M9300100003 RESERVE TANK 1 46 M9300100003 RESERVE TANK CAP 1 47 0199100215 HOSE 1 48 M1317100004 R...

Page 56: ...1 03 25 11 OUTPUT TERMINAL ASSY ADD THE FOLLOWING DIGITS AFTER THE PART NUMBER WHEN ORDERING ANY PAINTED PANEL TO INDICATE COLOR OF UNIT 1 ORANGE 5 BLACK 2 WHITE 6 CATERPILLAR YELLOW 3 SPECTRUM GREY 7...

Page 57: ...0040006000 WASHER LOCK 2 13B 0041206000 WASHER FLAT 2 13C 0080200005 RETAINING RING 2 14 0016906016 HEX HEAD BOLT 4 15 M1236400004 CABLE OUTLET COVER 1 16 M1236300004 CABLE OUTLET COVER SUPPORTER 1 1...

Page 58: ...PAGE 58 DCA20SPXU2D 60 HZ GENERATOR OPERATION AND PARTS MANUAL REV 1 03 25 11 BATTERY ASSY...

Page 59: ...O PART NO PART NAME QTY REMARKS 1 0602220185 BATTERY 1 2 B9310500014 BATTERY SHEET 1 3 M9103000304 BATTERY BAND 1 4 0602220920 BATTERY BOLT SET 2 5 0040006000 WASHER LOCK 2 6 M1348400204 BATTERY CABLE...

Page 60: ...PAGE 60 DCA20SPXU2D 60 HZ GENERATOR OPERATION AND PARTS MANUAL REV 1 03 25 11 MUFFLER ASSY...

Page 61: ...MUFFLER ASSY NO PART NO PART NAME QTY REMARKS 1 M1330100803 MUFFLER 1 2 0016908020 HEX HEAD BOLT 4 3 M1333002803 EXHAUST PIPE 1 4 0602320100 GASKET 1 5 M1333200014 GASKET 1 6 0207008000 HEX NUT 4 7 0...

Page 62: ...PAGE 62 DCA20SPXU2D 60 HZ GENERATOR OPERATION AND PARTS MANUAL REV 1 03 25 11 FUEL TANK ASSY...

Page 63: ...HEAD BOLT 2 12 M1363400104 DRAIN HOSE 1 13 0605515198 HOSE BAND 2 14 8943672922 FUEL FILTER 1 REPLACES P N 0602042202 14A 8980374810 FUEL FILTER CARTRIDGE 1 REPLACES P N 8943692993 15 M1366700104 FUE...

Page 64: ...PAGE 64 DCA20SPXU2D 60 HZ GENERATOR OPERATION AND PARTS MANUAL REV 1 03 25 11 ENCLOSURE ASSY...

Page 65: ...20 HEX HEAD BOLT 4 13 M1443301803 REAR COVER 1 14 M1443301703 REAR COVER DUCT 1 14A M1493303604 ACOUSTIC SHEET 1 15 0207006000 HEX NUT 7 16 0019208020 HEX HEAD BOLT 7 17 M1443200613 REAR DOOR 1 18 M14...

Page 66: ...PAGE 66 DCA20SPXU2D 60 HZ GENERATOR OPERATION AND PARTS MANUAL REV 1 03 25 11 ENCLOSURE ASSY CONTINUED...

Page 67: ...8 39 B9114000002 DOOR HANDLE ASSY 3 40 0021806016 MACHINE SCREW 12 40A 0030006000 HEX HEAD NUT 12 41 M9110100204 HINGE 4 42 M9110100304 HINGE 4 43 M9116100004 WASHER 8 44 0019208020 HEX HEAD BOLT 9 45...

Page 68: ...PAGE 68 DCA20SPXU2D 60 HZ GENERATOR OPERATION AND PARTS MANUAL REV 1 03 25 11 RUBBER SEALS ASSY...

Page 69: ...BER SEAL 1 6 0229400430 RUBBER SEAL 1 7 0228900540 RUBBER SEAL 1 8 0228900550 RUBBER SEAL 1 9 0229200595 RUBBER SEAL 1 10 0228900610 RUBBER SEAL 1 11 0229200750 RUBBER SEAL 2 12 0229200740 RUBBER SEAL...

Page 70: ...PAGE 70 DCA20SPXU2D 60 HZ GENERATOR OPERATION AND PARTS MANUAL REV 1 03 25 11 NAMEPLATE AND DECALS ASSY...

Page 71: ...1 M90300010 14 M9503100004 DECAL WARNING 1 M90310000 15 M9503200004 DECAL WARNING 1 M90320000 16 M9503200104 DECAL DANGER 1 M90320010 17 M9510000104 DECAL DOCUMENT BOX 1 M91000010 18 M9510100004 DECA...

Page 72: ...er products g Items purchased in kits h The sender will be noti ed of any material 7 received that is not acceptable Such material will be held for five 8 working days from noti cation pending instruc...

Page 73: ...DCA20SPXU2D 60 HZ GENERATOR OPERATION AND PARTS MANUAL REV 1 03 25 11 PAGE 73 NOTES...

Page 74: ...Fax 0161 339 3226 CANADA Multiquip 4110 Industriel Boul Laval Quebec Canada H7L 6V3 Contact jmartin multiquip com Tel 450 625 2244 Tel 877 963 4411 Fax 450 625 8664 COPYRIGHT 2011 MULTIQUIP INC Multi...

Reviews: