DCA-180SSJU — OPERATION AND PARTS MANUAL — REV. #3 (02/01/10) — PAGE 43
1
LOAD APPLICATION
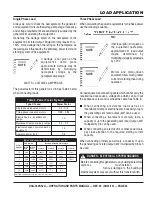
Single Phase Load
Always be sure to check the nameplate on the generator
and equipment to insure the wattage, amperage, frequency,
and voltage requirements are satisfactorily supplied by the
generator for operating the equipment.
Generally, the wattage listed on the nameplate of the
equipment is its rated output. Equipment may require 130—
150% more wattage than the rating on the nameplate, as
the wattage is influenced by the efficiency, power factor and
starting system of the equipment.
Motors and motor-driven
equipment draw much greater
current for starting than during
operation.
When connecting ordinary power tools, a capacity of up to
the generating set’s rated output (kW) multiplied by 0.8 can
be used.
If wattage is not given on the
equipment's name plate,
approximate wattage may be
determined by multiplying
nameplate voltage by the
nameplate amperage.
The power factor of this generator is 0.8. See Table 5 below
when connecting loads.
If 3Ø load (kVA) is not given on
the equipment nameplate,
approximate 3Ø load output
maybe determined by
multiplying voltage by amperage
by 1.732.
■
■
■
■
■
When connecting a resistance load such as an
incandescent lamp or electric heater, a capacity of up to
the generating set’s rated output (kW) can be used.
■
■
■
■
■
When connecting a fluorescent or mercury lamp, a
capacity of up to the generating set’s rated output (kW)
multiplied by 0.6 can be used.
■
■
■
■
■
When connecting an electric drill or other power tools,
pay close attention to the required starting current
capacity.
NOTE
WATTS = VOLTAGE x AMPERAGE
Three Phase Load
When calculating the power requirements for 3-phase power
use the following equation:
NOTE
An inadequate size connecting cable which cannot carry the
required load can cause a voltage drop which can burn out
the appliance or tool and overheat the cable. See Table 6.
NOTE
Before connecting this generator to any building’s electrical
system, a
must install an
. Serious damage to the building’s
electrical system may occur without this transfer switch.
DANGER - ELECTRICAL SYSTEM HAZARDS
)
n
o
i
t
a
r
e
p
O
e
s
a
h
P
e
l
g
n
i
S
,
z
H
0
6
(
n
o
i
t
c
e
l
e
S
e
l
b
a
C
.
6
e
l
b
a
T
n
i
t
n
e
r
r
u
C
s
e
r
e
p
m
A
s
t
t
a
W
n
I
d
a
o
L
h
t
g
n
e
L
e
l
b
a
C
e
l
b
a
w
o
ll
A
m
u
m
i
x
a
M
0
0
1
t
A
s
t
l
o
V
0
0
2
t
A
s
t
l
o
V
e
r
i
W
0
1
#
e
r
i
W
2
1
#
e
r
i
W
4
1
#
e
r
i
W
6
1
#
5
.
2
0
0
3
0
0
6
.t
f
0
0
0
1
.t
f
0
0
6
.t
f
5
7
3
.t
f
0
5
2
5
0
0
6
0
0
2
1
.t
f
0
0
5
.t
f
0
0
3
.t
f
0
0
2
.t
f
5
2
1
5
.
7
0
0
9
0
0
8
1
.t
f
0
5
3
.t
f
0
0
2
.t
f
5
2
1
.t
f
0
0
1
0
1
0
0
2
1
0
0
4
2
.t
f
0
5
2
.t
f
0
5
1
.t
f
0
0
1
5
1
0
0
8
1
0
0
6
3
.t
f
0
5
1
.t
f
0
0
1
.t
f
5
6
0
2
0
0
4
2
0
0
8
4
.t
f
5
2
1
.t
f
5
7
.t
f
0
5
.
e
g
a
tl
o
v
w
o
l
m
o
r
f
tl
u
s
e
r
n
a
c
e
g
a
m
a
d
t
n
e
m
p
i
u
q
E
:
N
O
I
T
U
A
C
d
a
o
L
y
B
r
o
t
c
a
F
r
e
w
o
P
.
5
e
l
b
a
T
d
a
o
L
f
O
e
p
y
T
r
o
t
c
a
F
r
e
w
o
P
s
r
o
t
o
m
n
o
it
c
u
d
n
i
e
s
a
h
p
-
e
l
g
n
i
S
5
7
.
0
-
4
.
0
s
r
o
t
o
m
n
o
it
c
u
d
n
i
e
s
a
h
p
-
e
e
r
h
T
5
6
.
0
.
0
-
8
5
t
n
e
c
s
e
d
n
a
c
n
i
,
s
r
e
t
a
e
h
c
i
r
t
c
e
l
E
s
p
m
a
l
0
.
1
s
p
m
a
l
y
r
u
c
r
e
m
,
s
p
m
a
l
t
n
e
c
s
e
r
o
u
l
F
9
.
0
-
4
.
0
n
o
it
a
c
i
n
u
m
m
o
c
,
s
e
c
i
v
e
d
c
i
n
o
r
t
c
e
l
E
t
n
e
m
p
i
u
q
e
0
.
1
s
l
o
o
t
r
e
w
o
p
n
o
m
m
o
C
8
.
0
Summary of Contents for DCA180SSJU WHISPERWATT SERIES
Page 2: ...PAGE 2 DCA 180SSJU OPERATION AND PARTS MANUAL REV 3 02 01 10 PROPOSITION 65 WARNING ...
Page 69: ...DCA 180SSJU OPERATION AND PARTS MANUAL REV 3 02 01 10 PAGE 69 1 NOTES ...
Page 72: ...PAGE 72 DCA 180SSJU OPERATION AND PARTS MANUAL REV 3 02 01 10 GENERATOR ASSY GENERATOR ASSY ...
Page 88: ...PAGE 88 DCA 180SSJU OPERATION AND PARTS MANUAL REV 3 02 01 10 BATTERY ASSY BATTERY ASSY ...
Page 90: ...PAGE 90 DCA 180SSJU OPERATION AND PARTS MANUAL REV 3 02 01 10 MUFFLER ASSY MUFFLER ASSY ...
Page 92: ...PAGE 92 DCA 180SSJU OPERATION AND PARTS MANUAL REV 3 02 01 10 FUEL TANK ASSY FUEL TANK ASSY ...
Page 105: ...DCA 180SSJU OPERATION AND PARTS MANUAL REV 3 02 01 10 PAGE 105 1 NOTES ...


