DCA300SSJU4F2 60 HZ GENERATOR• OPERATION MANUAL — REV. #0 (06/26/18) — PAGE 47
9. Clean the inside of the air cleaner body.
10. Reinstall the primary and secondary air filter elements
back into air cleaner body.
11. Reinstall the air cleaner cover, and secure with latches.
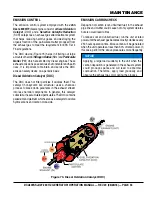
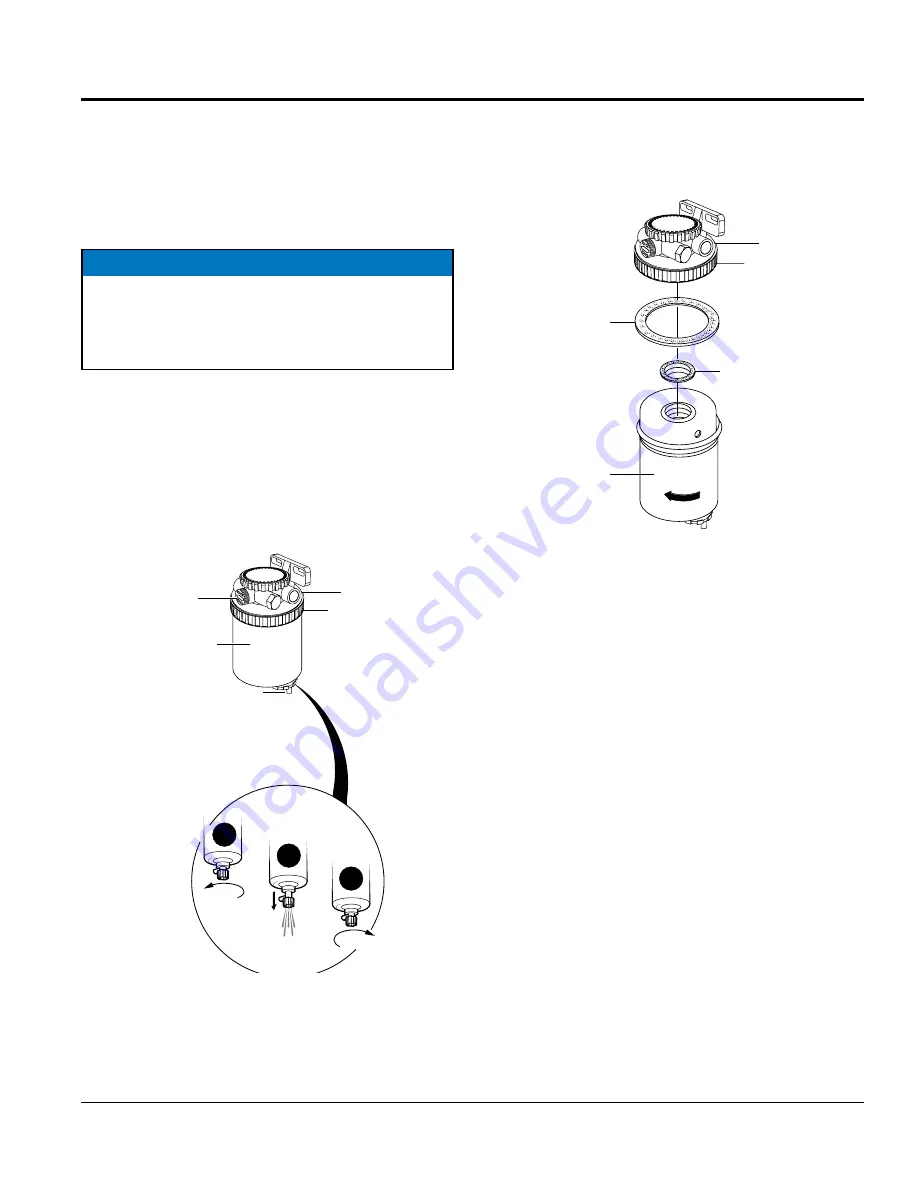
DRAINING FUEL FILTER CARTRIDGE
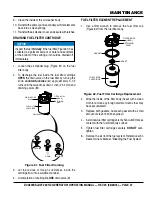
1. Loosen the air bleeder plug (Figure 61) on the fuel
filter body.
2. To discharge the fuel inside the fuel filter cartridge
OPEN
the drain valve on the fuel filter by turning the
knob
counterclockwise
(
A
) approximately 3-1/2
turns until the valve drops down 1-inch (25.4 mm) and
draining occurs (
B
).
Figure 61. Fuel Filter Draining
3. Let the residue or foreign substances inside the
cartridge flow into a suitable container.
4. At completion of draining
CLOSE
drain valve (
C
).
NOTICE
Inspect the fuel filter
daily
. If the fuel filter (Figure 61) has
collected a significant amount of water and sediment
at the bottom of the cartridge, it should be drained off
immediately.
OPEN
DRAIN
CLOSE
A
B
C
FILTER BODY
(HEAD)
AIR BLEEDER
PLUG
DRAIN VALVE
FUEL FILTER
CARTRIDGE
RETAINING
RING
MAINTENANCE
FUEL FILTER ELEMENT REPLACEMENT
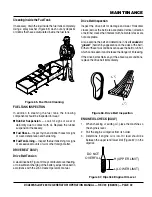
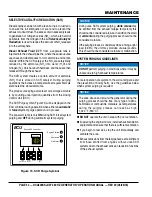
1. Use a filter wrench to remove the fuel filter cup
(Figure 62) from the fuel filter body.
Figure 62. Fuel Filter Cartridge Replacement
2. Wipe the inside of the filter body (head) with a clean
cloth to remove any foreign matter or debris that may
have accumulated.
3. Replace both gaskets. Coat each gasket with a small
amount of clean 15W-40 engine oil.
4. Install new fuel filter cartridge first by hand until it makes
contact with the fuel filter body surface.
5. Tighten fuel filter cartridge securely.
DO NOT
over-
tighten.
6. Remove the air from the fuel system. Reference John
Deere Owner's Manual, "Bleeding the Fuel System.
FILTER BODY
(HEAD)
FUEL FILTER
CARTRIDGE
RETAINING
RING
GASKET
GASKET


