Page 6
Operating Instructions
Read the
ENTIRE
IMPORTANT SAFETY INFORMATION section at the beginning of this manual including
all text under subheadings therein before set up or use of this product.
Bleeding the Pump
IMPORTANT!
Before first use, check for proper hydraulic oil level in the Pump. Then thoroughly test the Ram and Pump for proper
operation prior to its actual use. If the Pump operation feels spongy, or the Ram lowers while the Release Valve is closed, there
may be air in the Pump. Bleed the Pump as follows:
1.
Remove the Oil Fill Screw. The Seal Ring should come off with it.
2.
The fluid level should be near the bottom of the opening. If required, add high grade hydraulic fluid.
3.
Make sure the Seal Ring is still in place around the Oil Fill Screw and thread the Fill Screw into the Pump securely. Do not use
thread seal tape
.
4.
Follow the steps in page 10 (air in the pump).
General Operating Instructions
1.
Use the Hand Winch (21) to adjust the height of the Press Table (26).
Note:
The Press Table should be in the highest position possible with the workpiece as close as possible to the ram.
2.
Place the item to press on the Arbor Plates (27). Turn the Arbor Plates to support the stationary part of the workpiece.
WARNING!
Make sure there is no obstruction (such as a stray bolt or debris) under the Arbor Plates. Such items create an uneven
surface which can cause the Arbor Plates to break under pressure.
WARNING!
When pressing two items together, the items must be lined up vertically. If not, one item may forcefully eject itself sideways
from the unit.
3.
Open the Release Valve, ram will get down quickly. When pressing two items together, make sure that they are in vertical
alignment. Continue to operate the Pump Handle to press the work piece.
4.
After the task is completed, be careful when releasing Pump pressure. For safety, remove the Pump Han die, then slowly tur n the
Release Valve on the Pump, allowing the ram come back.
WARNING!
During the release process the ram may rise quickly. Stay clear
.
Summary of Contents for 8998049
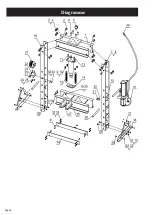
Page 8: ...Page 8 DIAGRAM ...
Page 18: ...Page 8 Diagramme ...


