D
23
GB
ENGLISH
Other safety instructions
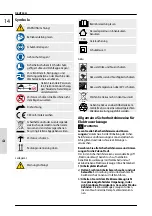
Keep children and other persons including animals in
a safe distance when using the appliance. Minimum
safe distance is 5 m.
Always have your arms and legs in safe distance from
the cutting mechanism, in particular after turning the
engine on.
Wear suitable protective clothing such as sturdy shoes
with non-slip sole, robust long trousers, gloves, safety
glasses and hearing protection!
Do not wear loose clothing or jewels. Hear, clothing
and gloves must be out of reach of moving parts
as they could get caught by the rotating parts. Do
not use the appliance when barefooted or in open
sandals.
Provide adequate lighting or good lighting conditions
when working with the machine.
Be careful to avoid injury by the cutting tools.
Turn the appliance on only when in a normal working
position.
A safe and firm posture must always be provided
when working with the appliance.
Be careful when going backwards – risk of tripping!
When being blocked, turn the appliance immediately
off and remove the jammed item.
Before work, check the area for any hidden items or
animals.
WARNING!: Keep all cables and the extension cable
out of reach of the cutting elements.
Do not use the appliance to cut grass that is not on
the ground, e.g. grass growing on walls, rocks, etc.
Never cross any gravel roads or paths with the run-
ning appliance.
When working, keep the appliance firmly with both
hands and with a distance from your body.
Make sure the appliance is off before inserting a
battery.
The ON/OFF switch and safety switch must not be
locked.
WARNING! Danger of injury !
The cutting head keeps rotating for a few seconds
after the appliance is switched off. Keep your
hands and feet in safe distance.
Before using, check the tightness and proper
seating of all screwed and socket joints and
protective equipment and if all moving parts are
moving smoothly.
It is strictly prohibited to demount, adjust and
alienate the protective equipment on the
machine or put other protective equipment on
the machine.
Do not use the appliance if damaged or the
safety equipment is defective. Replace any worn
and damaged parts.
Do not use the device near flammable liquids or
gases. Risk of fire and explosion in case of short
circuit.
Avertissement: Cet outil électrique génère
pendant le fonctionnement un champ magnétique.
Dans certaines circonstances, ce champ peut
perturber le fonctionnement des implants médicaux
actifs ou passifs. Afin de réduire le risque de blessure
graves ou mortelles, nous recommandons aux
personnes portant un implant médical de consulter
un médecin et le fabricant de l‘implant médical avant
l‘utilisation de l‘appareil.
Charging station
No metal parts may enter the shaft to slide the batte-
ry (risk of short circuit).
Never use the charger in moist or wet conditions.
Suitable for indoor areas only.
Make sure the system voltage corresponds to the
charger type plate details. There is a risk of electric
shock.
Cable connections to be separated by pulling the
plug only. Pulling the cable could damage both the
cable and plug. As a result, electric safety would no
longer be guaranteed.
Never use the charger when the cable, plug or the
machine is damaged by external influences. In case
damage let repaired in authorized workshop
Make sure the cooling function is not limited by cove-
ring the cooling slots. Do not operate the appliance near
heat sources or on a flammable surface.
Never open the charger. Contact a specialised work-
shop in case of any defect.
The Güde charger to be used only to charge the battery.
There can be malfunction or fire if different chargers
are used.
The outer battery surface must be clean and dry before
the battery starts being charged.
Summary of Contents for 5073
Page 4: ...1 2 4 LIEFERUMFANG DELIVERED ITEMS 3 5 6 ...
Page 6: ...2 1 D Montage GB Assembly 1 3 4 2 2 3 2 TIP 90 ...
Page 7: ...3 1 D Montage GB Assembly 5 6 7 8 3 ...
Page 9: ...5 1 D Montage GB Assembly 1 3 2 2 D Arbeitshöheneinstellung GB Working height adjustment ...
Page 10: ...6 1 D Montage GB Assembly 1 A B 2 1 2 2 1 180 2 D Schnittradius GB Cutting length ...
Page 11: ...7 1 D Montage GB Assembly 1 1 2 2 CLICK 2 D Akku GB Battery 95603 2 Ah T I P ...
Page 12: ...8 1 D Montage GB Assembly 2 D Akku GB Battery 100 1 2 D Grün GB Green D Rot GB Red 1 2 ...
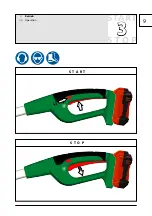
Page 13: ...9 1 D Montage GB Assembly S T A R T S T O P 1 2 3 D Betrieb GB Operation ...
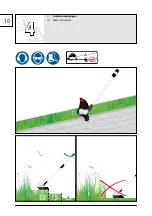
Page 14: ...10 1 D Montage GB Assembly 4 D Arbeitsanweisungen GB Work instructions 1 3 2 ...
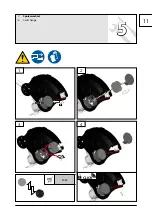
Page 15: ...11 1 D Montage GB Assembly 5 D Spulenwechsel GB Coill change 1 4 CLICK 3 2 1 2 5044 ...
Page 34: ...30 ...
Page 35: ...31 ...

