D
24
Battery
Vapours may leak out in case of unauthorised use or
when using a damaged accumulator. Bring fresh air
and seek medical advice if experiencing difficulties.
Vapours may irritate the respiratory system.
Risk of fire! Risk of explosion!
Never use damaged, defective or deformed accu-
mulators. Never open or damage the accumulator
or let it fall on the ground.
Never charge the battery in an environment with
acids and easily flammable materials.
Protect the battery against heat and fire.
Battery to be used at the ambient temperatures
between 10°C and +40°C only.
Never put the battery on heaters and do not
expose it to strong sunlight for a long time.
After being subject to heavy load, let the battery
cool down first.
Short circuit - do not bridge the accumulator
contacts with metal parts.
The accumulator must be packaged (plastic bag,
box) or accumulator contacts must be sealed up
for accumulator disposal, transport or storage.
Work instructions
Accumulators are supplied partially charged and
must therefore be fully charged before being used for
the first time.
• Charge the accumulator when the appliance is
running slowly or stops.
• A li-ion battery may be charged at any time without
any shortening of its life. Charging process interrup-
tion will not damage the accumulator.
• A li-ion battery is protected by the Electronic Cell
Protection against deep discharge.
• A significantly shorter operating time of a charged
battery means the battery life is over and the batte-
ry must be replaced.
Original spare batteries to be used only.
ENGLISH
Maintenance
Take the replaceable battery from the
appliance before any extension, cleaning
and servicing works.
Repairs and works specified in these Instructions may
only be performed by qualified authorised staff.
Use only original accessories and original spare parts.
Keep the device, in particular the air vents, clean at all
times. Never spray water on the device body!
Never clean the machine and its components with
solvents, flammable or toxic liquids. Us only a damp
cloth making.
After each use, clean the string trimmer and remove
any grass remains.
Check the cutting equipment function.
Only a regularly maintained and treated appliance
can serve as a satisfactory aid. Insufficient mainte-
nance and care can lead to unforeseen accidents and
injuries.
If necessary, a list of spare parts can be found at www.
guede.com.
Machine to be stored in a dry place.
Disposal
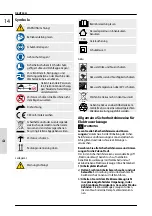
The disposal instructions are based on the icons
placed on the appliance or its package.
Any damaged or disposed devices must
be delivered to appropriate collection
centres.
Dispose of the batteries in an environmentally
friendly manner.
Li-ion batteries are subject to the special disposal
obligation. Have any defective batteries disposed of
by a specialised shop. The battery must be taken out
before the appliance is scrapped. Damaged batteries
may harm the environment and your health if toxic
vapours or liquids leak out of such batteries.
Therefore, never send a defective battery by post, etc.
Please contact your local recycling centre.
Dispose of the batteries when discharged. We
recommend applying an adhesive tape on the poles
to protect them against short circuit. Never open the
battery.
GB
Summary of Contents for 5073
Page 4: ...1 2 4 LIEFERUMFANG DELIVERED ITEMS 3 5 6 ...
Page 6: ...2 1 D Montage GB Assembly 1 3 4 2 2 3 2 TIP 90 ...
Page 7: ...3 1 D Montage GB Assembly 5 6 7 8 3 ...
Page 9: ...5 1 D Montage GB Assembly 1 3 2 2 D Arbeitshöheneinstellung GB Working height adjustment ...
Page 10: ...6 1 D Montage GB Assembly 1 A B 2 1 2 2 1 180 2 D Schnittradius GB Cutting length ...
Page 11: ...7 1 D Montage GB Assembly 1 1 2 2 CLICK 2 D Akku GB Battery 95603 2 Ah T I P ...
Page 12: ...8 1 D Montage GB Assembly 2 D Akku GB Battery 100 1 2 D Grün GB Green D Rot GB Red 1 2 ...
Page 13: ...9 1 D Montage GB Assembly S T A R T S T O P 1 2 3 D Betrieb GB Operation ...
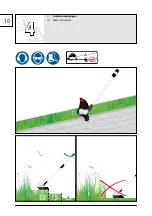
Page 14: ...10 1 D Montage GB Assembly 4 D Arbeitsanweisungen GB Work instructions 1 3 2 ...
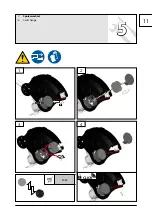
Page 15: ...11 1 D Montage GB Assembly 5 D Spulenwechsel GB Coill change 1 4 CLICK 3 2 1 2 5044 ...
Page 34: ...30 ...
Page 35: ...31 ...

