6
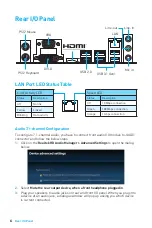
Rear I/O Panel
Rear I/O Panel
Link/ Activity LED
Status
Description
Off
No link
Yellow
Linked
Blinking
Data activity
Speed LED
Status
Description
Off
10 Mbps connection
Green
100 Mbps connection
Orange
1 Gbps connection
LAN Port LED Status Table
Audio 7.1-channel Configuration
To configure 7.1-channel audio, you have to connect front audio I/O module to JAUD1
connector and follow the below steps.
1.
Click on the
Realtek HD Audio Manager > Advanced Settings
to open the dialog
below.
2.
Select
Mute the rear output device, when a front headphone plugged in
.
3.
Plug your speakers to audio jacks on rear and front I/O panel. When you plug into
a device at an audio jack, a dialogue window will pop up asking you which device
is current connected.
PS/2 Keyboard
PS/2 Mouse
LAN
USB 3.1 Gen1
USB 2.0
DVI-D
VGA
Line-in
Line-out
Mic in
Summary of Contents for A320M PRO-M2 V2
Page 22: ...2 y ESD y y y ESD ESD y y y y y y y y PSU PSU y y y y 60 C 140 F...
Page 28: ...8 CPU CPU CPU y AM4 BIOS y CPU y CPU CPU CPU y CPU y CPU CPU CPU y CPU 1 3 5 4 6 7 8 2...
Page 40: ...20 1 MSI 2 3 Utilities 4 5 Install 6 7 OK 8...
Page 82: ...2 y y y y y y y y y y y y y y y y 60 C 140 F...
Page 88: ...8 y 4 BIOS y y y y y 1 3 5 4 6 7 8 2...
Page 100: ...20 1 MSI Driver Disc 2 3 Utilities 4 5 Install 6 7 OK 8...
Page 102: ...2 y ESD y y y ESD ESD y y y y y y y y y y y y 60 140...
Page 108: ...8 CPU CPU CPU y AM4 BIOS y CPU y CPU CPU CPU y CPU CPU y CPU CPU CPU y CPU 1 3 5 4 6 7 8 2...
Page 120: ...20 1 MSI 2 3 Utilities 4 5 Install 6 7 OK 8...
Page 122: ...2 y ESD y y y y y y y y y y y y y y y 60 C 140 F...
Page 128: ...8 CPU CPU CPU y AM4 BIOS y y CPU CPU y CPU y CPU CPU CPU y CPU 1 3 5 4 6 7 8 2...
Page 140: ...20 1 MSI 2 3 4 5 6 7 8...
Page 142: ...2 y ESD PC y y y ESD ESD y y PC y PC y PC y PC PC y y y y y y PC y 60O C 140O F...
Page 160: ...20 1 MSI 2 3 Utilities 4 5 Install 6 7 OK 8 PC...


