background image

日本語

161

概要

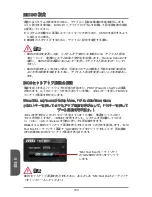
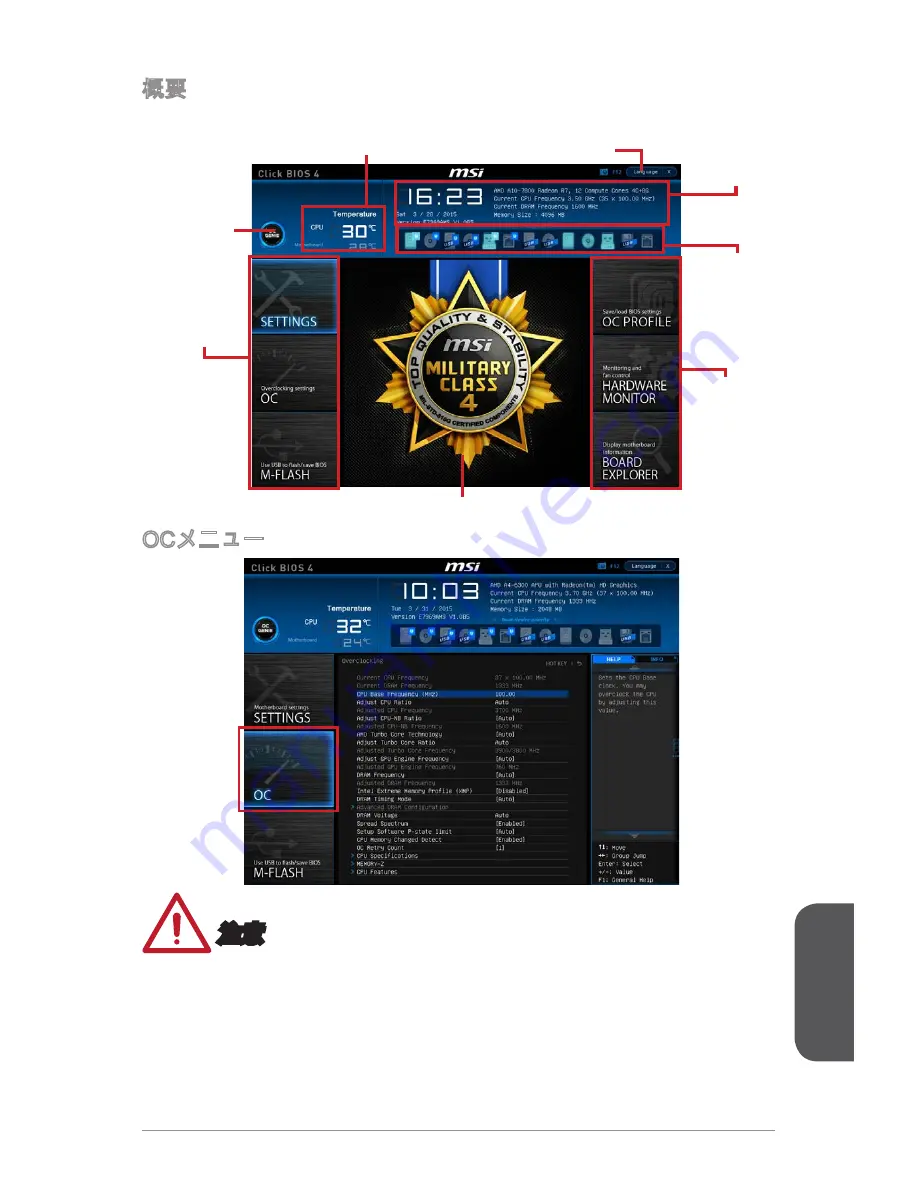
BIOSに入った後、以下の画面が表示されます。

BIOSメニュ

ー選択

温度モニタ

システム

情報

ブートデバ

イス優先順

序バー

メニューディスプレイ

BIOSメニ

ュー選択

言語

Virtual OC 

Genieボタン

OCメニュー

 注意

• 

高級なユーザー以外にPCを手動でオーバークロックすることをお薦めしません。

• 

オーバークロックによる故障は製品保証の対象外となりますのでご注意くださ

い。不適当に操作すると、保証を無効にさせ、またはハードウェアを破損する危

険性があります。

• 

ユーザーがオーバークロックに精通していない場合、OC Genieで簡単なオーバー

クロックを行うことをお勧めします。

Summary of Contents for A68HI AC Series

Page 1: ...s registered trademarks of Intel Corporation Windows is registered trademarks of Microsoft Corporation AMI is registered trademark of American Megatrends Inc Award is a registered trademark of Phoenix...

Page 2: ...aged Liquid has penetrated into the equipment The equipment has been exposed to moisture The equipment does not work well or you can not get it work according to User s Manual The equipment has been d...

Page 3: ...an experienced radio television technician for help Notice 1 The changes or modifications not expressly approved by the party responsible for compliance could void the user s authority to operate the...

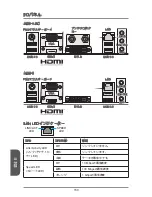
Page 4: ...information of chemical substances in products at http www msi com html popup csr evmtprtt_pcm html Japan JIS C 0950 Material Declaration A Japanese regulatory requirement defined by specification JIS...

Page 5: ...lation approved by the Resolution of Cabinet of Ministry of Ukraine as of December 3 2008 1057 in terms of restrictions for the use of certain dangerous substances in electrical and electronic equipme...

Page 6: ...ik Altger te nicht mehr als kommunale Abf lle entsorgt werden MSI hat europaweit verschiedene Sammel und Recyclingunternehmen beauftragt die in die Europ ische Union in Verkehr gebrachten Produkte am...

Page 7: ...roducten die de merknaam MSI dragen en verkocht zijn in de EU Deze goederen kunnen geretourneerd worden op lokale inzamelingspunten SRPSKI Da bi za titili prirodnu sredinu i kao preduze e koje vodi ra...

Page 8: ...rn ch MAGYAR Annak rdek ben hogy k rnyezet nket megv dj k illetve k rnyezetv d k nt fell pve az MSI eml kezteti nt hogy Az Eur pai Uni EU 2005 augusztus 13 n hat lyba l p az elektromos s elektronikus...

Page 9: ...tup 24 31 32 34 APU 35 37 38 BIOS 44 Fran ais 51 Sp cifications 52 Panneau Arri re 54 Installation d APU et son ventilateur 55 Installation de m moire 57 Connecteurs internes 58 Configuration BIOS 64...

Page 10: ...Preface 10 111 112 114 APU 115 117 118 BIOS 124 129 130 132 APU 133 135 136 BIOS 142 147 148 I O 150 APU 151 153 154 BIOS 160...

Page 11: ...the advanced AMD FM2 FM2 processor the A68HI AC A68HI Series motherboards deliver a high performance and professional desktop platform solution Layout Top LAN Jack Bottom USB 3 0 ports Top 1 PS 2 com...

Page 12: ...n Graphics 1x VGA port supporting a maximum resolution of 1920x1200 60Hz 24bpp 1x DVI D port supporting a maximum resolution of 2560x1600 60Hz 24bpp 1920x1200 60Hz 24bpp 1x HDMI port supporting a maxi...

Page 13: ...ports 2x USB 3 0 ports 1x VGA port 1x DVI D port 1x HDMI port 1x LAN RJ45 port 3x audio jacks Internal Connectors 1x 24 pin ATX main power connector 1x 4 pin ATX 12V power connector 4x SATA 6Gb s conn...

Page 14: ...o link Yellow Linked Blinking Data activity Speed LED Off 10 Mbps connection Green 100 Mbps connection Orange 1 Gbps connection A68HI AC A68HI PS 2 Mouse Keyboard VGA LAN HDMI USB 3 0 USB 2 0 DVI D An...

Page 15: ...the gold arrow of the APU The gold arrow should point as shown in the picture The APU can only fit in the correct orientation 3 If the APU is correctly installed the pins should be completely embedded...

Page 16: ...ble to the APU fan connector on the motherboard Important While disconnecting the Safety Hook from the fixed bolt it is necessary to keep an eye on your fingers because once the Safety Hook is disconn...

Page 17: ...mportant DDR3 memory modules are not interchangeable with DDR2 and the DDR3 standard is not backward compatible Always install DDR3 memory modules in DDR3 DIMM slots To ensure system stability memory...

Page 18: ...u n d 1 6 P S O N 4 5 V 1 7 G r o u n d 5 G r o u n d 1 8 G r o u n d 6 5 V 1 9 G r o u n d 7 G r o u n d 2 2 5 V 1 0 1 2 V 2 0 R e s 8 P W R O K 2 3 5 V 1 1 1 2 V 2 1 5 V 9 5 V S B 2 4 G r o u n d 1...

Page 19: ...hat large SATA devices such as HDDs SSDs and optical drives be screwed down into the case Refer to the manual that came with your computer case or your SATA device for further installation instruction...

Page 20: ...Smart Fan Control with liner mode The Command Center utility can be installed to automatically control the fan speeds according to the CPU s and system s temperature If there are not enough ports on t...

Page 21: ...JFP2 3 B U Z 4 S p e a k e r 1 S p e a k e r 2 B U Z Important On the connectors coming from the case pins marked by small triangles are positive wires Please use the diagrams above and the writing o...

Page 22: ...S B 3 _ R X _ D N 1 7 U S B 3 _ R X _ D P 1 6 G r o u n d 1 5 U S B 3 _ T X _ C _ D N 1 4 U S B 3 _ T X _ C _ D P 1 3 G r o u n d 1 2 U S B 2 0 1 1 U S B 2 0 Important Note that the VCC and GND pins...

Page 23: ...ar Data 1 1 Important You can clear the CMOS RAM by shorting this jumper while the system is off Afterwards open the jumper Do not clear the CMOS RAM while the system is on because it will damage the...

Page 24: ...e or failure booting due to inappropriate BIOS configuration Entering BIOS Setup Power on the computer and the system will start the Power On Self Test POST process When the message below appears on t...

Page 25: ...r Menu display BIOS menu selection Language Virtual OC Genie Button OC Menu Important Overclocking your PC manually is only recommended for advanced users Overclocking is not guaranteed and if done im...

Page 26: ...Adjusted CPU NB Frequency Shows the adjusted CPU NB frequency Read only AMD Turbo Core Technology Auto Base on AMD Turbo Core Technology part of CPU core ratio may pop down for providing more performa...

Page 27: ...hanging memory timing If it occurs please clear the CMOS data and restore the default settings Refer to the Clear CMOS jumper button section to clear the CMOS data and enter the BIOS to load the defau...

Page 28: ...time by pressing F4 Read only CPU Technology Support Press Enter to enter the sub menu The sub menu shows what the key features does the installed CPU support Read only MEMORY Z Press Enter to enter t...

Page 29: ...d When the CPU enters C6 state all cores will save architectural state and reduce core voltages to zero volts Wake up the CPU from C6 state will take a lot longer Disabled Disables this function Power...

Page 30: ...English 30...

Page 31: ...68HI AC A68HI Top LAN Jack Bottom USB 3 0 ports Top 1 PS 2 combo port Bottom 2 USB 2 0 ports DVI port Top VGA port Bottom HDMI port JUSB2 JUSB1 SATA1 JFP2 M2_PCIE1 JFP1 JTPM1 JPWR1 DIMM1 DIMM2 PCI_E1...

Page 32: ...i USB FM2 PCIe 3 0 M 2 Wake On WLAN VGA 1 1920x1200 60Hz 24bpp DVI D 1 2560x1600 60Hz 24bpp 1920x1200 60Hz 24bpp HDMI 1 4096x2160 24Hz 36bpp 3840x2160 30Hz 36bpp 1920x1200 120Hz 36bpp 1920x1200 60Hz 3...

Page 33: ...Wi Fi BLE Bluetooth Low Energy PS 2 1 USB 2 0 2 USB 3 0 2 VGA 1 DVI D 1 HDMI 1 LAN RJ45 1 3 24 ATX 1 4 ATX 12V 1 SATA 6Gb s 4 USB 2 0 1 USB 2 0 2 USB 3 0 1 USB 3 0 2 4 CPU 1 4 1 1 2 1 TPM 1 CMOS 1 BIO...

Page 34: ...AN LED LINK ACT LED SPEED LED LED LED Link Activity LED LED LAN LAN LAN Speed LED LED 10 Mbps 100 Mbps 1 Gbps A68HI AC A68HI PS 2 VGA LAN HDMI USB 3 0 USB 2 0 DVI D PS 2 VGA LAN HDMI USB 3 0 USB 2 0 D...

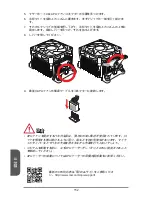
Page 35: ...35 APU APU APU APU APU APU 1 90 2 APU APU 3 APU 4 APU APU APU APU...

Page 36: ...36 5 CPU 6 7 8 9 APU CPU APU APU APU CPU http www msi com cpu support...

Page 37: ...37 http youtu be 76yLtJaKlCQ 1 2 3 DDR3 DDR2 DDR3 DDR3 DIMM DDR3 http www msi com test report...

Page 38: ...V 1 9 G r o u n d 7 G r o u n d 2 2 5 V 1 0 1 2 V 2 0 R e s 8 P W R O K 2 3 5 V 1 1 1 2 V 2 1 5 V 9 5 V S B 2 4 G r o u n d 1 2 3 3 V JPWR1 4 1 2 V 2 G r o u n d 3 1 2 V 1 G r o u n d JPWR2 ATX JAUD1...

Page 39: ...A1 4 SATA SATA SATA SATA HDD SSD CD DVD SATA HDD http youtu be RZsMpqxythc SATA1 4 AMD A68H 6Gb s SATA3 SATA4 SATA2 SATA1 HDD SSD CD DVD SATA HDD SSD SATA SATA SATA 90 SATA JCI1 BIOS 2 G N D 1 C H A S...

Page 40: ...le TPM 1 0 N o P i n 1 4 G r o u n d 8 5 V P o w e r 1 2 G r o u n d 6 S e r i a l I R Q 4 3 3 V P o w e r 2 3 V S t a n d b y p o w e r 1 L P C C l o c k 3 L P C R e s e t 5 L P C a d d r e s s d a t...

Page 41: ...c h H D D L E D P o w e r S w i t c h P o w e r L E D 7 9 R e s e r v e d 8 6 4 2 JFP1 JFP2 3 B U Z 4 S p e a k e r 1 S p e a k e r 2 B U Z M JFP1 JUSB1 USB 2 0 USB HDD MP3 USB 1 V C C 3 U S B 0 1 0 N...

Page 42: ...r 1 0 G r o u n d 9 U S B 2 0 8 U S B 2 0 7 G r o u n d 6 U S B 3 _ T X _ C _ D P 2 0 N o P i n 1 9 P o w e r 1 8 U S B 3 _ R X _ D N 1 7 U S B 3 _ R X _ D P 1 6 G r o u n d 1 5 U S B 3 _ T X _ C _ D...

Page 43: ...43 JBAT1 CMOS CMOS RAM CMOS RAM OS CMOS RAM 1 1 CMOS RAM CMOS PCI_E1 PCIe PCIe PCIe PCIe 3 0 x16...

Page 44: ...BIOS Enter BIOS BIOS POST Power On Self Test DEL Press DEL key to enter Setup Menu F11 to enter Boot Menu DEL F11 BIOS RESET Ctrl Alt Delete MSI BIOS MSI Fast Boot GO2BIOS BIOS MSI Fast Boot GO2BIOS...

Page 45: ...45 BIOS BIOS BIOS Virtual OC Genie OC OC Genie...

Page 46: ...ed CPU NB Frequency CPU NB AMD Turbo Core Technology Auto AMD Turbo Core Technology AMD Cool n Quiet Technology CPU CPU Auto Turbo Core Technology AMD Cool n Quiet Technology Enabled Disabled Adjust T...

Page 47: ...iming Mode Auto Auto DRAM SPD Serial Presence Detect Link DRAM UnLink DRAM Advanced DRAM Configuration Enter DRAM Link Unlink CMOS CMOS CMOS BIOS DRAM Voltage Auto DRAM Auto BIOS DRAM Spread Spectrum...

Page 48: ...Specifications Enter CPU F4 CPU Technology Support Enter CPU MEMORY Z Enter F5 DIMM1 2 Memory SPD Enter CPU Features Enter AMD Cool n Quiet Auto AMD Cool n Quiet Auto AMD Enable AMD Cool n Quiet Cool...

Page 49: ...Mode Enabled CPU Enabled Disabled Core C6 State Enabled C6 Enabled CPU C6 0 CPU C6 Disabled Power Policy Mode NB P state Performance NB P state NB Battery Life NB P state NB cTDP Auto VDD APU TDP Aut...

Page 50: ...50...

Page 51: ...FM2 FM2 avanc s les cartes m res de la s rie A68HI AC A68HI d livrent de hautes performances et offrent une solution adapt e tant aux professionnels qu aux particuliers Sch ma Top LAN Jack Bottom USB...

Page 52: ...port M 2 ne supporte pas la fonction Wake On WLAN Graphiques 1x port VGA supportant une r solution au maximum de 1920x1200 60Hz 24bpp 1x port DVI D supportant une r solution au maximum de 2560x1600 60...

Page 53: ...ports USB 2 0 2x ports USB 3 0 1x port VGA 1x port DVI D 1x port HDMI 1x port LAN RJ45 3x prises audio Connecteurs internes 1x connecteur d alimentation principal 24 pin ATX 1x connecteur d alimentat...

Page 54: ...Eteint Non reli Jaune Reli Clignote Activit de donn e Speed LED LED de vitesse Eteint D bit de 10 Mbps Vert D bit de 100 Mbps Orange D bit de 1 Gbps A68HI AC A68HI Souris Clavier PS 2 VGA LAN HDMI USB...

Page 55: ...e le lever jusqu 90 degr s 2 Cherchez la fl che d or de l APU Elle doit d signer comme montr dans le photo L APU ne s y installe que dans le position correcte 3 Si l APU est correctement install les p...

Page 56: ...au connecteur du ventilateur de l APU la carte m re Important Quand vous d connectez le crochet de s curit du verrou fix il faut garder un oeil sur vos doigts parce qu une fois que le crochet de s cu...

Page 57: ...re DDR3 ne sont pas interchangeables avec les modules DDR2 Vous devez toujours installer les modules de m moire DDR3 dans les emplacements DDR3 DIMM Pour garantir la stabilit du syst me assurez vous d...

Page 58: ...O N 4 5 V 1 7 G r o u n d 5 G r o u n d 1 8 G r o u n d 6 5 V 1 9 G r o u n d 7 G r o u n d 2 2 5 V 1 0 1 2 V 2 0 R e s 8 P W R O K 2 3 5 V 1 1 1 2 V 2 1 5 V 9 5 V S B 2 4 G r o u n d 1 2 3 3 V JPWR1...

Page 59: ...ormation Dans la plupart des bo tiers d ordinateur il est n cessaire de fixer les p riph riques SATA tels que HDD SSD et lecteur optique au bo tier R f rez vous au manuel de votre bo tier ou de votre...

Page 60: ...es connecteurs supportent le contr le Smart fan avec le mode liner Vous pouvez installer l utilitaire Control Center qui contr lera automatiquement la vitesse du ventilateur en fonction de la temp rat...

Page 61: ...B U Z Important Sur les branchements du bo tiers les broches marqu es par de petits triangles sont des fils positifs Veuillez utiliser les diagrammes ci dessus et l explication relative au M Connecto...

Page 62: ...X _ D N 1 7 U S B 3 _ R X _ D P 1 6 G r o u n d 1 5 U S B 3 _ T X _ C _ D N 1 4 U S B 3 _ T X _ C _ D P 1 3 G r o u n d 1 2 U S B 2 0 1 1 U S B 2 0 Important Notez que les pins de VCC et GND doivent t...

Page 63: ...Conserver les donn es Effacer les donn es 1 1 Important Vous pouvez effacer le CMOS RAM en connectant ce cavalier quand le syst me est teint Ensuite ouvrez le cavalier Evitez d effacer le CMOS pendan...

Page 64: ...la configuration BIOS Allumez l ordinateur et le syst me lancera le processus POST Test automatique d allumage Lorsque le message ci dessous appara t l cran appuyez sur la touche DEL pour entrer dans...

Page 65: ...menu BIOS Langue Bouton virtuel OC Genie OC Menu Important L Overclocking manuel du PC n est recommand que pour les utilisateurs avanc s L Overclocking n est pas garanti et une mauvaise manipulation p...

Page 66: ...esse CPU NB Adjusted CPU NB Frequency Il montre la fr quence ajust e du CPU NB En lecture seule AMD Turbo Core Technology Auto Selon AMD Turbo Core Technology le ratio des c urs CPU peut partiellement...

Page 67: ...gler la synchronisation de m moire pour chaque canal de m moire Le syst me peut tre instable ou ne peut plus red marrer apr s le changement de la synchronisation de la m moire Dans ce cas l veuillez...

Page 68: ...ctuelles CPU Specifications Appuyez sur Enter pour entrer dans le sous menu Ce sous menu affiche l information du CPU install Vous pouvez galement acc der au menu d information tout temps en appuyant...

Page 69: ...e multiple syst mes virtuellement Disabled D sactive cette fonction Core C6 State Enabled Active ou d sactive le support d tat C6 Enabled Lorsque le CPU entre en tat C6 tous les coeurs conservent l at...

Page 70: ...Fran ais 70...

Page 71: ...hentwickelten AMD FM2 FM2 Prozessor zu unterst tzen stellt die A68HI AC A68HI Motherboard die ideale L sung zum Aufbau eines professionellen Hochleistungsdesktopsystems dar Layout Top LAN Jack Bottom...

Page 72: ...ss unterst tzt eine maximale Aufl sung von 1920x1200 60Hz 24bpp 1x DVI D Anschluss unterst tzt eine maximale Aufl sung von 2560x1600 60Hz 24bpp 1920x1200 60Hz 24bpp 1x HDMI Anschluss unterst tzt eine...

Page 73: ...B 2 0 Anschl sse x2 USB 3 0 Anschl sse x2 VGA Anschluss x1 DVI D Anschluss x1 HDMI Anschluss x1 LAN RJ45 Anschluss x1 Audiobuchsen x3 Interne Anschl sse ATX 24 poliger Stromanschluss x1 ATX12V 4 polig...

Page 74: ...s Keine Verbindung Gelb Verbindung Blinkt Datenaktivit t Speed LED Geschwindigkeit LED Aus 10 Mbps Verbindung Gr n 100 Mbps Verbindung Orange 1 Gbps Verbindung A68HI AC A68HI VGA HDMI USB 3 0 USB 2 0...

Page 75: ...Sie den goldenen Pfeil auf der APU ausfindig Die APU passt nur in der korrekten Ausrichtung Setzen Sie die APU in den Sockel 3 Ist die APU korrekt installiert sollten die Pins an der Unterseite volls...

Page 76: ...e den Sicherungshebel 9 Verbinden Sie das Stromkabel des APU L fters mit dem Anschluss auf dem Motherboard Wichtig Es besteht Verletzungsgefahr wenn Sie den Sicherungshaken vom Sicherungsbolzen trenne...

Page 77: ...nicht untereinander getauscht werden und der Standard DDR3 ist nicht abw rtskompatibel Installieren Sie DDR3 Speichermodule stets in DDR3 DIMM Slots Verwenden Sie die Speichermodule des gleichen Typs...

Page 78: ...V 1 5 G r o u n d 3 G r o u n d 1 6 P S O N 4 5 V 1 7 G r o u n d 5 G r o u n d 1 8 G r o u n d 6 5 V 1 9 G r o u n d 7 G r o u n d 2 2 5 V 1 0 1 2 V 2 0 R e s 8 P W R O K 2 3 5 V 1 1 1 2 V 2 1 5 V 9...

Page 79: ...stplatten SSD und HDD und optische Laufwerke CD DVD Blu Ray Weitere Informationen bietet das entsprechende Handbuch des Laufwerks Meist m ssen Serial ATA Ger te im Geh use verschraubt werden Informati...

Page 80: ...unterst tzen die Smart Fan L ftersteuerung Das Utility Command Center kann installiert werden um die L ftergeschwindigkeit in Abh ngigkeit von der der Prozessor und System Temperatur zu steuern F r de...

Page 81: ...U Z 4 S p e a k e r 1 S p e a k e r 2 B U Z Wichtig An den Anschl ssen aus dem Geh use sind die positiven Kabel an den Pins die mit kleinen Dreiecken markiert sind erkennbar Bitte verwenden Sie das Di...

Page 82: ...1 5 U S B 3 _ T X _ C _ D N 1 4 U S B 3 _ T X _ C _ D P 1 3 G r o u n d 1 2 U S B 2 0 1 1 U S B 2 0 Wichtig Bitte beachten Sie dass Sie die mit VCC Stromf hrende Leitung und GND Erdleitung bezeichnet...

Page 83: ...schen 1 1 Wichtig Wenn das System ausgeschaltet ist k nnen Sie die Steckbr cke stecken um die Daten im CMOS zu l schen Danach entfernen Sie die Steckbr cke Versuchen Sie niemals die Daten im CMOS zu...

Page 84: ...omputer den POST Power On Self Test Selbst berpr fung nach Anschalten Sobald die Meldung unten erscheint dr cken Sie die Taste Entf DEL um das BIOS aufzurufen Press DEL key to enter Setup Menu F11 to...

Page 85: ...wahl Sprache Virtual OC Genie Taste OC Men Wichtig Die bertaktung ist nur f r fortgeschrittene Benutzer zu empfehlen Die erfolgreiche bertaktung ist nicht gew hrleistet Die Anwendung von bertaktungsma...

Page 86: ...ator Ratio angeben Adjusted CPU NB Frequency Zeigt die verstellte Frequenz der CPU NB Nur Anzeige keine nderung m glich AMD Turbo Core Technology Auto Auf Grund der AMD Turbo Core Technik senken einze...

Page 87: ...zelnen Speicherkan le Advanced DRAM Configuration Dr cken Sie die Eingabetaste Enter um das Untermen aufzurufen Dieses Untermen wird nach der Einstellung Link oder Unlink in DRAM Timing Mode aktiviert...

Page 88: ...g der Funktion und Beibehaltung der aktuellen BIOS Einstellungen OC Retry Count 1 Wenn die bertaktung fehlschl gt regelt diese Option das System mit den bertakteten Einstellungen versucht zu starten S...

Page 89: ...sierung und erlaubt so mehrere Betriebssysteme in unabh ngigen Partitionen ausf hren Das System kann als mehrere Systeme praktisch funktionieren Disabled Deaktivierung dieser Funktion Core C6 State En...

Page 90: ...Deutsch 90...

Page 91: ...I AMD FM2 FM2 Top LAN Jack Bottom USB 3 0 ports Top 1 PS 2 combo port Bottom 2 USB 2 0 ports DVI port Top VGA port Bottom HDMI port JUSB2 JUSB1 SATA1 JFP2 M2_PCIE1 JFP1 JTPM1 JPWR1 DIMM1 DIMM2 PCI_E1...

Page 92: ...USB Bluetooth FM2 APU M 2 Wake On WLAN 1x VGA 1920x1200 60 24bpp 1x DVI D 2560x1600 60 24bpp 1920x1200 60 24bpp 1x HDMI 4096x2160 24 36bpp 3840x2160 30 36bpp 1920x1200 120 36bpp 1920x1200 60 36bpp FM...

Page 93: ...WiDi Bluetooth v4 0 BLE Bluetooth 3 0 HS A68HI AC Wi Fi Bluetooth BLE 1x PS 2 2x USB 2 0 2x USB 3 0 1x VGA 1x DVI D 1x HDMI 1x LAN RJ45 3x 1x 24 ATX 1x 4 ATX 12 4x SATA 6 1x USB 2 0 2 USB 2 0 1x USB...

Page 94: ...94 LAN LINK ACT LED SPEED LED Link Activity LED Speed LED 10 100 1 A68HI AC A68HI PS 2 VGA LAN HDMI USB 3 0 USB 2 0 DVI D PS 2 VGA LAN HDMI USB 3 0 USB 2 0 DVI D...

Page 95: ...95 APU APU APU APU APU APU 1 2 gold arrow APU APU 3 APU APU 4 APU APU APU...

Page 96: ...96 5 6 7 8 9 APU APU APU APU APU http www msi com cpu support...

Page 97: ...97 http youtu be 76yLtJaKlCQ 1 2 3 DDR3 DDR2 DDR3 DDR3 DDR3 DIMM http www msi com test report...

Page 98: ...5 V 1 9 G r o u n d 7 G r o u n d 2 2 5 V 1 0 1 2 V 2 0 R e s 8 P W R O K 2 3 5 V 1 1 1 2 V 2 1 5 V 9 5 V S B 2 4 G r o u n d 1 2 3 3 V JPWR1 4 1 2 V 2 G r o u n d 3 1 2 V 1 G r o u n d JPWR2 JAUD1 1...

Page 99: ...99 SATA1 4 SATA SATA SATA SATA SATA DVD Blu Ray SATA http youtu be RZsMpqxythc SATA1 4 6 A68H SATA3 SATA4 SATA2 SATA1 SATA DVD Blu Ray SATA SATA SATA SATA JCI1 BIOS 2 G N D 1 C H A S S I S...

Page 100: ...o P i n 1 4 G r o u n d 8 5 V P o w e r 1 2 G r o u n d 6 S e r i a l I R Q 4 3 3 V P o w e r 2 3 V S t a n d b y p o w e r 1 L P C C l o c k 3 L P C R e s e t 5 L P C a d d r e s s d a t a p i n 0 7...

Page 101: ...t c h H D D L E D P o w e r S w i t c h P o w e r L E D 7 9 R e s e r v e d 8 6 4 2 JFP1 JFP2 3 B U Z 4 S p e a k e r 1 S p e a k e r 2 B U Z JFP1 JUSB1 USB 2 0 USB 1 V C C 3 U S B 0 1 0 N C 5 U S B 0...

Page 102: ...n d 9 U S B 2 0 8 U S B 2 0 7 G r o u n d 6 U S B 3 _ T X _ C _ D P 2 0 N o P i n 1 9 P o w e r 1 8 U S B 3 _ R X _ D N 1 7 U S B 3 _ R X _ D P 1 6 G r o u n d 1 5 U S B 3 _ T X _ C _ D N 1 4 U S B 3...

Page 103: ...103 JBAT1 CMOS CMOS CMOS CMOS 1 1 CMOS CMOS PCI_E1 PCIe PCIe PCIe PCIe 3 0 x16...

Page 104: ...S Enter BIOS BIOS BIOS BIOS POST Power On Self Test DEL Press DEL key to enter Setup Menu F11 to enter Boot Menu DEL F11 RESET Ctrl Alt Delete MSI BIOS GO2BIOS MSI Fast Boot BIOS GO2BIOS MSI Fast Boot...

Page 105: ...105 BIOS BIOS BIOS Virtual OC Genien OC OC Genie...

Page 106: ...o Auto CPU NB Adjusted CPU NB Frequency AMD Turbo Core Technology Auto AMD Turbo Core Auto Turbo Core Technology AMD Cool n Quiet Technology Enabled Disabled Adjust Turbo Core Ratio Auto Turbo Core Ad...

Page 107: ...d Profile 1 1 XMP Profile 2 2 XMP DRAM Timing Mode Auto Auto DRAM SPD Serial Presence Detect Link DRAM UnLink DRAM Advanced DRAM Configuration Enter Link Unlink DRAM Timing Mode CMOS CMOS CMOS BIOS DR...

Page 108: ...m Spread Spectrum CPU Memory Changed Detect Enabled Enabled Disabled BIOS OC Retry Count 1 1 2 3 1 2 3 Disabled BIOS CPU Specifications Enter F4 CPU Technology Support Enter MEMORY Z Enter F5 DIMM1 2...

Page 109: ...d Cool n Quiet CPU AMD Turbo Core Technology Turbo Core Tech Cool n Quiet SVM Mode Enabled CPU Virtualization Enabled CPU Virtualization Disabled Core C6 State Enabled C6 Enabled C6 C6 Disabled Power...

Page 110: ...110...

Page 111: ...A68HI AC A68HI Top LAN Jack Bottom USB 3 0 ports Top 1 PS 2 combo port Bottom 2 USB 2 0 ports DVI port Top VGA port Bottom HDMI port JUSB2 JUSB1 SATA1 JFP2 M2_PCIE1 JFP1 JTPM1 JPWR1 DIMM1 DIMM2 PCI_E1...

Page 112: ...FM2 PCIe 3 0 M 2 Wake On WLAN 1 VGA 1920x1200 60Hz 24bpp 1 DVI D 2560x1600 60Hz 24bpp 1920x1200 60Hz 24bpp 1 HDMI 4096x2160 24Hz 36bpp 3840x2160 30Hz 36bpp 1920x1200 120Hz 36bpp and 1920x1200 60Hz 36...

Page 113: ...3 0 HS A68HI AC Wi Fi BLE 1 PS 2 2 USB 2 0 2 USB 3 0 1 VGA 1 DVI D 1 HDMI 1 LAN RJ45 3 1 24 pin ATX 1 4 pin ATX 12V 4 SATA 6Gb s 1 USB 2 0 2 USB 2 0 1 USB 3 0 2 USB 3 0 1 4 pin CPU 1 4 pin 1 2 1 1 TPM...

Page 114: ...114 LAN LED LINK ACT LED SPEED LED LED LED Link Activity LED Speed LED 10 Mbps 100 Mbps 1 Gbps A68HI AC A68HI HDMI USB 3 0 USB 2 0 DVI D PS 2 VGA LAN HDMI USB 3 0 USB 2 0 DVI D VGA LAN PS 2...

Page 115: ...115 APU APU APU APU APU APU 1 90 2 APU APU 3 APU 4 APU APU APU APU...

Page 116: ...116 5 CPU 6 7 8 9 APU APU APU APU APU APU CPU http www msi com cpu support...

Page 117: ...117 http v youku com v_show id_XNDkyOTc5OTMy html 1 2 3 DDR3 DDR2 DDR3 DDR3 DDR3 http www msi com test report...

Page 118: ...u n d 6 5 V 1 9 G r o u n d 7 G r o u n d 2 2 5 V 1 0 1 2 V 2 0 R e s 8 P W R O K 2 3 5 V 1 1 1 2 V 2 1 5 V 9 5 V S B 2 4 G r o u n d 1 2 3 3 V JPWR1 4 1 2 V 2 G r o u n d 3 1 2 V 1 G r o u n d JPWR2...

Page 119: ...ATA ATA ATA HDD SSD CD DVD Blu Ray SATA HDD http v youku com v_show id_XNDkzODU5MTky html SATA1 4 6Gb s AMD A68H SATA3 SATA4 SATA2 SATA1 ATA HDD SSD CD DVD Blu Ray HDD SSD ATA 90 SATA JCI1 BIOS 2 G N...

Page 120: ...N o P i n 1 4 G r o u n d 8 5 V P o w e r 1 2 G r o u n d 6 S e r i a l I R Q 4 3 3 V P o w e r 2 3 V S t a n d b y p o w e r 1 L P C C l o c k 3 L P C R e s e t 5 L P C a d d r e s s d a t a p i n 0...

Page 121: ...S w i t c h H D D L E D P o w e r S w i t c h P o w e r L E D 7 9 R e s e r v e d 8 6 4 2 JFP1 JFP2 3 B U Z 4 S p e a k e r 1 S p e a k e r 2 B U Z M JFP1 JUSB1 USB 2 0 USB USB HDD MP3 1 V C C 3 U S B...

Page 122: ...0 G r o u n d 9 U S B 2 0 8 U S B 2 0 7 G r o u n d 6 U S B 3 _ T X _ C _ D P 2 0 N o P i n 1 9 P o w e r 1 8 U S B 3 _ R X _ D N 1 7 U S B 3 _ R X _ D P 1 6 G r o u n d 1 5 U S B 3 _ T X _ C _ D N 1...

Page 123: ...123 JBAT1 CMOS CMOS RAM CMOS RAM CMOS RAM 1 1 CMOS RAM CMOS PCI_E1 PCIe PCIe PCIe PCIe 3 0 x16...

Page 124: ...OS CMOS Restore Defaults BIOS Enter BIOS BIOS BIOS POST DEL BIOS Press DEL key to enter Setup Menu F11 to enter Boot Menu DEL F11 Setup Reset Ctrl Alt Delete MSI BIOS MSI Fast Boot GO2BIOS BIOS MSI Fa...

Page 125: ...125 BIOS BIOS BIOS OC...

Page 126: ...e Technology Auto AMD Turbo Core CPU CPU AMD Cool n Quiet Auto Turbo Core AMD Cool n Quiet Enabled Disabled Adjust Turbo Core Ratio Auto Turbo Adjusted Turbo Core Frequency Turbo Adjust GPU Engine Fre...

Page 127: ...CMOS CMOS BIOS DRAM Voltage Auto Auto BIOS Spread Spectrum EMI Enabled spread spectrum EMI Disabled CPU EMI Disabled EMI Spread Spectrum EMI Spread Spectrum EMI Spread Spectrum EMI Spread Spectrum CPU...

Page 128: ...Auto AMD Enable AMD Cool n Quiet Cool n Quiet CPU Disabled CPU Cool n Quiet CPU Turbo Core AMD Turbo Core AMD Cool n Quiet CPU SVM Mode Enabled CPU Enabled CPU Disabled Core C6 State Enabled C6 Enable...

Page 129: ...68HI AC A68HI Top LAN Jack Bottom USB 3 0 ports Top 1 PS 2 combo port Bottom 2 USB 2 0 ports DVI port Top VGA port Bottom HDMI port JUSB2 JUSB1 SATA1 JFP2 M2_PCIE1 JFP1 JTPM1 JPWR1 DIMM1 DIMM2 PCI_E1...

Page 130: ...type 2230 PCIe Wi Fi USB FM2 PCIe 3 0 M 2 Wake On WLAN 1 VGA 1920x1200 60Hz 24bpp 1 DVI D 2560x1600 60Hz 24bpp 1920x1200 60Hz 24bpp 1 HDMI 4096x2160 24Hz 36bpp 3840x2160 30Hz 36bpp 1920x1200 120Hz 36...

Page 131: ...BLE 3 0 HS A68HI AC BLE 1 PS 2 2 USB 2 0 2 USB 3 0 1 VGA 1 DVI D 1 HDMI 1 LAN RJ45 3 1 24 pin ATX 1 4 pin ATX 12V 4 SATA 6Gb s 1 USB 2 0 2 USB 2 0 1 USB 3 0 2 USB 3 0 1 4 pin CPU 1 4 pin 1 2 1 1 TPM...

Page 132: ...132 LINK ACT LED SPEED LED LED LED Link Activity LED Off Speed LED Off 10 Mbps 100 Mbps 1 Gbps A68HI AC A68HI PS 2 VGA LAN HDMI USB 3 0 USB 2 0 DVI D PS 2 VGA LAN HDMI USB 3 0 USB 2 0 DVI D...

Page 133: ...133 APU APU APU APU 1 90 2 APU APU 3 APU APU 4 APU APU...

Page 134: ...134 5 CPU 6 7 8 9 APU APU APU APU APU APU CPU http www msi com cpu support...

Page 135: ...135 http youtu be 76yLtJaKlCQ 1 2 3 DDR3 DDR2 DDR3 DDR3 http www msi com test report...

Page 136: ...1 9 G r o u n d 7 G r o u n d 2 2 5 V 1 0 1 2 V 2 0 R e s 8 P W R O K 2 3 5 V 1 1 1 2 V 2 1 5 V 9 5 V S B 2 4 G r o u n d 1 2 3 3 V JPWR1 4 1 2 V 2 G r o u n d 3 1 2 V 1 G r o u n d JPWR2 ATX JAUD1 1...

Page 137: ...ATA1 4 SATA SATA SATA SATA HDD SSD CD DVD Blu Ray SATA http youtu be RZsMpqxythc SATA1 4 6Gb s AMD A68H SATA3 SATA4 SATA2 SATA1 SATA CD DVD Blu Ray SATA SATA SATA 90 SATA JCI1 BIOS 2 G N D 1 C H A S S...

Page 138: ...o P i n 1 4 G r o u n d 8 5 V P o w e r 1 2 G r o u n d 6 S e r i a l I R Q 4 3 3 V P o w e r 2 3 V S t a n d b y p o w e r 1 L P C C l o c k 3 L P C R e s e t 5 L P C a d d r e s s d a t a p i n 0 7...

Page 139: ...e t S w i t c h H D D L E D P o w e r S w i t c h P o w e r L E D 7 9 R e s e r v e d 8 6 4 2 JFP1 JFP2 3 B U Z 4 S p e a k e r 1 S p e a k e r 2 B U Z M Connector JFP1 JUSB1 USB 2 0 USB USB MP3 1 V C...

Page 140: ...1 0 G r o u n d 9 U S B 2 0 8 U S B 2 0 7 G r o u n d 6 U S B 3 _ T X _ C _ D P 2 0 N o P i n 1 9 P o w e r 1 8 U S B 3 _ R X _ D N 1 7 U S B 3 _ R X _ D P 1 6 G r o u n d 1 5 U S B 3 _ T X _ C _ D N...

Page 141: ...141 JBAT1 CMOS CMOS RAM CMOS RAM CMOS RAM 1 1 CMOS RAM CMOS RAM PCI_E1 PCIe PCIe PCIe PCIe 3 0 x16...

Page 142: ...Restore Defaults Enter BIOS BIOS POST DEL Press DEL key to enter Setup Menu F11 to enter Boot Menu DEL F11 DEL BIOS RESET Ctrl Alt Delete BIOS MSI Fast Boot GO2BIOS GO2BIOS BIOS MSI Fast Boot GO2BIOS...

Page 143: ...143 BIOS BIOS BIOS OC Genie OC Genie...

Page 144: ...AMD Turbo Core AMD Cool n Quiet CPU active CPU core Auto Turbo Core AMD Cool n Quiet Enabled Disabled Adjust Turbo Core Ratio Auto Adjusted Turbo Core Frequency Adjust GPU Engine Frequency Auto GPU E...

Page 145: ...RAM Timing Mode Link Unlink CMOS CMOS BIOS DRAM Voltage Auto Auto BIOS Spread Spectrum Enabled Enabled EMI Disabled CPU EMI Disabled EMI CPU Memory Changed Detect Enabled CPU Enabled Disabled BIOS OC...

Page 146: ...t Auto AMD Enable AMD Cool n Quiet CPU Disabled CPU Ratio Cool n Quiet Turbo Core CPU Turbo Core Cool n Quiet CPU SVM Mode Enabled CPU Enabled CPU Disabled Core C6 State Enabled C6 Enabled CPU C6 CPU...

Page 147: ...M2 FM2 Top LAN Jack Bottom USB 3 0 ports Top 1 PS 2 combo port Bottom 2 USB 2 0 ports DVI port Top VGA port Bottom HDMI port JUSB2 JUSB1 SATA1 JFP2 M2_PCIE1 JFP1 JTPM1 JPWR1 DIMM1 DIMM2 PCI_E1 JPWR2 J...

Page 148: ...1 E 2230 PCIe Wi Fi USB Bluetooth FM2 PCIe 3 0 M 2 Wake On WLAN VGA x1 1920x1200 60Hz 24bpp DVI D x1 2560x1600 60Hz 24bpp 1920x1200 60Hz 24bpp HDMI x1 4096x2160 24Hz 36bpp 3840x2160 30Hz 36bpp 1920x12...

Page 149: ...lay WiDi Bluetooth v4 0 BLE Bluetooth 3 0 HS A68HI AC Wi Fi Bluetooth BLE Bluetooth Low Energy I O PS 2 x1 USB 2 0 x2 USB 3 0 x2 VGA x1 DVI D x1 HDMI x1 LAN RJ45 x1 x3 24 ATX x1 4 ATX 12V x1 SATA 6Gb...

Page 150: ...LED SPEED LED LED LED Link Activity LED LED Off Speed LED LED Off 10 Mbps 100 Mbps 1 Gbps A68HI AC A68HI PS 2 VGA LAN HDMI USB 3 0 USB 2 0 DVI D Line In Line Out Mic PS 2 VGA LAN HDMI USB 3 0 USB 2 0...

Page 151: ...151 APU APU APU APU APU APU 1 90 2 APU APU 3 APU APU APU 4 APU APU APU APU...

Page 152: ...152 5 APU 6 7 8 9 APU APU APU APU APU APU CPU Web http www msi com cpu support...

Page 153: ...153 http youtu be 76yLtJaKlCQ 1 2 3 DDR3 DDR2 DDR3 DDR3 DDR2 Web http www msi com test report...

Page 154: ...1 9 G r o u n d 7 G r o u n d 2 2 5 V 1 0 1 2 V 2 0 R e s 8 P W R O K 2 3 5 V 1 1 1 2 V 2 1 5 V 9 5 V S B 2 4 G r o u n d 1 2 3 3 V JPWR1 4 1 2 V 2 G r o u n d 3 1 2 V 1 G r o u n d JPWR2 ATX JAUD1 1...

Page 155: ...A SATA SATA SATA HDD SSD CD DVD Blu Ray SATA HDD http youtu be RZsMpqxythc SATA1 4 6Gb s AMD A68H SATA3 SATA4 SATA2 SATA1 SATA HDD SSD CD DVD Blu Ray SATA HDD SSD SATA SATA 90 SATA JCI1 2 BIOS 2 G N D...

Page 156: ...le TPM 1 0 N o P i n 1 4 G r o u n d 8 5 V P o w e r 1 2 G r o u n d 6 S e r i a l I R Q 4 3 3 V P o w e r 2 3 V S t a n d b y p o w e r 1 L P C C l o c k 3 L P C R e s e t 5 L P C a d d r e s s d a t...

Page 157: ...t c h H D D L E D P o w e r S w i t c h P o w e r L E D 7 9 R e s e r v e d 8 6 4 2 JFP1 JFP2 3 B U Z 4 S p e a k e r 1 S p e a k e r 2 B U Z M Connector JFP1 JUSB1 USB 2 0 USB USB HDD MP3 1 V C C 3 U...

Page 158: ...d 9 U S B 2 0 8 U S B 2 0 7 G r o u n d 6 U S B 3 _ T X _ C _ D P 2 0 N o P i n 1 9 P o w e r 1 8 U S B 3 _ R X _ D N 1 7 U S B 3 _ R X _ D P 1 6 G r o u n d 1 5 U S B 3 _ T X _ C _ D N 1 4 U S B 3 _...

Page 159: ...159 JBAT1 CMOS BIOS CMOS CMOS OS 1 1 CMOS RAM CMOS PCI_E1 PCIe PCIe PCIe PCIe 3 0 x16 BIOS...

Page 160: ...aults BIOS Enter BIOS BIOS BIOS POST Power On Self Test DEL BIOS Press DEL key to enter Setup Menu F11 to enter Boot Menu DEL F11 DEL RESET Ctrl Alt Delete MSI BIOS 1 MSI Fast Boot GO2BIOS PC BIOS MSI...

Page 161: ...161 BIOS BIOS BIOS Virtual OC Genie OC PC OC Genie...

Page 162: ...to CPU NB CPU NB Adjusted CPU NB Frequency CPU NB AMD Turbo Core Technology Auto AMD Turbo Core CPU CPU AMD Cool n Quiet Auto Turbo Core AMD Cool n Quiet Enabled Disabled Adjust Turbo Core Ratio Auto...

Page 163: ...1 Profile 2 XMP 2 DRAM Timing Mode Auto Auto SPD Serial Presence Detect DRAM Link DRAM UnLink DRAM Advanced DRAM Configuration Enter DRAM Timing Mode Link Unlink CMOS CMOS BIOS DRAM Voltage Auto DRAM...

Page 164: ...CPU Specifications Enter CPU F4 CPU Technology Support Enter CPU MEMORY Z Enter F5 DIMM1 2 Memory SPD Enter CPU Features Enter AMD Cool n Quiet Auto AMD Cool n Quiet Auto AMD Enable AMD Cool n Quiet C...

Page 165: ...de Enabled CPU Enabled CPU OS Disabled Core C6 State Enabled C6 Enabled C6 CPU C6 C6 CPU Disabled Power Policy Mode NB P state Performance NB P state NB Battery Life NB P state NB cTDP Auto VDD APU TD...

Page 166: ...166...
Reviews: