34
UEFI BIOS
EZ Mode
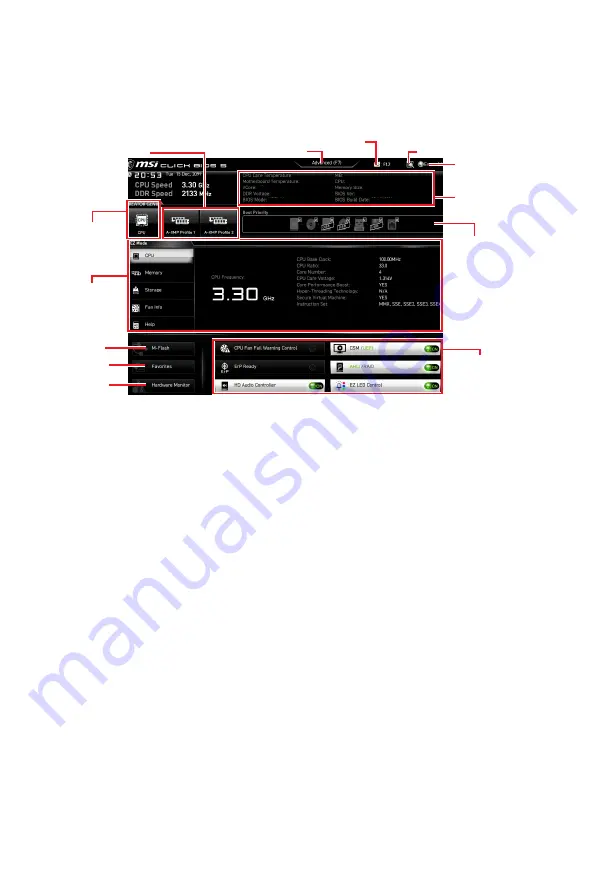
At EZ mode, it provides the basic system information and allows you to configure the
basic setting. To configure the advanced BIOS settings, please enter the Advanced
Mode by pressing the
Setup Mode switch
or
F7
function key.
A-XMP Profile
Component
Information
System
information
Boot device
priority bar
Function
buttons
Language
CREATOR
GENIE
Search
Screenshot
Setup Mode switch
M-Flash
Hardware
Monitor
Favorites
∙
CREATOR GENIE
- click on it to toggle the CREATOR GENIE for performance
optimization. This function is only available when both of the motherboard and CPU
are supporting this function.
⚠
Important
Please don’t make any changes in OC menu and don’t load defaults to keep the
optimal performance and system stability after activating the
CREATOR GENIE
function.
∙
A-XMP Profile
- allows you to select the A-XMP profile for memory to overclock.
This function is only available when the system, memory and CPU are supporting this
function.
∙
Setup Mode switch
- press this tab or the
F7
key to switch between Advanced mode
and EZ mode.
∙
Screenshot
- click on this tab or the
F12
key to take a screenshot and save it to USB
flash drive (FAT/ FAT32 format only).
∙
Search
- click on this tab or the
Ctrl+F
keys to enter the search page. It allows you
to search by BIOS item name. Move the mouse over a blank space and right click the
mouse to exit the search page.
⚠
Important
In search page, only the F6, F10 and F12 function keys are available.
∙
Language
- allows you to select language of BIOS setup.
Summary of Contents for B550-A PRO
Page 10: ...X Quick Start Connecting Peripheral Devices Processor with Radeon Graphics...
Page 11: ...XI Quick Start Power On 4 3 1 2...
Page 12: ...XII Quick Start NOTE...
Page 52: ...NOTE...
Page 54: ...2 OS 29 Windows 10 29 29 29 UEFI BIOS 30 BIOS 31 BIOS 31 BIOS 32 BIOS 32 EZ 34 37 OC 38...
Page 55: ...3 ESD PC ESD ESD PC PC PC PC PC PC 60OC 140OF...
Page 61: ...9 B550 A PRO SATA 6G 2 1 M 2 3 pcs 1 1 1 DVD 1 1 MSI 1...
Page 63: ...11 I O PC Realtek Realtek...
Page 64: ...12 I O AUDIO INPUT Rear Front Side Center Subwoofer AUDIO INPUT 7 1...
Page 80: ...28 EZ Debug LED LED CPU CPU DRAM DRAM VGA GPU PCIE M 2 BOOT LED_SW1 EZ LED LED LED_OFF LED_ON...
Page 92: ...NOTE...
Page 94: ...2 OS 29 Windows 10 29 29 29 UEFI BIOS 30 BIOS 31 BIOS 31 BIOS 32 BIOS 32 EZ 34 37 OC 38...
Page 95: ...3 ESD ESD ESD PSU PSU 60 C 140 F...
Page 101: ...9 B550 A PRO SATA 6G 2 1 M 2 3 pcs 1 1 1 DVD 1 1 MSI 1...
Page 103: ...11 I O Realtek Realtek...
Page 104: ...12 I O AUDIO INPUT Rear Front Side Center Subwoofer AUDIO INPUT 7 1...
Page 106: ...14 AM4 CPU CPU AM4 CPU 1 53 8 mm CPU DIMM AM4 BIOS CPU CPU CPU CPU CPU CPU CPU CPU CPU...
Page 120: ...28 EZ LED LED LED_SW1 EZ LED LED LED_ LED_ CPU CPU DRAM DRAM VGA GPU PCIE M 2 BOOT...
Page 127: ...35 UEFI BIOS CPU DDR CPU MB MB CPU CPU DDR BIOS CPU Help ON M M USB BIOS F3 BIOS BIOS 5...
Page 128: ...36 UEFI BIOS BIOS 1 BIOS BIOS 2 F2 3 OK BIOS 1 BIOS 2 F2 3 Delete OK...
Page 132: ...NOTE...
Page 134: ...2 29 Windows 10 29 29 29 UEFI BIOS 30 BIOS 31 BIOS 31 BIOS 32 BIOS 32 EZ 34 37 OC 38...
Page 135: ...3 ESD 60 C 140 F...
Page 141: ...9 B550 A PRO SATA 6G 2 1 M 2 3 1 1 1 DVD 1 1 MSI 1...
Page 143: ...11 I O Realtek Realtek...
Page 144: ...12 I O AUDIO INPUT Rear Front Side Center Subwoofer AUDIO INPUT 7 1...
Page 146: ...14 AM4 AM4 CPU 53 8 mm CPU DIMM AM4 BIOS CPU CPU CPU CPU CPU CPU CPU MSI...
Page 160: ...28 EZ LED LED CPU CPU DRAM VGA GPU PCIE M 2 BOOT LED_SW1 EZ LED LED LED_OFF LED_ON...
Page 168: ...36 UEFI BIOS BIOS 1 BIOS BIOS 2 F2 3 OK BIOS 1 BIOS 2 F2 3 Delete OK...
Page 172: ...NOTE...
Page 174: ...2 29 Windows 10 29 29 29 UEFI BIOS 30 BIOS 31 BIOS 31 BIOS 32 BIOS 32 EZ 34 37 OC 38...
Page 175: ...3 ESD ESD ESD 60 140...
Page 181: ...9 B550 A PRO SATA 6G 2 1 M 2 3 1 1 1 DVD 1 1 MSI 1...
Page 183: ...11 I O Realtek Realtek...
Page 184: ...12 I O AUDIO INPUT Rear Front Side Center Subwoofer AUDIO INPUT 7 1...
Page 200: ...28 LED LED CPU CPU DRAM DRAM VGA GPU PCIE M 2 BOOT LED_SW1 LED LED LED_OFF LED_ON...
Page 208: ...36 UEFI BIOS BIOS 1 BIOS BIOS 2 F2 3 OK BIOS 1 BIOS 2 F2 3 Delete OK...
Page 212: ...NOTE...


