background image

1-9

Preface

Safety Instructions

Read the safety instructions carefully and thoroughly. All cautions 
and warnings on the equipment or user’s manual should be noted.

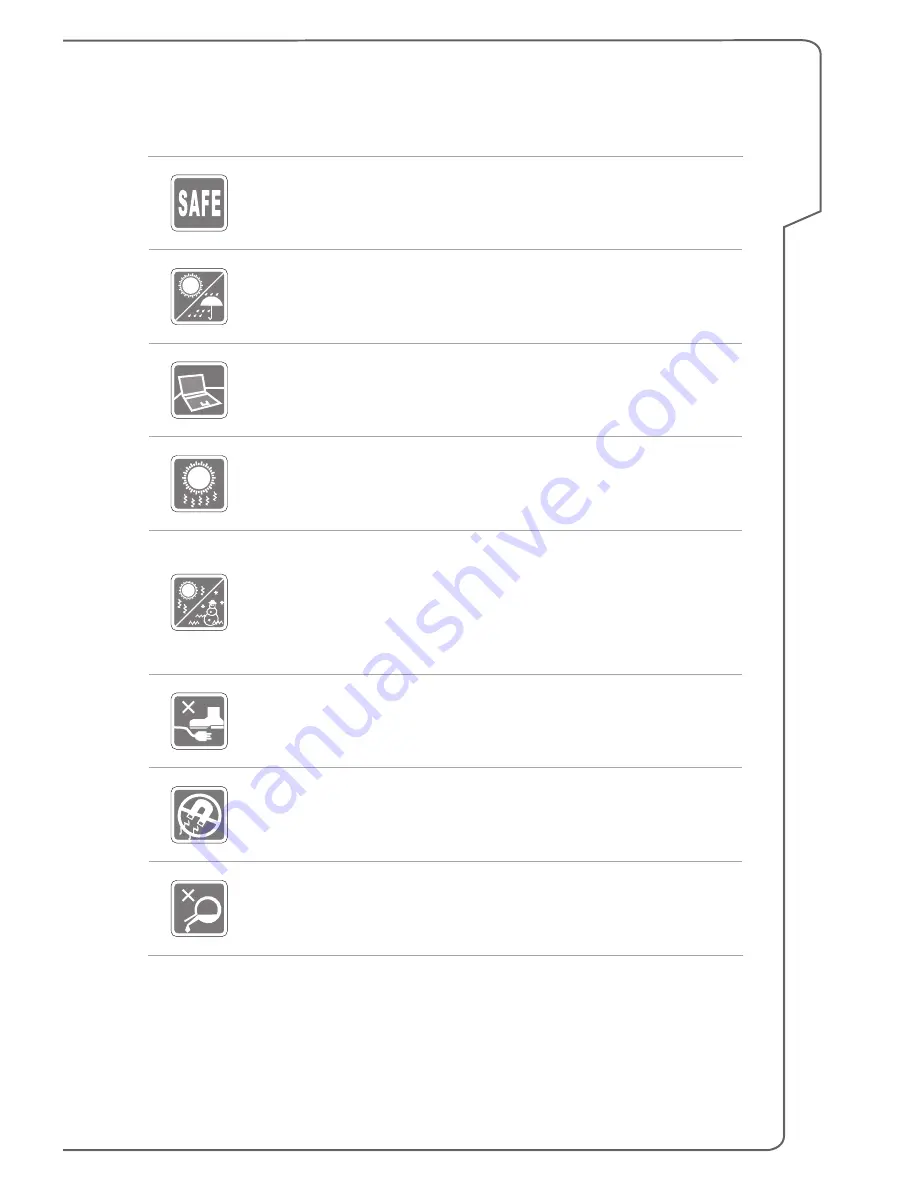
Keep the notebook away from humidity and high temperature.

Lay the notebook on a stable surface before setting it up.

Do not cover the ventilators of the notebook to prevent the 
notebook from overheating. 

• 

Do not leave the notebook in an unconditioned environment 
with a storage temperature above 60ºC (140ºF) or below 0ºC 
(32ºF), which may damage the notebook.

• 

This notebook should be operated under maximum ambient 
temperature of 35ºC (95ºF).

Place the power cord in a way that people are unlikely to step on 
it. Do not place anything on top of the power cord.

Always keep the strong magnetic or electrical objects away from 
the notebook.

Never pour liquid onto the notebook, since it may damage the 
equipment or cause an electrical shock.

Summary of Contents for Gaming G Series

Page 1: ...Notebook User s Manual Preface 1 ...

Page 2: ...dia RoHS 1 7 Turkey EEE regulation 1 7 Ukraine restriction of hazardous substances 1 7 Vietnam RoHS 1 7 Upgrade and Warranty 1 8 Acquisition of Replaceable Parts 1 8 Optical Disc Drive Notice 1 8 Safety Instructions 1 9 MSI Highlights 1 11 2 Introductions 2 1 Unpacking 2 2 Product Overview 2 3 Top open View 2 3 Front Side View 2 6 Right Side View 2 7 Left Side View 2 8 Rear Side View 2 10 Bottom S...

Page 3: ... 3 4 AC DC Adapter 3 4 Battery 3 4 How to Set Up a Power Plan in Windows 10 3 6 Choose or Customize a Power Plan 3 6 Create Your Own Power Plan 3 8 How to Use the Touchpad 3 10 About HDD and SSD 3 11 About M 2 SSD Slot 3 11 How to Use Optical Disc Drive 3 12 How to Connect the Internet 3 13 Wireless LAN 3 13 Wired LAN 3 15 How to Set Up Bluetooth Connection 3 20 Activating Bluetooth Connection 3 2...

Page 4: ...We take every care in the preparation of this document but no guarantee is given as to the correctness of its contents Our products are under continual improvement and we reserve the right to make changes without notice Trademarks All trademarks are the properties of their respective owners Revision History Version 1 0 Date 10 2015 ...

Page 5: ...ry to correct the interference by one or more of the following measures Reorient or relocate the receiving antenna Increase the separation between the equipment and receiver Connect the equipment into an outlet on a circuit different from that to which the receiver is connected NOTE The changes or modifications not expressly approved by the party responsible for compliance could void the user s au...

Page 6: ...mation please visit http www dtsc ca gov hazardouswaste perchlorate WEEE Statement European Union Under the European Union EU Direc tive on Waste Electrical and Electronic Equipment Directive 2002 96 EC which takes effect on August 13 2005 products of electrical and electronic equipment cannot be discarded as municipal waste anymore and manufacturers of covered elec tronic equipment will be obliga...

Page 7: ...d diphenyl ethers in concentrations exceeding 0 1 weight and 0 01 weight for cadmium except for the exemptions set in Schedule 2 of the Rule Turkey EEE regulation Conforms to the EEE Regulations of the Republic Of Turkey Ukraine restriction of hazardous substances The equipment complies with requirements of the Technical Regulation approved by the Resolution of Cabinet of Ministry of Ukraine as of...

Page 8: ... Replaceable Parts Please be noticed that the acquisition of replaceable parts or compatible ones of the product users purchased in certain countries or territories may be fulfilled by the manufacturer within 5 years at most since the product has been discontinued depending on the official regulations declared at the time Please contact the manufacturer via http www msi com support for the detaile...

Page 9: ...book from overheating Do not leave the notebook in an unconditioned environment with a storage temperature above 60ºC 140ºF or below 0ºC 32ºF which may damage the notebook This notebook should be operated under maximum ambient temperature of 35ºC 95ºF Place the power cord in a way that people are unlikely to step on it Do not place anything on top of the power cord Always keep the strong magnetic ...

Page 10: ... to the environment and health Easily dismantled and recycled Reduced use of natural resources by encouraging recycling Extended product lifetime through easy upgrades Reduced solid waste production through take back policy Environmental Policy The product has been designed to enable proper reuse of parts and recycling and should not be thrown away at its end of life Users should contact the local...

Page 11: ...first gaming Notebook featuring XSplit Gamecaster live stream app MSI gaming notebook features XSplit Gamecaster the easiest live streaming and recording solution for gamers See the basic tutorial of XSplit Gamecaster Sound by Dynaudio on MSI Gaming Notebooks MSI partners with Dynaudio the Danish sound specialists in its gaming notebooks to present you an authentic fidelity audio performance Color...

Page 12: ...Notebook User s Manual 1 12 ...

Page 13: ...Introductions 2 Notebook User s Manual ...

Page 14: ...endability and customer satisfaction Unpacking First unpack the shipping carton and check all items carefully If any item contained is damaged or missing please contact your local dealer immediately Also keep the box and packing materials in case you need to ship the unit in the future The package should contain the following items Notebook Quick Start Guide AC DC adapter and AC power cord Optiona...

Page 15: ...the notebook It will help you to know more about the appearance of this notebook before using it Please be aware that the figures shown here are for reference only Top open View The figure of top open view and description shown below will lead you to browse the main operating area of your notebook ...

Page 16: ...the Num Lock function is activated 4 Touchpad This is the pointing device of the notebook 5 Quick Launch Buttons Use the quick launch buttons to activate the specific applications or tools The following quick launch buttons will only be functional in the operating system with the SCM application installed Find the SCM exe file in the optional all in one disk that comes with the package or download...

Page 17: ... application users will be able to own several combinations of keyboard hot keys defined separately for specific occasions Use this button repeatedly to switch between keyboard 1 layer 1 keyboard 2 layer 2 keyboard 3 layer 3 and keyboard 4 layer 4 recurrently 6 Power Button Power LED Power Power Button Use this button to turn the notebook power ON and OFF Use this button to awake the notebook from...

Page 18: ...ows when the battery is being charged Continuously blinking if the battery fails Always consult an authorized retailer or service center for purchasing or replacing an equivalent type of battery recommended by the manufacturer Battery LED goes out when it is fully charged or when the AC DC adapter is disconnected Drive Activity Indicator LED blinks when the system is accessing the internal storage...

Page 19: ...ive The actual device preinstalled in the notebook depends on the model you purchased 2 USB 3 0 Port USB 3 0 the SuperSpeed USB delivers the higher interface speeds for connecting various devices such as storage devices hard drives or video cameras and offers more advantages over high speed data transferring ...

Page 20: ... USB 3 0 Port Super Charger USB Port USB 3 0 the SuperSpeed USB delivers the higher interface speeds for connecting various devices such as storage devices hard drives or video cameras and offers more advantages over high speed data transferring Super Charger USB port provides faster power charging function for Apple devices when the notebook is in power off mode 3 Audio Port Connectors Microphone...

Page 21: ...or speakers or headphones Used for speakers or headphones The S PDIF connector is also provided for digital audio transmission to external speakers through an optical fiber cable 4 Card Reader The built in card reader supports various types of memory cards Check the Specifications in for details ...

Page 22: ... C exclusively designed by MSI supports Thunderbolt 3 optional DisplayPort and USB 3 1 connections with a single connector 4 RJ 45 Connector This connector is used to connect a LAN cable for network connection 5 Ventilator The ventilator is designed to cool the system DO NOT block the ventilator for air circulation 6 HDMI Connector HDMI High Definition Multimedia Interface technology is the indust...

Page 23: ...tion 2 Subwoofer Speaker The subwoofer speaker is to reproduce low pitched audio frequencies known as bass 3 Battery Reset Hole Whenever the system firmware EC is upgraded or the system hangs please 1 power off the notebook 2 connect the AC power 3 use a straightened paperclip to insert this hole and reset the notebook 4 power on the notebook ...

Page 24: ...o ensure that the keyboard will be functional properly it is a must to install SCM application before using the keyboard function keys Windows Key You can find the Windws Logo key on the keyboard which is used to perform Windows specific functions such as opening the Start menu and launching the shortcut menu ...

Page 25: ...o launch the User Defined application ECO Engine Power Saving Press Fn and F5 keys repeatedly to switch among various power saving modes provided by ECO Engine or to turn this function off recurrently Webcam Press Fn and F6 keys to turn the Webcam function on Press again to turn it off Webcam is turned off under default settings Shift Press Fn and F7 keys to switch among Sport Comfort Green modes ...

Page 26: ...ut mode between the LCD external monitor and both Use Multiple Monitors If users connect an additional monitor to the notebook the system will automatically detect the external monitor connected Users will be allowed to customize the display settings Connect the monitor to the notebook Press and hold the Windows key and then press P key to bring up Project Select how you want your display to proje...

Page 27: ... Adjust the Sound Level of the Speaker Increase the built in speaker s volume Decrease the built in speaker s volume Mute the built in speakers Adjust the Brightness Level of the Keyboard Backlight LED Increase the brightness level of the keyboard backlight LEDs Decrease the brightness level of the keyboard backlight LEDs ...

Page 28: ...ience Refer to the Notebook Software Application Manual for detailed instructions True Color optional Press and hold the Fn key and then press the Z key to launch the True Color application True Color Selections optional Press and hold the Fn key and then press the A key to change different view modes Video How to Use Fn Buttons Watch the instruction video at https www youtube com watch v u2EGE1rz...

Page 29: ...the product user purchased Physical Characteristic Dimension 428 W x 249 D x 48 H mm Weight 3 85kg with battery CPU Package FCBGA CPU Processor Type Intel Quad Dual Core Mobile Processor L3 Cache Up to 8MB Based on CPU Core Chip Platform Controller Hub Intel PCH H Memory Technology DDR4 2133 2400MHz Memory DDR4 SO DIMM slots x 4 8G 16G DDR4 SDRAM Maximum Up to 64GB Power AC DC Adapter 230W 19 5V I...

Page 30: ...Supported I O Port USB x 6 version 3 0 x 1 SuperPort Type C optional Mic in x 1 Headphone out x 1 S PDIF Out supported Side out x 1 Line in x 1 RJ45 x 1 HDMI x 1 v1 4 Mini DisplayPort x 1 v1 2 Card Reader x 1 SD4 0 MMC The supported memory cards may vary without notice Communication Port LAN 10 100 1000Mb Ethernet Wireless LAN Bluetooth optional M 2 type Display LCD Type 17 3 LED panel Brightness ...

Page 31: ...ics NVIDIA GeForce discrete MXM graphics card or Intel HD UMA graphics card VRAM 3 4 6 8GB based on GPU structure Webcam CMOS Camera FHD Audio Internal Speaker 2 speakers 1 subwoofer Sound Volume Adjusted by keyboard hot key and switches ...

Page 32: ...2 20 Notebook User s Manual 2 20 ...

Page 33: ...How To Get Started 3 Notebook User s Manual ...

Page 34: ...3 2 Notebook User s Manual Begin to Use the Notebook For a new user of this notebook we would like to suggest you follow the illustrations below to begin to use the notebook ...

Page 35: ...the work area Choose a chair and desk with good ergonomics and adjust their heights according to your posture Adjust the backrest to support your lower back comfortably when you are sitting upright Place your feet flat on the floor with your knees bent to a 90 degrees Adjust the angle position of the LCD panel to have an optimal view Stretch and relax your body regularly Always take a break after ...

Page 36: ...ng off the system when the notebook is going to be left unused for a longer time Battery When you get a new notebook or a new notebook battery it is important to know how to charge and care for your battery in order to get the most out it for as long as you can Be aware of that the battery may not be replaced by users Safety guidelines Danger of explosion if battery is incorrectly replaced Replace...

Page 37: ... Please pay attention to the following tips before recharging the battery If a charged battery pack is not available save your work and close all running programs and shut down the system Plug in an AC DC adapter You can use the system suspend system operation or shut down and turn off the system without interrupting the charging process The Li ion or Li polymer battery has no memory effect It is ...

Page 38: ... icon in the lower left corner of the screen Right click it to show selection menu Select Power Options in the menu 2 Choose a Power Plan by left clicking on one of the selections from the Power Plan list The Power Plan of Balanced is selected as an example here Click on the Change plan settings to the right of the power plan to customize a power plan 3 Choose the sleep and display settings you wa...

Page 39: ...How To Get Started 3 7 ...

Page 40: ... refer to the section of System Control Manager SCM in the Notebook Software Application Manual for details 1 Select Power Options in the menu Click Create a power plan in the left pane 2 Select an existing plan that meet your needs most and give the plan a name Click Next to continue 3 Change the settings for the new power plan Click Create to make the customized power plan taking effect 4 Now yo...

Page 41: ...How To Get Started 3 9 ...

Page 42: ...pe moving speed and other advanced features of the cursor on the screen To configure the touchpad you can use the standard Microsoft or IBM PS 2 driver in your Windows operating system The Mouse Properties in Control Panel allows you to change the configuration Position and Move Place your finger on the touchpad usually using the forefinger and the rectangular pad will act as a miniature duplicate...

Page 43: ... your finger from the touchpad to drop the item into place Alternately you can press and hold the left button when you select an item and then move your finger to the desired location finally release the left button to finish the drag and drop operation About HDD and SSD This notebook may be equipped with hard disk drive HDD or solid state drive SSD depending on the models users purchased The hard...

Page 44: ...shown here are for reference only 1 Confirm that the notebook is turned on 2 Press the eject button on the panel and the disc tray will slide out partially 3 Gently pull the tray out until fully extended 4 Place the disc in the tray and confirm the disc is placed correctly Slightly press the center of the disc to secure it into place 5 Push the tray back into the drive ...

Page 45: ...on Wireless LAN Connection 1 Go to the desktop Find the LAN icon in the lower right corner of the task bar and click on it to unfold the Network settings menu 2 There are Wi Fi and Airplane mode two options in the Network settings select Wi Fi here 3 Choose one Wireless LAN connection from the network list to connect to the Internet Click Connect to continue 4 A security key may be required for co...

Page 46: ... mode is turned off 1 Go to the desktop Find the LAN icon in the lower right corner of the task bar and click on it to unfold the Network settings menu 2 Check if Wireless LAN mode is available in the Network settings 3 Or find the SCM icon in the lower right corner of the task bar and click on it to bring out the main window of System Control Manager please checkif Wireless LAN mode is turned on ...

Page 47: ... Find the LAN icon in the lower right corner of the task bar and then right click on it to select Open Network and Sharing Center 2 Choose Change adapter settings 3 Right click on Ethernet to select Properties from the drop down menu 4 In the Ethernet Properties window select Networking tab and check Internet Protocol Version 4 TCP IPv4 Then click Properties to continue 5 Select General tab click ...

Page 48: ...3 16 Notebook User s Manual ...

Page 49: ...click on it to select Open Network and Sharing Center 2 Select Set up a new connection or network under Change your networking settings 3 Select Connect to the Internet and then click Next 4 Click Broadband PPPoE 5 Fills User name Password and Connection name fields Then click Connect Troubleshoot problems Open Network and Sharing Center ...

Page 50: ...3 18 Notebook User s Manual ...

Page 51: ...ow the previous steps 1 to 4 in Dynamic IP PPPoE Connection 2 Select General tab and click Use the following IP address and Use the following DNS server addresses You will be asked to fill the IP address Subnet mask and Default gateway and then click OK ...

Page 52: ...ff Before setting up a Bluetooth connection make sure that Airplane mode is turned off 1 Go to the desktop Find Windows icon in the lower left corner of the screen and click on it 2 Select Settings and then go to Devices Bluetooth to check if the Bluetooth connection is available 3 Switch On the Bluetooth connection if it is set to Off 4 Or find the SCM icon in the lower right corner of the task b...

Page 53: ...How To Get Started 3 21 ...

Page 54: ...the Bluetooth icon in the lower right corner of the task bar and click on it 2 Choose Add a Bluetooth Device 3 Select one Bluetooth connection from the network list 4 Click Pair to continue 5 Match the passcode between the notebook and the selected Bluetooth device click Yes to finish ...

Page 55: ...How To Get Started 3 23 ...

Page 56: ...o connect diverse peripheral devices to the notebook To connect these devices refer to the instruction manuals of each device first and then connect the device to the notebook This notebook is capable to auto detect the connected devices and if there is no detection of the devices please manually enable the devices by going to Start Menu Control Panel Hardware and Sound Add a device to add the new...

Page 57: ...ls RAID allows users to store data on multiple hard disk drives or solid state drives Contact the local dealer for further and correct information and be noted that the supported RAID functions may vary depending on the models users purchased Watch the instruction video at https youtu be u2C35 ctFbw YouTube Youku ...

Page 58: ... appears press the DEL key immediately and enter the BIOS menu 2 Move the cursor to Boot tab and select Boot mode select in Boot Configuration 3 For operating systems support UEFI based BIOS Windows 10 and Windows 8 1 it is suggested to select UEFI 4 For Windows 7 or previous versions of Windows select Legacy mode ...

Page 59: ...tore Windows 10 Operating System on MSI Notebooks Watch the instruction video at https www youtube com watch v hSrK6xAQooU to restore the Windows 10 operating system by using F3 Recovery and Windows 10 Settings when it is needed YouTube Youku ...

Page 60: ...installer application allows users to efficiently install all needed drivers on MSI notebooks with single click Watch the instruction video at Windows 10 8 1 https www youtube com watch v ERItRaJUKQs Windows 7 https www youtube com watch v 43lnM4m 500 YouTube Youku Windows 10 8 1 YouTube Youku Windows 7 ...

Page 61: ...How To Get Started 3 29 ...

Page 62: ...3 30 Notebook User s Manual ...

Reviews: