9
Overview of Components
Overview of Components
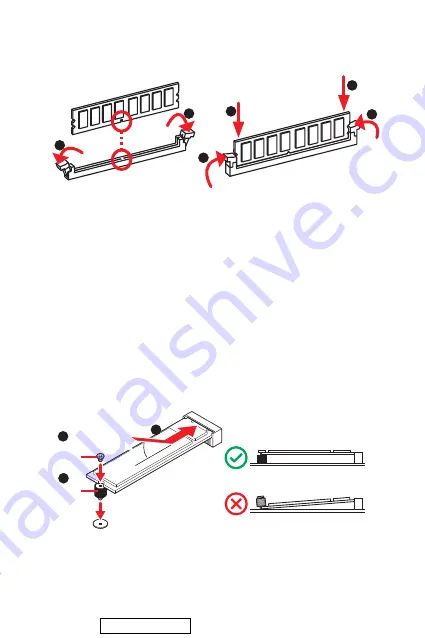
DIMM Slots
Please install the memory module into the DIMM slot as shown below.
1
1
2
3
3
2
⚠
Important
∙
Always insert memory modules in the DIMMA1 slot first.
∙
To ensure system stability for Dual channel mode, memory modules must be of the
same type, number and density.
∙
Some memory modules may operate at a lower frequency than the marked value
when overclocking due to the memory frequency operates dependent on its Serial
Presence Detect (SPD). Go to BIOS and find the DRAM Frequency to set the memory
frequency if you want to operate the memory at the marked or at a higher frequency.
∙
It is recommended to use a more efficient memory cooling system for full DIMMs
installation or overclocking.
∙
Please refer www.msi.com for more information on compatible memory.
M2_1: M.2 Slot (Key M)
Please install the M.2 device into the M.2 slot as shown below.
1
3
Standoff
Supplied
M.2 screw
30º
30º
2
Downloaded from
Summary of Contents for H310M PRO-C
Page 22: ...2 ESD ESD ESD PSU PSU 60 C 140 F Downloaded from ManualsNet com search engine...
Page 82: ...2 60 C 140 F Downloaded from ManualsNet com search engine...
Page 88: ...8 MSI 1 4 6 5 7 8 9 3 2 Downloaded from ManualsNet com search engine...
Page 102: ...2 ESD ESD ESD 60 140 Downloaded from ManualsNet com search engine...
Page 122: ...2 ESD 60 C 140 F Downloaded from ManualsNet com search engine...
Page 142: ...2 ESD PC ESD ESD PC PC PC PC PC PC 60OC 140OF Downloaded from ManualsNet com search engine...


