background image


Go ld ar row

Corr ect CPU
pla ce me nt

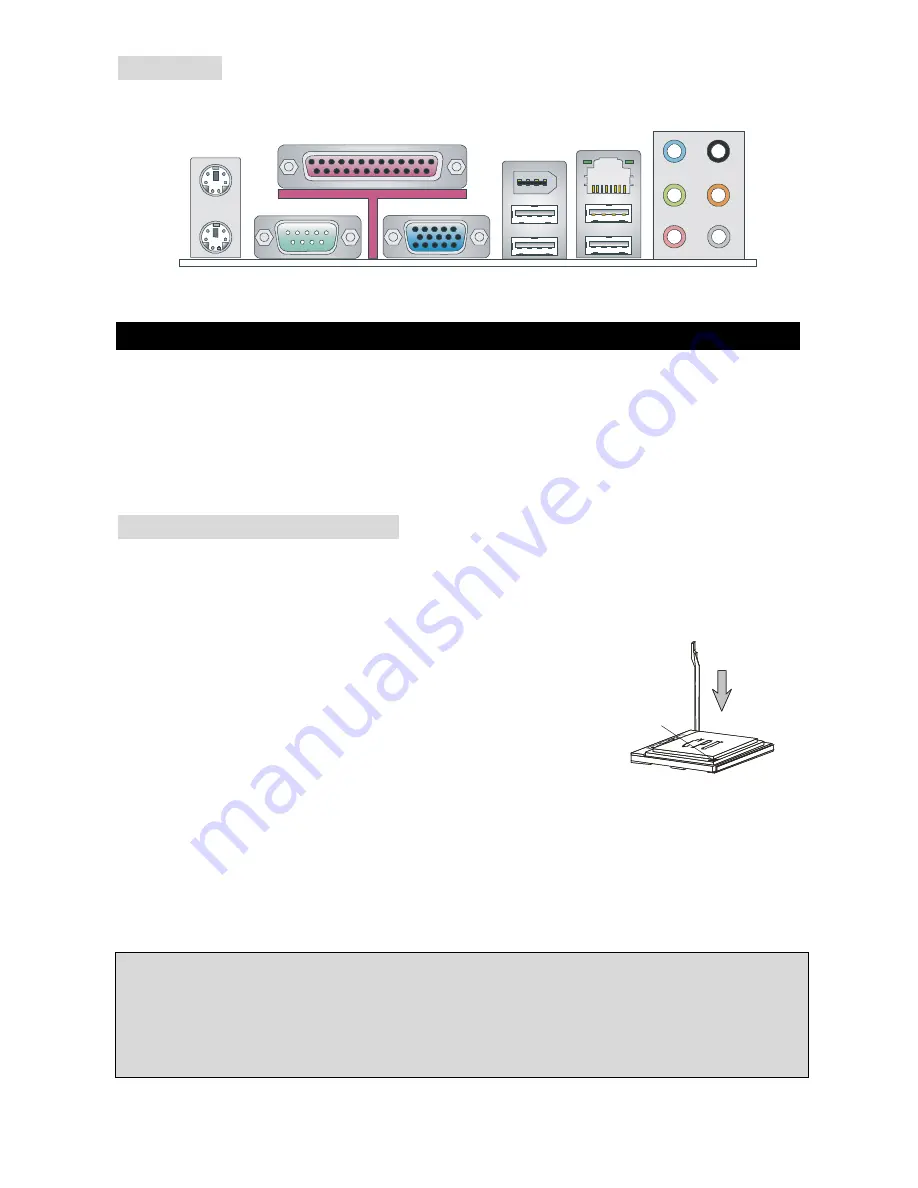
Rear Panel


The rear panel provides the following connectors:


COM port

Mouse

Keyboard

USB ports

Line ln

Line Out

MIC

VGA  port

Parallel

1394 port
(optional)

LAN

RS

CS

SS


Hardware Setup 

This chapter tells you how to install the CPU, memory modules, and expansion cards, as well as 

how to setup the jumpers on the mainboard. It also provides the instructions on connecting the 

peripheral devices, such as the mouse, keyboard, etc. While doing the installation, be careful in 

holding the components and follow the installation procedures. 

(For the latest information about CPU, please visit: 

http://global.msi.com.tw/index.php?func=cpuform) 

 
Central Processing Unit: CPU 

The mainboard supports AMD

®

 Athlon64 X2 / Athlon64 / Sempron processors. The mainboard 

uses a CPU socket called Socket AM2(940-pin) for easy CPU installation. 


CPU Installation Procedures for Socket AM2 

1. Please  turn  off  the  power  and  unplug  the  power  cord  before 

installing the CPU. 

2. Pull the lever sideways away from the socket.    Make sure to raise 

the lever up to a 90-degree angle. 

3. Look  for  the  gold  arrow  on  the  CPU. The  CPU  can  only  fit  in  the 

correct orientation. Lower the CPU down onto the socket. 

4. If the CPU is correctly installed, the pins should be completely embedded into the socket and 

can  not  be  seen.  Please  note  that  any  violation  of  the  correct  installation  procedures  may 

cause permanent damages to your mainboard. 

5. Press the CPU down firmly into the socket and close the lever. As the CPU is likely to move 

while the lever is being closed, always close the lever with your fingers pressing tightly on top 

of the CPU to make sure the CPU is properly and completely embedded into the socket. 


MSI Reminds You... 

Overheating 

Overheating will seriously damage the CPU and system; always make sure the cooling fan can 

work properly to protect the CPU from overheating. 

Overclocking 

Summary of Contents for K9N6PGM2 series

Page 1: ...e by one or more of the measures listed below 4 Reorient or relocate the receiving antenna 4 Increase the separation between the equipment and receiver 4 Connect the equipment into an outlet on a circ...

Page 2: ...t is a registered trademark of Microsoft Corporation Windows 98 2000 NT XP are registered trademarks of Microsoft Corporation NVIDIA the NVIDIA logo DualNet and nForce are registered trademarks or tra...

Page 3: ...erting any add on card or module 9 All cautions and warnings on the equipment should be noted 10 Never pour any liquid into the opening that could damage or cause electrical shock 11 If any of the fol...

Page 4: ...s la poubelle Les fabricants de ces quipements seront oblig s de r cup rer certains produits en fin de vie MSI prendra en compte cette exigence relative au retour des produits en fin de vie au sein de...

Page 5: ...al nmas iste i ile i birli i i erisinde olacakt r r nlerinizi yerel toplama noktalar na b rakabilirsiniz ESKY Z le n m na ochran ivotn ho prost ed spole nost MSI upozor uje Podle sm rnice Evropsk uni...

Page 6: ...vi Table of Content English 1 13 Deutsch 25 Fran ais 39 51 65 77 89...

Page 7: ...vii...

Page 8: ...ional desktop platform solution Layout ID E 1 JCI1 JS P I1 AT X 1 JAUD1 JCD1 JPW1 PCI _E1 CPUFAN1 PCI _E2 optional PCI2 PCI1 ALC883 861 RTL8201CL RT8211BL optional VIA VT6308P optional SATA1 SATA2 JBA...

Page 9: ...AN Supports 10 100 LAN by Realtek 8201CL K9N6SGM V K9N6VGM V Supports 10 100 1000 LAN by Realtek 8211BL GR K9N6PGM2 Audio 7 1 channel audio codec Realtek ALC888 optional 7 1 channel audio codec Realte...

Page 10: ...x Intel Front Audio pin head 1 x CD in connector 1 x SPDIF OUT connector Slots 1 PCI Express x16 slot K9N6PGM2 1 PCI Express x16 slot but only provides x8 bandwidth K9N6SGM V 1 PCI Express x1 slot 2...

Page 11: ...on CPU Installation Procedures for Socket AM2 1 Please turn off the power and unplug the power cord before installing the CPU 2 Pull the lever sideways away from the socket Make sure to raise the leve...

Page 12: ...ompound on CPU before installing the cooler for better heat dispersion Follow the steps below to install the CPU cooler correctly Wrong installation will cause the damage of your CPU mainboard 1 Posit...

Reviews: