background image

5

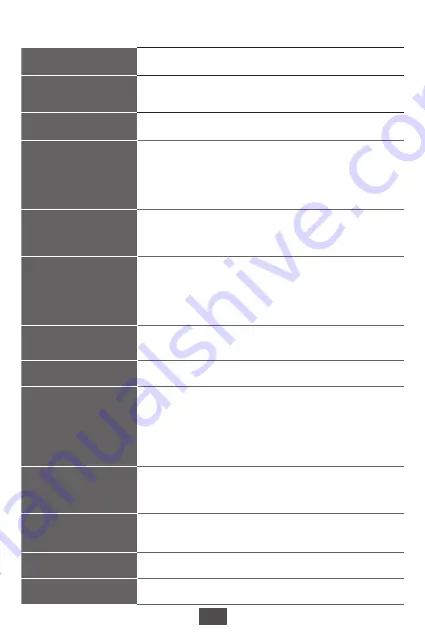
Specification / 產品規格

Size

尺寸

Mid-Tower

Touch Panel

觸控面板

4.3” LCD

Pixel & Definition: 480 x 800

Active Area: 95.04mm(H) x 53.86mm(V)

Pre-Installed Fan

預裝風扇

Front: 3x 140 mm ARGB fans

Rear: 1x 140 mm ARGB fan

Material

材質

Top Panel: Steel ( 鋼板 )

Chassis: Steel (SPCC 0.8 mm) ( 鋼板外框 )

Right Side Panel: Steel ( 右側鋼板 )

Left Side Panel: Tempered glass ( 左側強化玻璃 )

Front Bezel: P Mesh + Steel 

( 前面板 : 塑膠 + 防塵濾網 + 鋼板 )

Dust Filters

防塵濾網

Front, Top, Side: Metal vents + Magnetic frame dust filter ABS 

mesh( 前面、頂部、側邊金屬框 +ABS 磁性框防塵濾網 )

Bottom


removable


dust filter ABS mesh

( 底部 ABS 抽屜式磁性防塵濾網 )

Fan Support

支援風扇

Top: 3 x 120 mm / 3x 140 mm

Front: 3 x 120mm / 3 x 140mm

Rear: 1 x 120 mm / 1 x 140mm

Side: 3 x 120mm

(The side panel fans cannot be Installed simultaneously with 

E-ATX motherboard. 側板風扇與 E-ATX 主板無法同時安裝 )

Drive Bays

硬碟槽

2 x 2.5” SSD mounting brackets ( 2.5” SSD 安裝支架 )

2 x 3.5” drive bays ( 3.5”硬碟槽 )

Expansion Slots

擴充槽

Supports 7 expansion slots ( 支援 7 個擴充槽 )
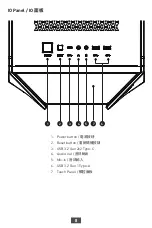
IO Panel

IO 面板

1 x Power button/ 電源按鈕

1 x Reset button / 重新開機按鈕

1 x USB 3.2 Gen 2x2 Type-C

1 x Audio-out / 音訊輸出

1 x Mic-in / 音訊輸入

2 x USB 3.2 Gen1 Type-A 

1 x Touch Panel / 觸控面板

Radiator Support

支援水冷排

Top: 120 / 140 / 240 / 280 / 360 mm 

Front: 120 / 140 / 240 / 280 / 360 mm

Rear: 120 / 140mm 

Side: 120 / 240 / 360 mm

Clearance

空間

CPU Cooler Height (CPU 散熱器高度 ): Max 185 mm ( 7.28 inch)

Graphics Card Length ( 顯示卡長度 ): Max 400 mm (15.75 inch)

PSU Length ( 電源供應器長度 ): Max 220 mm (8.66 inch)

Case Dimensions

機殼尺寸

585(D) x 257(W) x 537(H) mm

23.03 (D) x 10.12 (W) x 21.14 (H) inch

Motherboard Support

支援主機板

E-ATX


(up to 310mm x 304.8mm) / ATX / Micro-ATX / Mini-ITX

Summary of Contents for MEG PROSPECT 700R

Page 1: ...MEG PROSPECT 700R PC Case User Guide...

Page 2: ...l Removal 12 Water Cooling Radiator Installation 13 Back Cable Cover Replacement 16 E ATX Motherboard Bracket Replacement E ATX 17 Motherboard Installation 18 Horizontal Graphics Card Installation 19...

Page 3: ...graphics card holder Screw M3 5mm x29 Motherboard SSD PCIe riser cable SSD PCIe Screw 6 32 5mm x6 Securing E ATX motherboard bracket E ATX Screw 6 32 6mm x8 PSU PCIe card PCIe Screw 6 32 6mm x2 HDD S...

Page 4: ...phics card holder kit x1 Installing graphics card Back cable cover x1 Replacing the side fan bracket E ATX motherboard bracket E ATX x1 Securing E ATX motherboard E ATX Support E ATX motherboard up to...

Page 5: ...3 x 120mm The side panel fans cannot be Installed simultaneously with E ATX motherboard E ATX Drive Bays 2 x 2 5 SSD mounting brackets 2 5 SSD 2 x 3 5 drive bays 3 5 Expansion Slots Supports 7 expans...

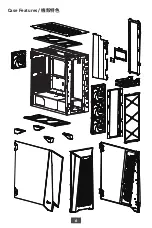
Page 6: ...6 Case Features...

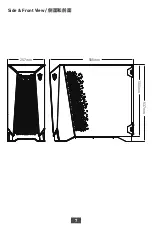
Page 7: ...7 585mm 257mm Side Front View 537mm 500mm...

Page 8: ...8 IO Panel IO 1 2 3 4 5 7 6 1 Power button 2 Reset button 3 USB 3 2 Gen 2x2 Type C 4 Audio out 5 Mic in 6 USB 3 2 Gen 1 Type A 7 Touch Panel...

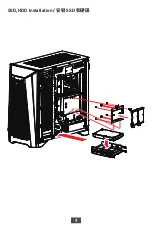
Page 9: ...9 SSD HDD Installation SSD 45...

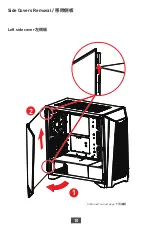
Page 10: ...10 Side Covers Removal Continued on next page Left side cover 1 2...

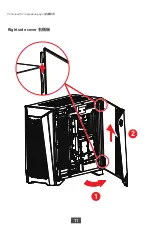
Page 11: ...11 Continued from previous page Right side cover 1 2...

Page 12: ...12 Front Bezel Removal Remove the left and right side covers first before opening the front bezel...

Page 13: ...Cooling Radiator Installation Continued on next page Top water cooling radiator Note Water cooling radiators must be purchased separately For more information please refer to water cooling radiator us...

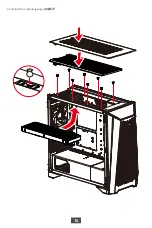
Page 14: ...14 Continued from previous page...

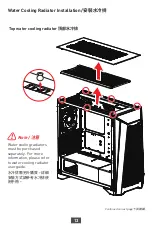
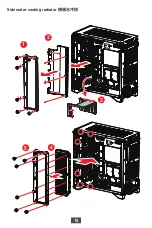
Page 15: ...15 Side water cooling radiator 2 1 3 4 5...

Page 16: ...16 2 1 Back Cable Cover Replacement Side fan bracket Securing liquid cooling radiator or system fan Back cable cover...

Page 17: ...17 2 1 3 E ATX Motherboard Bracket Replacement E ATX Front cable cover Cable management E ATX motherboard bracket Support E ATX motherboard up to 310mm x 304 8mm E ATX E ATX 310mm x 304 8mm...

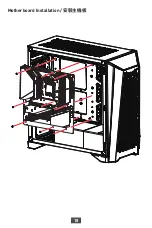
Page 18: ...18 Motherboard Installation...

Page 19: ...19 Horizontal Graphics Card Installation...

Page 20: ...20 1 2 3 3 Vertical Graphics Card Installation Continued on next page...

Page 21: ...21 Continued from previous page 4 7 6 9 8 5 Connect to motherboard PCIe Riser Cable must be purchased separately PCIe...

Page 22: ...22 PSU Installation 1 2...

Page 23: ...23 Cable Connection SATA Power JAUD1 HDAUDIO JUSB USB 3 2 Gen2 JUSB USB 3 2 Gen1 JFP1...

Page 24: ...n PWM fan Please make sure all cables are properly connected before turning the power on 128 LED 4 pin PWM Motherboard JRAINBOW JARGB Gen2 PSU SATA Power Motherboard JUSB Control Board Motherboard SYS...

Page 25: ...nd customize the touch panel by using MSI Center MSI Center MSI Center User Guide MSI Center If you would like to know more information about MSI Center please refer to http download msi com manual mb...

Page 26: ...26 Touch Panel Interface Setting Sync Mode Sync Mode Panel Controls ARGB and Fans with touch panel Sync Mode MSI Center MSI Center Controls ARGB and Fans with MSI Center Tap to set Sync Mode...

Page 27: ...e Motherboard In Sync with motherboard settings Note When Sync Mode MSI Center and Sync Mode Motherboard are enabled ARGB and Fans will be grayed out and can only be set in MSI Center MSI Center ARGB...

Page 28: ...Color Select page Tap to set ARGB ARGB Setting Fans Tap to set fans Note The adjustable fan speed is subject to the limitations of the fan MSI Center provides advanced settings for your fans Download...

Page 29: ...n choose from 3 default animations or upload your own animation in MSI Center Please note that animations should be in mp4 format and should not exceed 5 minutes in length When Sleep mode is set ON th...

Page 30: ...30 Setting Weather Please Install MSI Center to enable functions MSI Center Tap any space on the screen to display home button Tap to set Weather...

Page 31: ...31 Setting Clock Please Install MSI Center to enable functions MSI Center Tap to set Clock Tap to access Clock Style page Setting Temp Tap to set Temp Tap to switch the unit...

Page 32: ...32 Error Message Note Please turn off the system if the above error message appears Then check to make sure that SATA power and USB cables are connected properly before turning the system on SATA USB...

Reviews: