background image

2 5

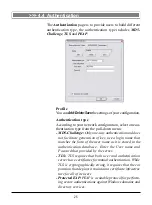
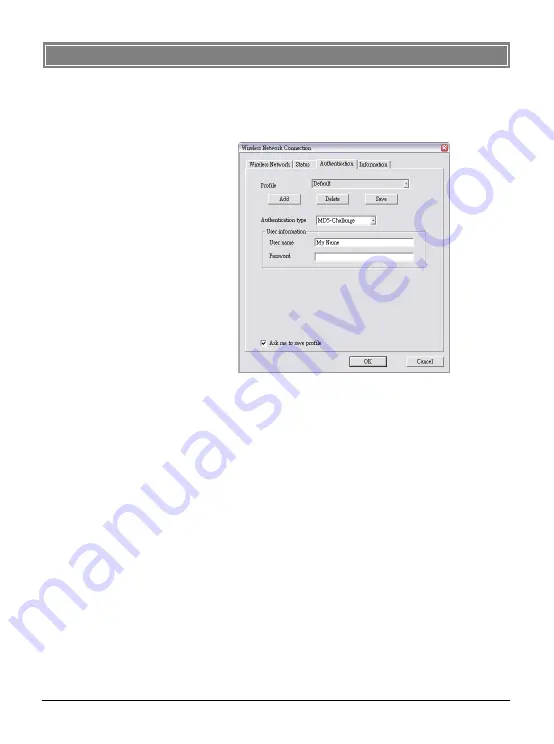
Profile

You can 

Add

/

Delete

/

Save

 the settings of your configuration.

Authentication type

According to your network configuration, select one au-
thentication type from the pull-down menu:

- MD5-Challenge:

 Only one-way authentication and does

not facilitate generation of key, use a login name that
matches the form of the user name as it is stored in the
authentication database.  Enter the User name and
Pasword that provided by the server.

- TLS:

 TLS requires that both user and authentication

server have certificates for mutual authentication. While
TLS is cryptographically strong, it requires that the cor
poration that deploys it maintain a certificate infrastruc
ture for all of its users

- Protected EAP:

 PEAP is a suitable protocol for perform-

ing secure authentications against Windows domains and
directory services.

The 

Authentication

 page is to provide users to build different

authentication type, the authentication type includes 

MD5-

Challenge

TLS

 and 

PEAP

.

>>> 4.4  Authentication

Summary of Contents for MS-6852

Page 1: ...i MSI PC54GBT MS 6852 Wireless 11g Bluetooth Combo PCI Card User s Guide ...

Page 2: ...ion with any other antenna or transmitter 4 Changes or modifications to this unit not expressly approved by the party responsible for compliance could void the user authority to operate the equipment Copyright Notice The material in this document is the intellectual property of MICRO STAR INTERNA TIONAL We take every care in the preparation of this document but no guarantee is given as to the corr...

Page 3: ...s and warnings on the equipment should be noted 6 Never pour any liquid into the opening that could damage or cause electrical shock 7 If any of the following situations arises get the equipment checked by a service personnel Liquid has penetrated into the equipment The equipment has been exposed to moisture The equipment has not work well or you can not get it work according to User s Manual The ...

Page 4: ... Chapter 4 Wireless Network Utility describes the MSI Wireless Network Utility that lets you configure your product to connect the network quickly and easily Chapter 5 Networking Basic helps you to build your network and share resources over the network Please note that the setting diagrams or values in this guide are FOR YOUR REFER ENCE ONLY The actual settings and values depend on your system an...

Page 5: ...evice which can serve as a trans mitter when you are establishing a Bluetooth connection It is the solution for the seamless integration of Bluetooth technol ogy into personal computers enabling short range wireless con nections between desktop notebook PCs Bluetooth enabled peripheral devices such as printers faxes etc portable handheld devices and connectivity to the Internet PC54GBT is availabl...

Page 6: ...ommunications session Users in the network can share files print to a shared printer and access the Internet with a shared modem In this kind of network new devices can be quickly added however users can only communicate with other wireless LAN comput ers that are in this wireless LAN workgroup and are within range 1 2 How PC54GBT Works In WLAN Environment 1 2 1 PC54GBT WLAN Bluetooth Combo PCI Ca...

Page 7: ...width utilization Addi tionally the Access Point enables users on a wireless LAN to access an existing wired network allowing wireless users to take advantage of the wired networks resources such as Internet email file transfer and printer sharing The scale and range of the Infrastructure networking are larger and wider than that of the Ad hoc networking Wireless enabled notebook PC PC54GBT WLAN B...

Page 8: ...nd device accepts or rejects the connection The originator of the request is known as the client The device that accepts or rejects the request is known as the server Many Bluetooth devices can act as both client and server Every Bluetooth device that provides a service must be prepared to respond to a connection request Bluetooth soft ware is always running in the background on the server ready t...

Page 9: ... Dimension 120 x 83 2mm Raw Data Rates and Modulation Types IEEE802 11b Auto Fallback CCK 11 and 5 5Mbps DQPSK 2Mbps DBPSK 1Mbps IEEE802 11g Auto Fallback OFDM 54 48 36 24 18 12 9 6Mbps Frequency and Channels 2 4 2 4835 GHz 14 channels Communication Protocol DSSS Direct Sequence Spread Spectrum with ACK Half Duplex Access Method Infrastructure Mode Station To LAN Architecture Ad Hoc Mode Station T...

Page 10: ...age TBD Connection Interface USB connector Throughput Around 723 Kbps data channels Operating Voltage 5V from USB interface Spread Spectrum FHSS Frequency Hopping Spread Spectrum Frequency 2 4 2 4835 GHz Output Power 4dBm max Bluetooth Specification ...

Page 11: ...ght to indicate PC54GBT is installed correctly and power inputted WLAN LNK ACT indicating the wireless status OFF no wireless connection Blink ing PC54GBT is receiving transmitting data over the wireless network BT LNK ACT indicating the bluetooth status OFF no bluetooth connection Blinking PC54GBT is receiving transmitting data over the bluetooth connection Wireless LAN Connector Bluetooth Connec...

Page 12: ...able Then remove the computer s chassis to locate the communication PCI slot the ORANGE one on your mainboard Put the PC54GBT directly over the PCI slot and press it into the slot firmly Connect one end of the USB cable to PC54GBT and the other end to the mainboard STEP1 1 1 1 1 STEP2 2 2 2 2 NOTE DO NOT hold your PC54GBT on the golden fin ger while installing doing this may cause interference or ...

Page 13: ...omputer s chassis after securing the PC54GBT with a bracket screw Connect the external antenna to the connectors Bluetooth and WLAN on the PC54GBT s bracket If your are not skilled at installing the PCI adapter please ask the vendor or an experienced technician for help Connecting the external antenna Bluetooth and WLAN connectors Connect to PC54GBT Connect to mainboard ...

Page 14: ...the Windows Setup CD at hand before installing the driver because the sys tem will ask you to insert the Setup CD to copy files during the installation Please NOTE that your PC54GBT should be installed into your computer before installing the driver and utility Then the operating system will detect a new device and start to con figure the new device Click Cancel here to start installation from the...

Page 15: ...to launch the Setup program manually The main screen of Setup program will appear as below 1 Click the Install WLAN Driver button 2 The welcome screen of InstallShield Wizard appears Click Next 3 Read and accept the License Agreement then click Next 4 Click Install and the program will copy the necessary files to the system The progress indicator shows the installing status 5 Click Finish when the...

Page 16: ...the driver in the default destination folder 5 Click Install and the program will copy the necessary files to the system The progress indicator shows the installing status 6 Click Finish when the bluetooth driver installation is completed Wireless LAN icon STEP3 3 3 3 3 STEP4 4 4 4 4 Click the Exit button The Wireless LAN icon and Bluetooth icon will appear in the status bar Bluetooth icon ...

Page 17: ...onvenient and powerful utility that allows you to set up configure and know your networking status easily and clearly 4 1 Introduction The MSI Wireless LAN icon Not connected to the network Connected to the network Receiving transmitting data from to the network When you move the mouse over the icon it shows the current connection information 4 1 1 4 ...

Page 18: ...itch to Gateway Mode optional If your MSI wireless LAN adapter supports Software Gateway function you can see this item in the sub menu and which allows you to use your MSI wireless adapter as a virtual gateway For details refer to the MSI Software AP Gateway User s Guide Open Network Connections Select to open the Network Connections window View Available Wireless Networks Launch the utility to c...

Page 19: ...ur MSI wireless adapter it is recommended to use the MSI Wireless Network Utility to control your wireless LAN Click Double click To change the control setting 1 Right click the MSI Wireless LAN icon and select the Open Network Connections option 2 In the Network Connections window double click the Wireless Network Connection icon to bring up the following dialog window ...

Page 20: ...e Properties window will appear as below 4 Uncheck the Use Windows to configure my wireless network settings option Then click OK 5 Now you can use MSI Wireless Network Utility to configure your network Uncheck this option Click ...

Page 21: ...ess net work you are configuring requires that you authenticate using your personal credentials check Authenticate using profile and select the profile to use for authentication from the drop down list at the right You must have already configured a profile appropriate for authenticating onto this network When you check Authenticate using profile MSI utility performs an 802 1X authentication using...

Page 22: ...want and then click Configure to set up the selected network You can click Refresh to search the available Access Points in the network again Click 3 Setup the Network Key if needed in the Wireless Network Key WEP field according to the network s settings Only the network administrator can change the SSID and WEP settings in the Association window if you have problem of accessing the network pleas...

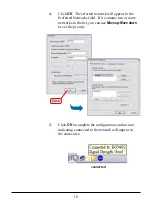
Page 23: ...r in the Preferred Networks field If it contains two or more networks in the list you can use Move up Move down to set the priority 5 Click OK to complete the configuration and an icon indicating connected to the network will appear in the status area Click ...

Page 24: ...ble wireless adapter If you want to use the network in Ad hoc mode All the computers connected should be set to Ad hoc mode The computers have the same SSID network name setting To configure the settings 1 Click the MSI Wireless LAN icon to bring up the Wireless Network Connection window Then click Advanced Click Click ...

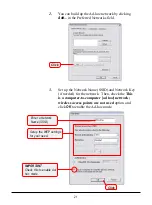
Page 25: ...to computer ad hoc network wireless access points are not used option and click OK to enable the Ad hoc mode 2 You can build up the Ad hoc network by clicking Add in the Preferred Networks field Click Enter a Network Name SSID IMPORTANT Check this to enable Ad hoc mode Setup the WEP settings for your need Click ...

Page 26: ...ated administrator of the network Any computer can access the network by selecting Connect in the Wireless Network Connection window connected 5 Click OK to complete the configuration and an icon indicating connected to the network appears in the status area Click Select ...

Page 27: ...ransfer speed for best perfor mance and longest range automatically Radio Set to On to activate the radio SSID Means Service Set Identifier a unique name shared among all points in a wireless network It must be identical for all points in the network Then the card will be able to connect to an access point with the same SSID Click Advance and you can get more information about the LAN traffic stat...

Page 28: ...tions are Long It is set to 144 bits Short It is set to 72 bits Auto The card supports an auto detection feature it will automatically select the Preamble Type depending on the Access Point Preamble Type if this option is selected Country Display the country that you are in read only Power save The card will turn into power save mode when idle Band Display the information of current band It is not...

Page 29: ...er name and Pasword that provided by the server TLS TLS requires that both user and authentication server have certificates for mutual authentication While TLS is cryptographically strong it requires that the cor poration that deploys it maintain a certificate infrastruc ture for all of its users Protected EAP PEAP is a suitable protocol for perform ing secure authentications against Windows domai...
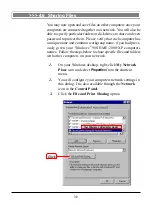
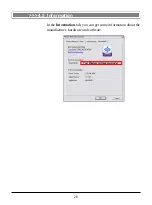
Page 30: ...26 In the Information tab you can get some information about the manufacturer hardware and software 4 5 Information Your Wireless LAN adapter model ...

Page 31: ... elements are required for all computers if you want to connect to a network Client for Microsoft Network TCP IP File and printer sharing for Microsoft Networks To check the required elements are installed in the system you can 4 1 Checking the Network Elements Under Windows 98SE ME 1 Click Start and choose Settings then click Control Panel to open the Control Panel window 2 Double click the Netwo...

Page 32: ...ction icon to open the Network Connection window 3 Right click the Wireless Network Connection icon and click Properties from the shortcut menu 4 The Wireless Network Connection Properties window appears to show the current network settings of the system Check the required elements from this field Your Wireless LAN adapter model ...

Page 33: ...the computer In the Computer name box This will be the name of this computer used by other computers on your network to communicate with Please NOTE that each computer s name must be unique on a particular network to avoid confusion 3 Type the workgroup name that the computer will belong to in the Workgroup box All the computers on your network should have an identical Workgroup name 4 The Compute...

Page 34: ...uter Name tab Under Windows 2000 XP 1 Right click My Computer icon on your Windows desktop and click Properties from the shortcut menu Right click Select Your computer s name Your computer will belong to this workgroup Enter some information for reference ...

Page 35: ...rs as below Enter a Computer Name select Workgroup and enter the name of your workgroup Please NOTE that each computer s name must be unique on a particular network to avoid confusion 5 Click OK to save changes Enter a name for your computer less than 15 characters without space Enter the name of the workgroup ...

Page 36: ...ted Subnet Mask is 255 255 255 0 Under Windows 98SE ME 1 Go to Start Settings Control Panel 2 Double click the Network icon 3 The Network window appears as below Select TCP IP your Wireless LAN adapter model and click Properties to bring up the TCP IP Properties window Select this When the drivers are installed the default setting here is set to obtain IP dynamically through a DHCP server If you w...

Page 37: ...33 Check this Enter a fixed IP address and Subnet Mask 5 Click OK Then click Yes when prompted to reboot the computer 4 a Configuring a dynamic IP address 4 b Configuring a fixed IP address Check this ...

Page 38: ...nder Windows 2000 XP 1 Click Start and choose Control Panel to open the Control Panel window 2 Double click the Network Connection icon to open the Network Connection window 3 Right click the IEEE802 11g Wireless PCI Adapter icon and click Properties from the shortcut menu 4 When the Wireless Network Connection Proper ties window appears choose General tab and select Internet Protocol TCP IP and c...

Page 39: ...35 Check this 6 Click OK to complete the configuration 5 a Configuring a dynamic IP address 5 b Configuring a fixed IP address Enter a fixed IP address and Subnet Mask Check this ...

Page 40: ...inipcfg here 3 The IP Configuration screen will appear click More Info to bring up a screen containing detail information of your wireless network adapter Check the configuration of IP Address Subnet Mask and Default Gateway are correct 4 4 Checking TCP IP Address Your Wireless LAN adapter model ...

Page 41: ...ask and Default Gateway are correct Under Windows 2000 XP 1 Go to Start Run 2 Type cmd in the Open box and click OK 3 A DOS prompt window appears Type ipconfig all and press Enter to display IP information Type cmd here Your Wireless LAN adapter model ...

Page 42: ...ows 2000 XP in the Open box and click OK 3 A DOS prompt window appears Type ping 210 59 147 160 or any URL address which is the IP address of the Gateway in this case and press Enter You will get reply if the pinging is successful 4 5 Checking Connection by Pinging ...

Page 43: ...ou had previ ously given your Windows 98SE ME 2000 XP computers names Follow the steps below to share specific files and folders with other computers on your network 1 On your Windows desktop right click My Network Place icon and select Properties from the shortcut menu 2 You will configure your computers network settings in this dialog It is also available through the Network icon in the Control ...

Page 44: ...hich means you can share a folder that both you and your family member colleague needs to access occasionally You can also share your CD ROM drive for others to use if your other computers do not have one Both of these processes are the same Only the disk drives and folders that you specifically identify as shared will be accessible to other computers on your network 8 Locate the disk drive or fol...

Page 45: ... field is optional which can be used to further de scribe the disk drive or folder for others in the network Access Type This option allows you to designate how much someone else can do with this shared disk drive or folder Setting options are Read Only only allows others to look at or open the files in the disk drive or folder Full allows others to read write open save copy move and even delete f...

Page 46: ...o so by double clicking the My Network Place icon on your Windows desktop or inside Windows Explorer 13 Navigate to the computer with the shared disk drive or folder recognized by the Computer Name you provided and double click it If you specified a password when sharing this disk drive or folder you will be asked for the password 14 You can access a disk drive of folder shared over the network fr...

Reviews: