background image

3-16

MS-7276  Mainboard

 Energy Lake Feature (optional,  only for ICH8DH)

This item  allows you to enable Intel

Energy Lake

 Technology which can support

Viiv feature to turn on and turn off the computer instantly.

 ACPI Function

This item  is to activate the ACPI (Advanced Configuration and Power Management
Interface) Function. If your operating system is ACPI-aware, such as W indows 2000/
XP, select [Yes].

 ACPI Standby State

This  item specifies the  power saving  modes for ACPI  function.  If  your  operating
system supports ACPI, such  as W indows 2000/ XP ,  you can choose to enter the
Standby mode in S1(POS) or S3(STR) fashion through the setting of this field.  Set-
tings are:

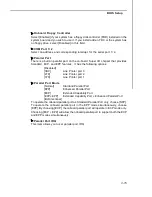
[S1/POS]

The  S1  sleep  mode  is  a low  power  state. In  this  state, no
system context is lost (CPU or chipset) and hardware main-
tains all system context.

[S3/STR]

The  S3  sleep  mode  is  a  lower  power  state  where  the  in
formation of system configuration and open applications/files
is saved  to  main memory that  remains powered while  most
other  hardware  components  turn  off  to  save  energy.  The

Power Management Setup

Important

S3-related  functions described  in this section are available only when your
BIOS supports S3 sleep mode.

Summary of Contents for MS-7241

Page 1: ...i G965MDH Q965MDO Series MS 7276 V1 X Mainboard G52 72761X1...

Page 2: ...Intel Corporation PS 2 and OS 2 are registered trademarks of International Business Machines Corporation Windows 95 98 2000 NT XP are registered trademarks of Microsoft Corporation Netware is a regis...

Page 3: ...lace the power cord such a way that people can not step on it Do not place anything over the power cord 8 Always Unplug the Power Cord before inserting any add on card or module 9 All cautions and war...

Page 4: ...interference by one or more of the measures listed below Reorient or relocate the receiving antenna Increase the separation between the equipment and receiver Connect the equipment into an outlet on...

Page 5: ...v WEEE Waste Electrical and Electronic Equipment Statement...

Page 6: ...vi...

Page 7: ...vii...

Page 8: ...r IDE1 optional 2 12 Serial ATAII Connectors SATA1 SATA6 2 13 Fan Power Connectors CPUFAN1 SYSFAN1 PWRFAN1 2 14 CD In Connector CD_IN1 2 14 Chassis Intrusion Switch Connector JCASE1 2 14 Front Panel A...

Page 9: ...e Realtek HD Audio Driver 7 2 Software Configuration 7 4 Sound Effect 7 5 Mixer 7 8 Audio I O 7 12 Microphone 7 16 3D Audio Demo 7 17 Information 7 18 Hardware Setup 7 19 Appendix B Intel ICH8R DO DH...

Page 10: ...nboard The G965MDH Q965MDO Series mainboards are based on Intel G965 Q965 ICH8R ICH8DO ICH8DH chipsets for optimal system efficiency Designed to fit the ad vanced Intel CoreTM 2 Duo Pentium 4 Pentium...

Page 11: ...ting memory modules please visit http www msi com tw program products mainboard mbd pro_mbd_trp_list php LAN Supports Gbe LAN by 82566 DM DC optional Supports 10 100 LAN by 82562V optional IEEE 1394 o...

Page 12: ...P ECP mode 1 VGA Port 1 IEEE 1394 port optional 4 USB 2 0 Ports 1 LAN jack 6 flexible audio jacks On Board Pinheaders 1 COM port pinheader 3 USB 2 0 pinheaders JUSB1 is optional 1 CD IN pinheader 1 SP...

Page 13: ...USB3 JMicron Jm20335 JCOM1 SATA6 SATA5 SATA4 SATA3 SATA2 SATA1 Intel ICH8R DO DH PCI E1 BATT PCI 2 PCI 1 PCI E2 ALC883 ALC888 VIA VT6307 VT6308 JAUD1 CD_IN1 J1394_1 optional PWRFAN1 CPUFAN1 JPW1 Intel...

Page 14: ...st Power Cable SATA Cable Optional User s Guide MSI motherboard MSI Driver Utility CD Back IO Shield The pictures are for reference only Your packing contents may vary depending on the model you purch...

Page 15: ...dures While doing the installation be careful in holding the components and follow the installation procedures For some components if you install in the wrong orientation the components will not work...

Page 16: ...JFP2 p 2 16 JFP1 p 2 16 PWRFAN1 p 2 14 SATA1 6 p 2 13 IDE1 p 2 12 JUSB2 3 p 2 17 JSPD1 p 2 15 JCD1 p 2 14 JAUD1 p 2 15 PCI Slots p 2 20 PCIE x16 Slot p 2 20 PCIE x1 Slot p 2 20 SYSFAN1 p 2 14 JPW1 p 2...

Page 17: ...seriously damage the CPU and system Always make sure the cooling fan can work properly to protect the CPU from overheating 2 Make sure that you apply an even layer of heat sink paste or thermal tape...

Page 18: ...lling the CPU make sure the CPU has a cooler attached on the top to prevent overheating If you do not have the cooler contact your dealer to purchase and install them before turning on the computer Me...

Page 19: ...U packing 6 After confirming the CPU direction for correct mating put down the CPU in the socket housing frame Be sure to grasp on the edge of the CPU base Note that the align ment keys are matched 8...

Page 20: ...not plug unplug the CPU too often 10 Align the holes on the mainboard with the heatsink Push down the cooler until its four clips get wedged into the holes of the mainboard 12 Turn over the mainboard...

Page 21: ...n GREEN Channel B in ORANGE 1 DIMM_A1 DIMM_A2 DIMM_B1 DIMM_B2 2 DIMM_A1 DIMM_A2 DIMM_B1 DIMM_B2 3 DIMM_A1 DIMM_A2 DIMM_B1 DIMM_B2 he mainboard provides four 240 pin non ECC DDRII 800 667 533 DIMM slot...

Page 22: ...DIMM slots To enable successful system boot up always insert the memory modules into the DIMM_A1 first Installing DDRII Modules 1 The memory module has only one notch on the center and will only fit...

Page 23: ...ed Then push down the power supply firmly into the connector You may use the 20 pin ATX power supply as you like If you d like to use the 20 pin ATX power supply please plug your power sup ply along w...

Page 24: ...or a PS 2 mouse keyboard Parallel Port Connector A parallel port is a standard printer port that supports Enhanced Parallel Port EPP and Extended Capabilities Parallel Port ECP mode Serial Port Connec...

Page 25: ...differentiate the color of the audio jacks for different audio sound effects Blue audio jack Line In is used for external CD player tapeplayer or other audio devices Green audio jack Line Out is a con...

Page 26: ...es CD ROM drives and other IDE devices Note Due to Full Speed USB bandwidth is limited to 480Mb s 60MB s this IDE port can not support Ultra DMA 100 interface devices Important If you install two hard...

Page 27: ...ATA interface ports Each supports 2nd genera tion serial ATA data rates of 300MB s and is fully compliant with Serial ATA 2 0 specifications Each Serial ATA connector can connect to 1 hard disk device...

Page 28: ...board you must use a specially designed fan with speed sensor to take advantage of the CPU fan control GND L R CPUFAN1 SYSFAN1 SENSOR 12V GND CONTROL PWRFAN1 12V GND Chassis Intrusion Switch Connecto...

Page 29: ...io transmission JSPD1 GND SPDIF VCC PIN SIGNAL DESCRIPTION 1 AUD_MIC Front panelmicrophone input signal 2 AUD_GND Ground usedbyanalog audio circuits 3 AUD_MIC_BIAS Microphonepower 4 AUD_VCC Filtered 5...

Page 30: ...Speaker 3 SLPLED SuspendLED 4 BUZ Buzzer 5 PWRLED PowerLED 6 BUZ Buzzer 7 Key Key no pin 8 SPK Speaker JFP2 Pin Definition PIN SIGNAL DESCRIPTION 1 HD_LED Hard disk LED 2 PWR SLPLED PowerLED SuspendL...

Page 31: ...CC 2 VCC 3 USB0 4 USB1 5 USB0 6 USB1 7 GND 8 GND 9 Key no pin 10 N C Pin Definition Important Note that the pins of VCC and GND must be connected correctly to avoid possible damage 1 2 9 10 JUSB1 2 3...

Page 32: ...n 11 LAD3 12 GND 13 LFRAME 14 GND FWH LPC Debugging Pin Header JLPC1 Optional The pin header is for internal debugging only JLPC1 13 14 2 1 JSPI Debugging Pin Header JSPI1 The pin header is for intern...

Page 33: ...S RAM the system can automatically boot OS every time it is turned on If you want to clear the system configuration set the JBAT1 Clear CMOS Jumper to clear data Important You can clear CMOS by shorti...

Page 34: ...re for Desktop Platforms doubling the capability of existing AGP 8x de signs with transfer rates of 4 0 GB s over a PCI Express x16 lane for graphics controllers while PCI Express x1 supports transfer...

Page 35: ...st line and pronounced I R Q are hardware lines over which devices can send interrupt signals to the microprocessor The PCI IRQ pins are typically connected to the PCI bus pins as follows Order 1 Orde...

Page 36: ...IOS Setup program and allows you to configure the system for optimum use You may need to run the Setup program when An error message appears on the screen during the system booting up and requests you...

Page 37: ...HOENIX 2nd 5th digit refers to the model number 6th digit refers to the chipset as I Intel N nVidia and V VIA 7th 8th digit refers to the customer as MS all standard customers V1 0 refers to the BIOS...

Page 38: ...can use the control keys to enter values and move from field to field within a sub menu If you want to return to the main menu just press the Esc General Help F1 The BIOS setup program provides a Gen...

Page 39: ...ize your system s performance Integrated Peripherals Use this menu to specify your settings for integrated peripherals Power Management Features Use this menu to specify your settings for power manage...

Page 40: ...3 5 BIOS Setup BIOS Setting Password Use this menu to set the password for BIOS Save Exit Setup Save changes to CMOS and exit setup Exit Without Saving Abandon all changes and exit setup...

Page 41: ...e The format is day month date year day Day of the week from Sun to Sat determined by BIOS Read only month The month from Jan through Dec date The date from 1 to 31 can be keyed by numeric function ke...

Page 42: ...atus to predict hard disk failure This gives you an opportunity to move data from a hard disk that is going to fail to a safe place before the hard disk becomes offline Floppy Drive A This item allows...

Page 43: ...8 MS 7276 Mainboard This sub menu shows the CPU information BIOS version and memory status of your system read only System Information Press Enter to enter the sub menu and the following screen appear...

Page 44: ...on is enabled and someone attempt to write date into this area BIOS will shows a warning message on screen and alarm beep Hyper Threading Function The processor uses Hyper Threading technology to incr...

Page 45: ...le the APIC Advanced Programmable Interrupt Controller Due to compliance with PC2001 design guide the system is able to run in APIC mode Enabling APIC mode will expand available IRQ resources for the...

Page 46: ...memory which as PCI resources Internal Graphics Select The field specifies the size of system memory allocated for video memory DVMT Mode Select The field allows you to select the DVMT mode Dynamic Vi...

Page 47: ...3 12 MS 7276 Mainboard ME HECI This field allows you to enable disable ME HECI ME IDER This field allows you to enable disable ME IDER ME KT This field allows you to enable disable ME KT...

Page 48: ...USB controller mode BIOS EHCI Hand Off This item can used to stop the EHCI legacy for operations systems without EHCI hand off mechanism loading properly Setting it to Disabled to force EHCI owner sh...

Page 49: ...as IDE RAID or AHCI function Configure SATA 1 as When the SATA 1 Configuration sets to Enhanced the field is adjustable It allows user to configure the SATA devices as IDE AHCI or RAID SATA 2 Configu...

Page 50: ...owing options Disabled 3BC Line Printer port 0 278 Line Printer port 2 378 Line Printer port 1 Parallel Port Mode Normal Stardand Parallel Port EPP Enhanced Parallel Port ECP Extended Capability Port...

Page 51: ...erating system supports ACPI such as Windows 2000 XP you can choose to enter the Standby mode in S1 POS or S3 STR fashion through the setting of this field Set tings are S1 POS The S1 sleep mode is a...

Page 52: ...specified in this field all devices except CPU will be shut off Power Button Function This feature sets the function of the power button Settings are On Off The power button functions as normal power...

Page 53: ...signal of the PS 2 mouse is detected GbE Wake Up From S5 An input signal on LAN awakens the system from S5 Resume by RTC Alarm The field is used to enable or disable the feature of booting up the sys...

Page 54: ...d the bus before another takes over When set to higher values every PCI device can conduct transactions for a longer time and thus improve the effective PCI bandwidth For better PCI performance you sh...

Page 55: ...to Reserved and IRQ 14 15 are allocated to the onboard PCI IDE IRQ 9 will still be available for PCI and PnP devices DMA Resource Setup Press Enter to enter the sub menu and the following screen appea...

Page 56: ...SST Simple Serial Transport Bus AFSC Sensor Thresholds optional This item allows you to lock unlock AFSC Sensor Thresholds AFSC Manual Fan Ctrl optional This item allows you to lock unlock AFSC Manua...

Page 57: ...suing a warning message if the chassis is once opened To clear the warning message set the field to Reset The setting of the field will automatically return to Enabled later Sytem Monitor These items...

Page 58: ...ized values The Optimized Defaults are the default values set by the mainboard manufacturer specifically for optimal performance of the mainboard When you select Load Optimized Defaults a message as b...

Page 59: ...rd and press Enter You may also press Esc to abort the selection and not enter a password To clear a set password just press Enter when you are prompted to enter the password A message will show up co...

Page 60: ...83 Audio Appendix A The Realtek ALC883 provides 10 channel DAC that si multaneously supports 7 1 sound playback and 2 chan nels of independent stereo sound output multiple streaming through the Front...

Page 61: ...Service Pack1 or later before installing the driver The following illustrations are based on Windows XP environment and could look slightly different if you install the drivers in different operating...

Page 62: ...A 3 Realtek ALC883 Audio 3 Click Next to install the Realtek High Definition Audio Driver 4 Click Finish to restart the system Click here Click here Select this option...

Page 63: ...el audio feature now Click the audio icon from the system tray at the lower right corner of the screen to activate the HD Audio Configuration It is also available to enable the audio driver by clickin...

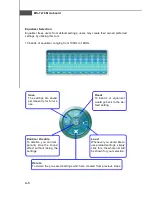
Page 64: ...nt You may choose the provided sound effects and the equalizer will adjust automatically If you like you may also load an equalizer setting or make an new equalizer setting to save as an new one by us...

Page 65: ...without losing the settings Load Whenever you would like to use preload settings simply click this the whole list will be shown for your selection Delete To delete the pre saved settings which are cr...

Page 66: ...Pop Live Club Rock shown on the page to pull down the arrow in Others you will find more optimized settings available to you Karaoke Mode Karaoke mode brings Karaoke fun back home Simply using the mus...

Page 67: ...nd let them output respectively from the indicated real panel or front panel This feature is very helpful when 2 people are using the same computer together for different purposes Click the button and...

Page 68: ...d from the rear panel which is the default setting Then you must to select the Realtek HD Audio 2nd output from the scroll list first and use a different program to play the second audio source for ex...

Page 69: ...gle or multiple volume controls or to completely mute sound output Tool Show the following volume controls This is to let you freely decide which volume control items to be displayed Advanced controls...

Page 70: ...mpletely mute sound input Tool Show the following volume controls This is to let you freely decide which volume control items to be displayed Enable recording multi streaming Tool Mute Important ALC88...

Page 71: ...H Speaker for 5 1 Speaker Output e 8CH Speaker for 7 1 Speaker Output Speaker Configuration 1 Plug the speakers in the corresponding jack 2 Dialogue connected device will pop up for your selection Ple...

Page 72: ...jack detection option Jack detection function only works with HD audio front panel Mute rear panel output when front headphone plugged in Enable auto popup dialogue when device has been plugged in On...

Page 73: ...rading when it is converted to analog Output Sampling Rate 44 1KHz This is recommend while playing CD 48KHz This is recommended while playing DVD or Dolby 96KHz This is recommended while playing DVD A...

Page 74: ...up and make testing sound If any speaker fails to make sound then check whether the cable is inserted firmly to the connector or replace the bad speakers with good ones Or you may click the auto test...

Page 75: ...rom being recorded by mi crophone together with your sound For example you might have chance to use VOIP function through Internet with your friends The voice of your friend will come out from speaker...

Page 76: ...883 Audio 3D Audio Demo In this tab you may adjust your 3D positional audio before playing 3D audio applica tions like gaming You may also select different environment to choose the most suitable envi...

Page 77: ...Audio Controller Audio Codec You may also select the language of this utility by choosing from the Language list Also there is a selection Show icon in system tray Switch it on and an icon will show i...

Page 78: ...nel Mode for Stereo Speaker Output Refer to the following diagram and caption for the function of each phone jack on the back panel when 2 Channel Mode is selected Back Panel 1 Line In 2 Line Out Fron...

Page 79: ...l Line Out connector and two speakers to the real channel Line Out connector 4 Channel Analog Audio Output 1 Line In 2 Line Out Front channels 3 MIC 4 Line Out Rear surround channels 5 Line Out Center...

Page 80: ...to the rear channel Line out connector and two s peaker s to the c enter subwoofer channel Line Out connector 6 Channel Analog Audio Output 1 Line In 2 Line Out Front channels 3 MIC 4 Line Out Rear su...

Page 81: ...hannel Line out connector two speak ers to the center subwoofer channel Line Out connector and two speakers to the side chan nel Line Out connector 8 Channel Analog Audio Output 1 Side Surround Out Si...

Page 82: ...solution that com bines six independent SATAII ports for support of up to six Serial ATAII Serial ATAII RAID drives It offers RAID level 0 Striping RAID level 1 Mirroring and Duplexing RAID level 5 Bl...

Page 83: ...Data handling optimizations including tagged command queuing elevator seek and packet chain command Intel ICH8R DO DH offers RAID level 0 Striping RAID level 1 Mirroring and Duplexing RAID level 5 Blo...

Page 84: ...on all motherboards with a supported Intel chipset The Intel Matrix Stroage Manager Option ROM is the Intel RAID implementation and provides BIOS and DOS disk services Please use Ctrl I keys to enter...

Page 85: ...llowing screen appears Then in the Name field specify a RAID Volume name and then press the TAB or Enter key to go to the next field 2 Use the arrow keys to select the RAID level best suited to your u...

Page 86: ...he upper arrow or down arrow keys to scroll through the available values and pressing the Enter key to select and advance to the next field The available values range from 4KB to 128 KB in power of 2...

Page 87: ...on is finished Important Since you want to create two volumes Intel Matrix RAID Technology this default size maximum needs to be reduced Type in a new size for the first volume As an example if you wa...

Page 88: ...ete RAID Volume from the main menu window and press Enter key to select a RAID volume for deletion Then press Delete key to delete the selected RAID volume The following screen appears Press Y key to...

Page 89: ...structures from the drives The following screen appears Press Y key to accept the selection Important 1 You will lose all data on the RAID drives and any internal RAID structures when you perform this...

Page 90: ...th installation 6 From the Windows XP 2000 Setup screen press the Enter key Setup will now load all device files and then continue the Windows XP 2000 installation Existing Windows XP 2000 Driver Inst...

Page 91: ...ive from which the system is booting or a hard drive that contains important data For this reason you cannot remove or un install this driver from the system after installation however you will have t...

Page 92: ...B 11 Intel ICH8R DO DH SATA RAID The InstallShield Wizard will begin automatically for installation showed as following Click on the Next button to proceed the installation in the welcoming window...

Page 93: ...MS 7276 Mainboard B 12 B After reading the license agreement in the following window click Yes button to continue The window shows the components to be installed Click Next button to continue...

Page 94: ...ICH8R DO DH SATA RAID Once the installation is complete the following window appears The following window appears to show the Readme File Information It shows the system requirements and installation...

Page 95: ...he system is first configured in order to take advantage of RAID when upgrading to a second SATA hard drive 1 BIOS must be configured for RAID before installing Windows XP on the single SATA hard driv...

Page 96: ...e from Existing Disk To create a RAID volume from an existing disk choose Action Create RAID Volume from Existing Hard Drive The Create RAID Volume from Existing Hard Drive Wizard pops up to lead you...

Page 97: ...ncy will provide you with a realtime duplicate copy of your data Note Only half of the available volume space will be avail able for data storage RAID 5 Useful RAID 5 can be used on three or more disk...

Page 98: ...ost typical strip size settings are 4KB For specialized usage models requiring 4KB strips 8KB For specialized usage models requiring 8KB strips 16KB Best for sequential transfers 32KB Good for sequent...

Page 99: ...disk the target disk that you wish to use and then click to move it to the Selected field Then click Next to continue Please note that the existing data on the selected hard drive s will be deleted p...

Page 100: ...rive space will be worked as RAID 1 volume which is the new technology called Intel Matrix RAID Then click Next to continue 5 Start Creating RAID Volume from Existing Hard Drive Wizard Before you cont...

Page 101: ...you can still continue using your computer during the migration process once the migration proc ess starts it cannot be stopped If the migration process gets interrupted and your system is rebooted f...

Page 102: ...t corresponds to the current situation Missing Hard Drive Member 1 Make sure the system is powered off 2 Reconnect the hard drive 3 Reboot the system to Windows the rebuild will occur automatically Fa...

Page 103: ...ystem 6 When prompted to rebuild the RAID volume click Yes 7 The Intel R Storage Utility will be launched Right click the new hard drive and select Rebuild to this Disk The Rebuild Wizard will be laun...

Reviews: