background image

7

Continued from previous column

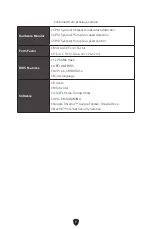
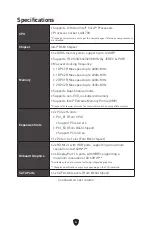
Hardware Monitor


CPU/ System/ Chipset temperature detection


CPU/ System/ Pump fan speed detection


CPU/ System/ Pump fan speed control

Form Factor


Micro-ATX Form Factor


9.6 in. x 9.6 in. (24.4 cm x 24.4 cm)

BIOS Features


1x 256 Mb flash


UEFI AMI BIOS


ACPI 6.4, SMBIOS 3.4


Multi-language

Software


Drivers


MSI Center


Intel Extreme Tuning Utility


CPU-Z MSI GAMING


Google Chrome™, Google Toolbar, Google Drive


Norton™ Internet Security Solution
Summary of Contents for PRO B660M-A WIFI DDR4

Page 1: ...1 JFP2 Front Panel Connectors 14 M2_1 2 M 2 Slots Key M 15 SATA5 8 SATA 6Gb s Connectors 17 JAUD1 Front Audio Connector 17 CPU_PWR1 2 ATX_PWR1 Power Connectors 18 CPU_FAN1 PUMP_FAN1 SYS_FAN1 2 Fan Con...

Page 2: ...2 Installing OS Drivers MSI Center 25 UEFI BIOS 26 BIOS Setup 27 Resetting BIOS 28 Updating BIOS 28...

Page 3: ...before installation is completed This could cause permanent damage to the components as well as injury to the user If you need help during any installation step please consult a certified computer te...

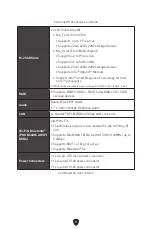
Page 4: ...nel mode Supports non ECC un buffered memory Supports Intel Extreme Memory Profile XMP Please refer to www msi com for more information on compatible memory Expansion Slots 2x PCIe x16 slots PCI_E1 Fr...

Page 5: ...e when installing M 2 SATA SSD in the M2_2 slot RAID Supports RAID 0 RAID 1 RAID 5 and RAID 10 for SATA storage devices Audio Realtek ALC897 Codec 7 1 Channel High Definition Audio LAN 1x Realtek RTL8...

Page 6: ...m panel connectors 1x Chassis Intrusion connector 1x TPM module connector 1x Tuning Controller connector 1x TBT connector supports RTD3 1x Serial port Jumpers 1x Clear CMOS jumper LED Features 1x 4 pi...

Page 7: ...U System Pump fan speed control Form Factor Micro ATX Form Factor 9 6 in x 9 6 in 24 4 cm x 24 4 cm BIOS Features 1x 256 Mb flash UEFI AMI BIOS ACPI 6 4 SMBIOS 3 4 Multi language Software Drivers MSI...

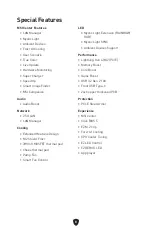
Page 8: ...ded Heatsink Design M 2 Shield Frozr 7W mK MOSFET thermal pad Choke thermal pad Pump Fan Smart Fan Control LED Mystic Light Extension RAINBOW RGB Mystic Light SYNC Ambient Devices Support Performance...

Page 9: ...connectors PRO B660M A WIFI DDR4 6 Line in port 7 Line out port 8 USB 2 0 Type A ports From B660 chipset 9 HDMI ports 10 USB 3 2 Gen 2 10Gbps Type A ports From B660 chipset 11 Mic in port 5 7 8 9 10...

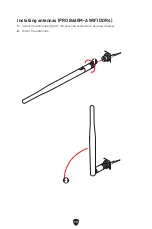
Page 10: ...10 Installing antennas PRO B660M A WIFI DDR4 1 Screw the antennas tight to the antenna connectors as shown below 2 Orient the antennas 1 2...

Page 11: ...NBOW1 PUMP_FAN1 CPU_FAN1 DIMMB2 Processor Socket CPU_PWR1 CPU_PWR2 JFP1 JTPM1 JDASH1 JUSB2 JUSB1 JCOM1 JTBT1 SATA8 JRGB1 JAUD1 PCI_E3 PCI_E2 M2_2 PCI_E1 SYS_FAN2 M2_1 DIMMB1 DIMMA2 DIMMA1 Overview of...

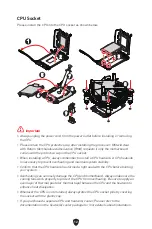
Page 12: ...has formed a tight seal with the CPU before booting your system Overheating can seriously damage the CPU and motherboard Always make sure the cooling fans work properly to protect the CPU from overhea...

Page 13: ...rclocking due to the memory frequency operates dependent on its Serial Presence Detect SPD Go to BIOS and find the DRAM Frequency to set the memory frequency if you want to operate the memory at the m...

Page 14: ...cessary additional hardware or software changes JFP1 JFP2 Front Panel Connectors The JFP1 connector controls the power on power reset and the LEDs on your PC case chassis Power Switch Reset Switch hea...

Page 15: ...2 SHIELD FROZR heatsink 2 Remove the M 2 SHIELD FROZR and remove the protective films from the thermal pads 2 1 1 M2_1 3 If there is no EZ M 2 Clip installed please install the supplied EZ M 2 Clip k...

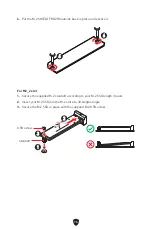
Page 16: ...ecure it 6 6 For M2_2 slot 1 Secure the supplied M 2 standoff according to your M 2 SSD length if need 2 Insert your M 2 SSD into the M 2 slot at a 30 degree angle 3 Secure the M 2 SSD in place with t...

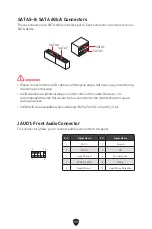
Page 17: ...r sides of the cable However it is recommended that the flat connector be connected to the motherboard for space saving purposes SATA8 will be unavailable when installing M 2 SATA SSD in the M2_2 slot...

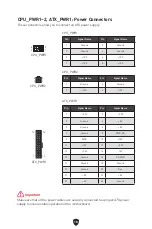
Page 18: ...R1 Pin Signal Name Pin Signal Name 1 Ground 2 Ground 3 Ground 4 Ground 5 12V 6 12V 7 12V 8 12V ATX_PWR1 Pin Signal Name Pin Signal Name 1 3 3V 2 3 3V 3 Ground 4 5V 5 Ground 6 5V 7 Ground 8 PWR OK 9 5V...

Page 19: ...trol fan speed by changing voltage 1 PWM Mode pin definition Pin Signal Name Pin Signal Name 1 Ground 2 12V 3 Sense 4 Speed Control Signal Fan connector specifications Connector Default fan mode Max c...

Page 20: ...mper cap from JBAT1 4 Plug the power cord and Power on the computer Normal default Trigger the chassis intrusion event Using chassis intrusion detector 1 Connect the JCI1 connector to the chassis intr...

Page 21: ...en 1 5Gbps Type C connector on the front panel The connectors possess a foolproof design When you connect the cable be sure to connect it with the corresponding orientation JUSB4 USB Type C Cable USB...

Page 22: ...TPM1 TPM Module Connector This connector is for TPM Trusted Platform Module Please refer to the TPM security platform manual for more details and usages Pin Signal Name Pin Signal Name 1 VCC 2 VCC 3 U...

Page 23: ...LK_VSB 11 DG_PEWake 12 SMBDATA_VSB 13 TBT_RTD3_PWR_EN 14 Ground 15 TBT_Card_DET_R 16 PD_IRQ JCOM1 Serial Port Connector This connector allows you to connect the optional serial port with bracket 1 2 1...

Page 24: ...BOW connector provide different voltages and connecting the 5V LED strip to the JRGB connector will result in damage to the LED strip Important The JRAINBOW connector supports up to 75 LEDs WS2812B In...

Page 25: ...xe to open the installer If you turn off the AutoPlay feature from the Windows Control Panel you can still manually execute the DVDSetup exe from the root path of the MSI USB Drive 4 The installer wil...

Page 26: ...pports full capabilities of new devices new devices may not provide backward compatibility Supports secure startup UEFI can check the validity of the operating system to ensure that no malware tampers...

Page 27: ...to enter Boot Menu message appears on the screen during the boot process Function key F1 General Help list F2 Add Remove a favorite item F3 Enter Favorites menu F4 Enter CPU Specifications menu F5 Ent...

Page 28: ...BIOS file that matches your motherboard model from MSI website And then save the BIOS file into the USB flash drive Updating BIOS 1 Insert the USB flash drive that contains the update file into the US...

Page 29: ...ting the BIOS To update BIOS 1 Install and launch MSI Center and go to Support page 2 Select Live Update and click on Advance button 3 Select the BIOS file and click on Install button 4 The installati...

Reviews: