36
Overview of Components
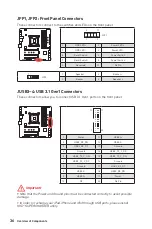
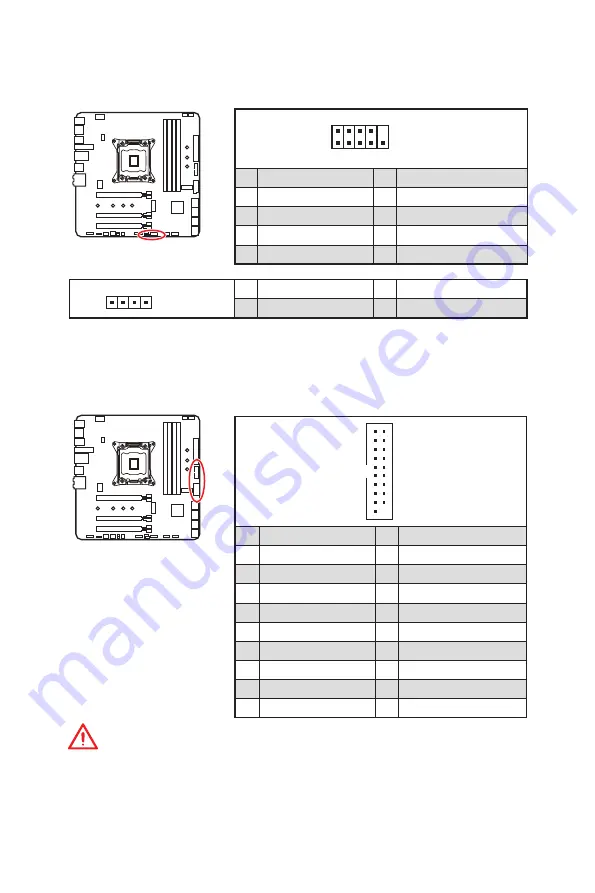
JFP1, JFP2: Front Panel Connectors
These connectors connect to the switches and LEDs on the front panel.
1
2
10
9
JFP1
1
HDD LED +
2
Power LED +
3
HDD LED -
4
Power LED -
5
Reset Switch
6
Power Switch
7
Reset Switch
8
Power Switch
9
Reserved
10
No Pin
1
JFP2
1
Speaker -
2
3
Buzzer -
4
S
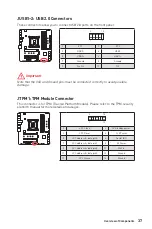
JUSB3~4: USB 3.1 Gen1 Connectors
These connectors allow you to connect USB 3.1 Gen1 ports on the front panel.
1
10
11
20
1
Power
11
USB2.0+
2
USB3_RX_DN
12
USB2.0-
3
USB3_RX_DP
13
Ground
4
Ground
14
USB3_TX_C_DP
5
USB3_TX_C_DN
15
USB3_TX_C_DN
6
USB3_TX_C_DP
16
Ground
7
Ground
17
USB3_RX_DP
8
USB2.0-
18
USB3_RX_DN
9
USB2.0+
19
Power
10
NC
20
No Pin
Important
y
Note that the Power and Ground pins must be connected correctly to avoid possible
damage.
y
In order to recharge your iPad,iPhone and iPod through USB ports, please install
MSI
®
SUPER CHARGER utility.
Summary of Contents for X299M-A PRO
Page 4: ...4 Quick Start Installing a Processor 1 2 3 6 4 5 7 8 9 10 11 12 13 https youtu be ecdkLMmkya4...
Page 7: ...7 Quick Start BAT1 Installing the Motherboard 1 2...
Page 8: ...8 Quick Start Installing SATA Drives http youtu be RZsMpqxythc 1 2 3 4 5...
Page 9: ...9 Quick Start Installing a Graphics Card 1 http youtu be mG0GZpr9w_A 2 3 4 5 6...
Page 10: ...10 Quick Start Connecting Peripheral Devices AC version only...

