En-10
MS-7760 Manboard
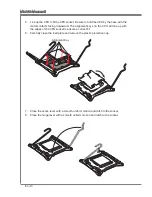
7. Close the actve lever wth a smooth unform moton and latch to the socket.
8. Close the hnge lever wth a smooth unform moton and latch to the socket.
5. Lne up the CPU to fit the CPU socket. Be sure to hold the CPU by the base wth the
metal contacts facng downward. The algnment keys on the CPU wll lne up wth
the edges of the CPU socket to ensure a correct fit.
6. Carefully close the load plate and remove the plastc protectve cap.
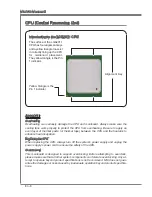
Algnment Key
Summary of Contents for X79A-GD45 series
Page 1: ...X79A GD65 8D series MS 7760 v1 x Mainboard G52 77601X2 Europe version...
Page 11: ...English X79A GD65 8D Series...
Page 55: ...Deutsch X79A GD65 8D Serie...
Page 101: ...Fran ais X79A GD65 8D S ries...
Page 145: ...X79A GD65 8D...
Page 152: ...Ru 8 MS 7760 CPU CPU CPU CPU Overclocking Overclocking LGA2011 CPU LGA2011 CPU 1 1...
Page 153: ...Ru 9 3 4 CPU CPU CPU CPU 1 2...
Page 154: ...Ru 10 MS 7760 7 8 5 6...
Page 155: ...Ru 11 9 CPU CPU 10 CPU CPUFAN1 11 CPU 12 9 13 CPU CPUFAN1 BATT CPUFAN1...
Page 156: ...Ru 12 MS 7760 BATT...
Page 159: ...Ru 15 DIMM DIMM DIMM DIMM DIMM 1 2 3...
Page 172: ...Ru 28 MS 7760 POWER1 BATT Direct OC Plus Minus BATT...
Page 173: ...Ru 29 CMOS JBAT1 CMOS CMOS CMOS BATT 1 1 CMOS CMOS CMOS JCOLD1 JCOLD2 BATT CPU...
Page 174: ...Ru 30 MS 7760 Multi BIOS MULTI_BIOS_SWITCH BIOS ROM A B BIOS ROM A BIOS ROM BIOS A B BATT BIOS...
Page 181: ...Ru 37 CLICK BIOS II BIOS Enter Esc Exit F1 F4 CPU F5 Memory Z F6 F10 F12 USB FAT FAT32...
Page 182: ...Ru 38 MS 7760 Enter Esc CLICK BIOS II F1 HELP BIOS setting...


