English
En-11
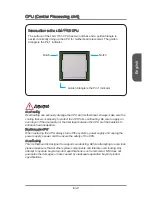
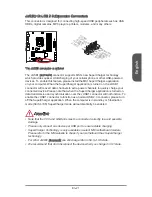
3. Align the notches with the socket alignment keys. Lower the CPU straight down,
without tilting or sliding the CPU in the socket. Inspect the CPU to check if it is
properly seated in the socket.
4. Close and slide the load plate under the retention knob. Close and engage the
load lever.
Alignment Key
CPU notches
Retention knob
5. When you press down the load lever the PnP cap will automatically pop up from
the CPU socket. Do not discard the PnP cap. Always replace the PnP cap if the
CPU is removed from the socket.
6. Evenly spread a thin layer of thermal paste (or thermal tape) on the top of the
CPU. This will help in heat dissipation and prevent CPU overheating.
PnP cap
Thermal paste
Summary of Contents for Z87M-G43 Series
Page 1: ...Z87M G43 H87M G43 B85M G43 Motherboard G52 78231X3 Preface...
Page 135: ...Ru 9 MSI LGA 1150 LGA 1150 1 1...
Page 136: ...Ru 10 1 2 http youtu be bf5La099urI...
Page 137: ...Ru 11 3 4 5 6...
Page 138: ...Ru 12 7 8 9 10 11...
Page 140: ...Ru 14...
Page 142: ...Ru 16 PCI_E1 4 PCIe PCIe PCIe PCIe 2 0 x1 PCIe 3 0 x16 PCIe 2 0 x16...
Page 143: ...Ru 17 CPU MSI PCIe x16 http youtu be mG0GZpr9w_A PCI_E1 1 2 3 4 5...
Page 151: ...Ru 25 JBAT1 CMOS CMOS CMOS CMOS 1 1 CMOS CMOS...
Page 155: ...Ru 29 BIOS Virtual OC Genie OC Genie OC Genie MSI Enter...
Page 156: ...Ru 30 BIOS M Enter Esc Exit F1 F4 F5 Memory Z F6 F8 OC USB F9 OC USB F10 F12 FAT FAT32...
Page 166: ...Installation A 2 CPU 1 2 3 4 5 6 http youtu be bf5La099urI...
Page 167: ...Installation A 3 7 8 9...
Page 168: ...Installation A 4 http youtu be 76yLtJaKlCQ Memory Speicher M moire 1 2 3...
Page 169: ...Installation A 5 Motherboard Carte m re 1 2...
Page 170: ...Installation A 6 3...
Page 174: ...Installation A 10 mSATA SSD...
Page 177: ...Installation A 13 http youtu be mG0GZpr9w_A Graphics Card Grafikkarte Carte graphique B 1 2...
Page 178: ...Installation A 14 3 4 5...

