background image

DRAINAGE, CLEANING AND STORAGE

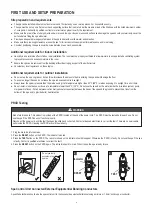
Spa Drainage

1.   Turn off all the functions.

2.   Connect the drain valve adaptor to a garden hose and point the other end of the garden hose to a suitable draining area.

3.   Remove the drain valve cap from the outside of the spa tub and attach the drain valve adaptor to the drain valve.

4.   On the inside of the spa tub, open the drain valve cap. Water will start flowing out from the garden hose.

5.   When the water stops draining, lift the spa tub wall from the side opposite the drain, directing any remaining water to the drain and emptying the spa 

      completely.

6.   Press the BUBBLE button to dry the spa pool.

7.   Disassemble the control box. Pour out any water from the piping system.

8.   Use a clean towel to wipe up any remaining water and moisture on the spa tub and spa control unit. Ensure the spa tub and spa control unit are  

      thoroughly dried.

17

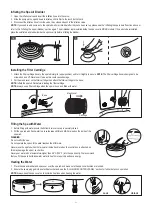
Cleaning The Spa Tub

If dirt is visible in the water or if the water becomes cloudy and the correct water chemistry does not clear it up, change the water and clean the spa tub. See 

the “Spa tub drainage” section on how to drain the spa. While empty, clean and/or replace the filter cartridge. Use a sponge and mild soap solution to wipe 

away any soil or stains on the inside of the spa wall. Rinse thoroughly before refilling with clean water.

IMPORTANT: 

Do not use steel wool, hard brushes or abrasive cleaners.

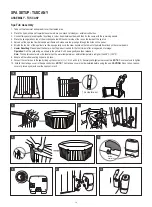
Deflation Instructions

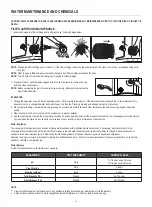
Spa deflation (MONO)

1.  Open the valve cap by twisting it counter-clockwise. Ensure the valve is clear from debris, sand, or dirt before 

     releasing.

2.  Push the valve button in and turn it clockwise to lock it in the DOWN position.

3.  Once deflation is completed, replace the cap.

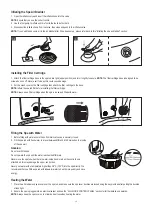
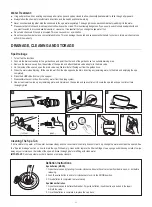
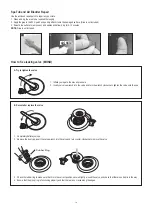
Spa Bladder Deflation

1.  Open the valve cap to deflate the bladder. For quick deflation, insert the straw (included in the repair 

     kit) into the valve.

2.  Once the deflation is completed, re-place the cap back.

Water Treatment:

It is good practice with an existing spa to keep all air jets open and valves closed to allow chemically treated water to flush through all pipework.

Always follow the chemical manufacturer’s directions, and the health and hazard warning.

Never mix chemicals together. Add the chemicals to the spa water separately. Thoroughly dissolve each chemical before adding it to the water.

Please note that chlorine and bromine products should never be mixed. This is extremely dangerous. If you  usually use chlorine-based products and 

you want to switch to bromine-based products, or vice versa, it is essential that you change the spa water first.

Do not add chemicals if the spa is occupied. This can cause skin or eye irritation.

Do not overuse chemicals or use concentrated chlorine. This can damage the spa tub and cause potential hazard to your skin. Improper chemical use 

will void the warranty.

2

3

6

8

7

5

15

minutes

DOWN

BUBBLE

4

(TUSCANY)

(MONO)

Summary of Contents for F-MO061

Page 1: ...o change the specifications and appearance of its products which may result in updates to the instruction manual without prior notice F MO061 Mono F TU061 Tuscany PLEASE DO NOT RETURN THE PRODUCT TO T...

Page 2: ...first time We are delighted to welcome you to the MSpa family and look forward to sharing with you the full spectrum of our expertise Enjoy your MSpa Welcome CONTENT Safety precautions Specifications...

Page 3: ...pa when it is raining thundering or lightning To reduce the risk of electric shock do not use an extension cord timers plug adaptors or converter plugs to connect the unit to the electrical supply pro...

Page 4: ...fect the heart rate blood pressure or circulation i Check with a doctor before use if pregnant diabetic in poor health or under medical care A recommendation that owners of spa pools learn a recognize...

Page 5: ...Do not expose the spa to direct sunlight Check regularly before each use When the spa is not in use store it away immediately or keep it in an enclosed area Open the spa top lid when the Bubble functi...

Page 6: ...and fixed partitions Zones Zone 0 Zone 1 Zone 2 Description of the zones Zone 0 is the interior of the basin including any recesses in the walls or floor Zone 1 is limited by Zone 0 A vertical plane 2...

Page 7: ...ntegrated Ozone Generator UVC Radiant flux Top Lid Liner Material AC 220 240V 50Hz 2300W 1500W 3 Levels Level 1 300W Level 2 500W Level 3 720W 1800L hr 5 5W 30 50mg hr 2000uW Rhino Tech reinforced PVC...

Page 8: ...nch for inflation valve Repair kit A B C D E F G H I J NOTE The drawings are for reference only Actual products may vary Not to scale Use accessories exclusively provided by MSpa for safety reasons Wh...

Page 9: ...ht Always lower the spa air pressure than 10psi when using it at a temperature higher than 20 C 68 F or when exposing it to sunlight for a short time Do not install or use the spa outdoors at a temper...

Page 10: ...ture or ambient temperature is higher than 38 C 100 F 3 Ensure all the rubber sealing rings are in place 4 Connect the control box to the spa by lining up the numbers 1 to 1 2 to 2 and 3 to 3 Securely...

Page 11: ...ch the filter cartridge to the base NOTE Inflate the spa tub first before installing the filter cartridge NOTE Always use a filter cartridge when the spa is in use and filled with water Filling the Sp...

Page 12: ...e corner beams 7 Heater Resetting Please reset the heater when the product is used for the first time or after a long period of storage Operation Find the yellow ring as shown in the picture Pull it d...

Page 13: ...a filter cartridge when the spa is in use and filled with water Filling the Spa with Water 1 Before filling with water ensure the bottom drain valve cap is securely closed 2 Fill the spa tub with fres...

Page 14: ...automatically to heat the water to 3 C 37 4 F IMPORTANT The following conditions will lead to slow water heating An ambient temperature lower than 10 C 50 F An outdoor wind speed above 3 5 5 4m s 8 1...

Page 15: ...ain on the LED display for 3 seconds to confirm the value To modify the timer setting Press the Timer button again and use the UP or the DOWN button to adjust Cancel the setting Press the TIMER button...

Page 16: ...is not in use cover it with the buckle cover to prevent pollution 4 Use spa chemicals to maintain the proper water conditions Spa damage resulting from the misuse of chemicals or the mismanagement of...

Page 17: ...RTANT Do not use steel wool hard brushes or abrasive cleaners Deflation Instructions Spa deflation MONO 1 Open the valve cap by twisting it counter clockwise Ensure the valve is clear from debris sand...

Page 18: ...debris in the way 4 Ensure that the pin spring is functioning properly and that there are no cracks along the edges Spa Tub and Air Bladder Repair Use the enclosed repair patch to repair any puncture...

Page 19: ...ained from your local authorities To return your used device please use the return and collection systems or contact the retailer where the product was purchased for environmentally safe recycling SUN...

Page 20: ...ied with your spa Check the repair section on P18 Change the water Extend the filtration time Clean or replace the filter cartridge in time Refer to the chemical manufacturer s instructions Check the...

Page 21: ...ells and services the same model with identical technical specifications Warranty service outside the country of purchase is limited to the terms and conditions of the corresponding warranty in the co...

Reviews: