background image

16

CONTROL PANEL OPERATION 

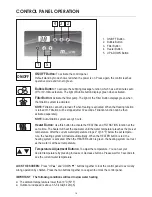
1.   ON/OFF Button

2.   Bubble Button

3.   Filter Button

4.   Heater Button

5.   UP & DOWN Button

1

5

4 3 2

ON/OFF

ON/OFF Button:


To activate the control panel.

Default stand by mode shows red when the power is on. Press again, the control reaches

operative mode and turns to green. 

Bubble Button:


To activate the bubbling massage function, which has a 20-minutes auto 

off for 10-mintues feature. The light of Bubble button displays green when activated.

Filter Button: 

Activate the filter pump. The light of the Filter Button displays green when 

the filtration system is activated. 

NOTE: 

Filtration cannot be turned off when Heating is activated. When the Heating function

is turned off, Filtration will be stopped after 30 seconds. Filtration function can be then

activated separately.

NOTE: 

Auto-filtration system every 4 hours.

Heater Button:


Use this button to activate the HEATING and FILTRATION function at the 

same time. The heater will heat the spa water until the water temperature reaches the pre-set 

temperature. After the current water temperature drops 2°C(3.6°F) below the set tempera-

ture, the heating system will restart automatically. When the HEATER button is red, the 

heating system is activated. When the HEATER button is green, the heating system is at rest 

as the water is at the set temperature.

Temperature Adjustment Buttons:

 To adjust the temperature. You can set your 

desired temperature by pressing Increase or Decrease buttons. Please wait for 3 seconds to 

see the current water temperature.

LOCK THE SCREEN: 

 Press “UP 

” and “DOWN 

 ” buttons together to lock the control panel to avoid any 

wrong operation by children. Press the two buttons together once again to unlock the control panel. 

IMPORTANT

The following conditions will lead to slow water heating 

●   The ambient temperature is lower than 10°C(50°F)

●   Outdoor wind speed is above 3.5-5.4m/s(8-12mph)

Summary of Contents for M-001LS Nest

Page 1: ...LS Glow Camaro Super Camaro EN DO NOT RETURN MERCHANDISE TO YOUR DEALER STORE DIRECTLY CALL MSPA AFTER SALES SERVICE CENTER FOR PRODUCT QUESTIONS OR CONTACT MSPA AT info the mspa com Due to MSpa continuous product improvement MSpa reserves the right to change specifications and product appearance which may result in updates to the instruction manual without notice Twilight Sapphire ...

Page 2: ... 21 22 24 25 26 Thank you for choosing MSpa and for your confidence in our brand We believe that you will enjoy many benefits of using MSpa products for years to come To guide you in your initial MSpa experience we are pleased to present you with this instruction manual Please carefully and thoroughly read this manual entirety before using the product for the first time We are delighted to welcome...

Page 3: ... damaged it must be replaced by the manu facturer its service agent or similarly qualified persons in order to avoid a hazard Risk of Electric Shock Do not permit any electrical appliances such as a light telephone radio or television within 1 5m 5 feet of a spa tub Risk of Electric Shock Do not use the spa when it is raining thundering or lightning To reduce the risk of electric shock do not use ...

Page 4: ...nd from the spec sheet calculate the expected load of water capacity plus total weight Adequate draining system must be provided around the spa to deal with over flow water To reduce the risk of injury a Lower water temperatures are recommended for young children and when spa use exceeds 10 minutes In order to avoid the possibility of hyperthermia heat stress occurring it is recommended that the a...

Page 5: ...a or hot tub Water temperature in excess of 42 C 108 F may be injurious to your health Never use a spa or hot tub alone or allow others to use the spa alone Do not use a spa or hot tub immediately following strenuous exercise Spa heat in conjunction with alcohol drugs or medication can cause uncon sciousness Exit immediately if uncomfortable dizzy or sleepy Spa heat can cause hyper thermia and unc...

Page 6: ... not operating Always enter and exit the spa or hot tub slowly and cautiously Caution of wet floor To avoid damage to the pump never turn on the spa or hot tubs unless it is filled with water to the minimum water line Place the spa or hot tub only on a properly prepared site that can withstand the floor loading requirement of the spa Do not leave the spa empty for extended period of time Drain awa...

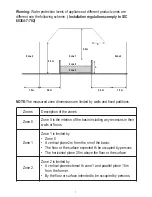
Page 7: ...fixed partitions Zones Zone 0 Zone 1 Zone 2 Description of the zones Zone 0 is the interion of the basin including any recesses in their walls or floors Zone 1 is limited by Zone 0 A vertical plane 2m from the rim of the basin The floor or the surface expected th be occupied by persons The horizontal plane 2 5m above the floor or the surface Zone 2 is limited by A vertical plane external th zone 1...

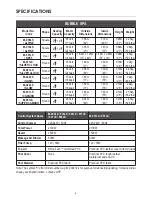
Page 8: ...kg 54 0lbs 22kg 48 5lbs 24kg 52 9lbs 25 5kg 56 2lbs 28 5kg 62 8lbs SPECIFICATIONS Control System Total Power Heater Massage Air Blower Filter Pump Top Lid Pool Cover Pool Material Control System Specs 220 240V 50Hz 2100W 1500W 600W 12V 35W Rhino Tech reinforced PVC None Premium PVC fabric M 009LS 019LS 001LS 011LS 021LS 022LS 220 240V 50Hz 2100W 1500W 600W 12V 35W Premium PVC leather cover with fo...

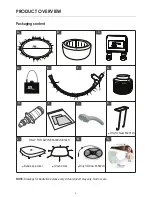
Page 9: ...ing content NOTE Drawings for illustration purpose only Actual product may vary Not to scale A B C D E F G H I J K M N Only for Glow M 022LS Only for Nest M 001LS L Buckle spa cover Ground mat E F ONLY FOR ALPINE M 009LS 019LS ...

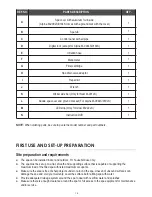
Page 10: ... G H I J K L M N 1 1 1 1 1 1 1 1 1 1 1 1 1 1 FIRST USE AND SET UP PREPARATION The spa can be installed indoor and outdoor For household use only The spa must be set up on a flat smooth and supporting surface that is capable of supporting the maximum load of the filled spa with listed maximum occupants Make sure the area is free of sharp objects under or around the spa Uneven of unsound surfaces ca...

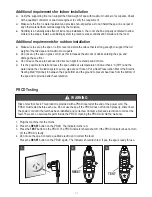
Page 11: ...ide the circulation system pump pipe are not frozen Put a Heat Preservation Mat or the Electric Heating Mat Optional in between the spa bottom and the ground to prevent heat loss from the bottom of the spa and to provide better heat retention Additional requirements for outdoor installation Plug the machine into the mains Press the RESET button on the PRCD The indicator turns red Press the TEST bu...

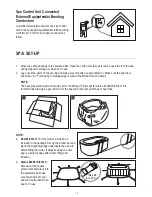
Page 12: ...efore filling the water It helps keeping the oval spa in a proper shape after water filling and inflation Alpine M 009LS 019LS Spread out the square ground mat and place it to the selected site Make sure the buckle of cover and mat is attached when spa not in use NOTE The heat preservation ground mat is not for the MSpa LITE except for Alpine M 009LS 019LS It is recommended to apply a ground mat f...

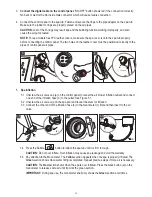
Page 13: ... on the control panel to reveal the air blower inflation outlet and connect one end of the inflation hose b to the outlet See Figure 5 1 5 2 Unscrew the air valve cap on the spa pool and reveal the stem for inflation 5 3 Connect the other end of the inflation hose b to the manometer c first and then insert to the air valve 5 3 4 O rings 11 5 1 5 2 5 3 a b b c 5 4 Press the Bubble button to inflate...

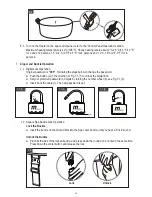
Page 14: ...er fill the spa It is recommended to fill the spa with lukewarm water for quick heating and energy saving WARNING Water level must reach the Minimum water line but not exceed the Maximum line to avoid pump failure Never pour water with a temperature higher than 40 C 104 F into the spa directly To avoid control system failure do not operate the spa until water reaches the Minimum line 6 3 After wat...

Page 15: ...below to change the password Push the button a in the direction of Fig 7 1 1 to unlock the digital lock Set your preferred password in 3 digits by turning the number wheel b see Fig 7 1 2 Insert back the cable c The new password is set 7 2 Square Spa Buckle Lock Operation Lock the Buckle Insert the buckle on the Ground Mat into the Spa cover buckle until you hear a Click sound Unlock the Buckle Pi...

Page 16: ...Heater Button Use this button to activate the HEATING and FILTRATION function at the same time The heater will heat the spa water until the water temperature reaches the pre set temperature After the current water temperature drops 2 C 3 6 F below the set tempera ture the heating system will restart automatically When the HEATER button is red the heating system is activated When the HEATER button ...

Page 17: ...ected It is OK to use the spa If error code shows after self checking contact the MSpa Service Change the water or contact the MSpa Service Center ERROR CODE CHART Water Sanitation The spa owner must regularly check and keep the spa water sanitized with scheduled maintenance daily if necessary Adding sanitizer or other chemical will control bacteria and viruses present in the spa water The mainten...

Page 18: ...er is not covered by the warranty Consult with your local spa or pool retailer for more information on chemical use 4 All occupants must shower before entering the spa 5 When spa inlet or outlet is stuck with dirt Use the Wrench to check the problem and clean the inlet or outlet Water Balance Maintain the spa water pH level between 7 2 and 7 8 total alkalinity between 80 and 120ppm and free chlori...

Page 19: ...hypobromous acid B0301860 Chlorine Granules 1Kg Bottle Adds isocyanuric acid to the spa water which resists chlorine loss from UV rays Does not contain calcium can be used to sanitize hard water without increasing the calcium hardness Contains troclosene Sodium dehydrate 100 B0301861 Algaecide 1L Bottle Kills all types of algae including green and mustard algae Non foaming algaecide for improving ...

Page 20: ...0 minutes 20 DRAINAGE CLEANING AND STORAGE Spa Drainage 1 Turn off all the buttons heater filter and bubble on the control panel unit 2 Connect the drain valve adapter to a garden hose and point the other end of the garden hose to a suitable draining area with local environmental regulations Fig 1 3 Remove the drain valve cap from the outside of the spa tub and attach the drain valve adapter with ...

Page 21: ...rage and Prepare for the Next Time Use 1 Drain and clean the spa by following the Drainage and Spa Cleaning sections 2 Reserve the set up instructions to deflate and disassemble the spa tub spa control unit and air bladder 3 Make sure all the spa components and accessories are thoroughly clean and dry before storage Air dry the spa tub in the mild sun for an hour before folding 4 Fold the spa tub ...

Page 22: ...OWER DOES NOT WORK Pump is too hot Bubble motor is short circuit Auto off 10 minute Unplug the control box and reset in a while Contact the MSpa Service Center SPA LEAKING Spa inlet outlet connection not securely tight Tighten the inlet and outlet connection Pin plug connection failure Water leaks from the spa pool body Water level is not at the minimum water line Waiting for 10 minutes and turn o...

Page 23: ...ll bubble After you find the leak clean and dry the leaking area then use the repair patch comes with your spa Check the repair section on P20 Fill up the tub with air make sure the air valves are secure replace if necessary SPA TUB IN AN ABNORMAL SHAPE Extra air pressure by strong sunshine Please check the air pressure and release air if necessary During hot weather it recommended to check if it ...

Page 24: ...lid only in the country of purchase in such countries where MSpa sells and services the same model with identical technical specifications Warranty service outside the country of purchase is limited to the terms and conditions of the corresponding warranty in the country of service Where the cost of repairs or replacement is not covered by this warranty MSpa will advise the owners and the cost sha...

Reviews: