background image

Rev AE

User Interface     4-15

MSSC QM1610 Operator Manual

5

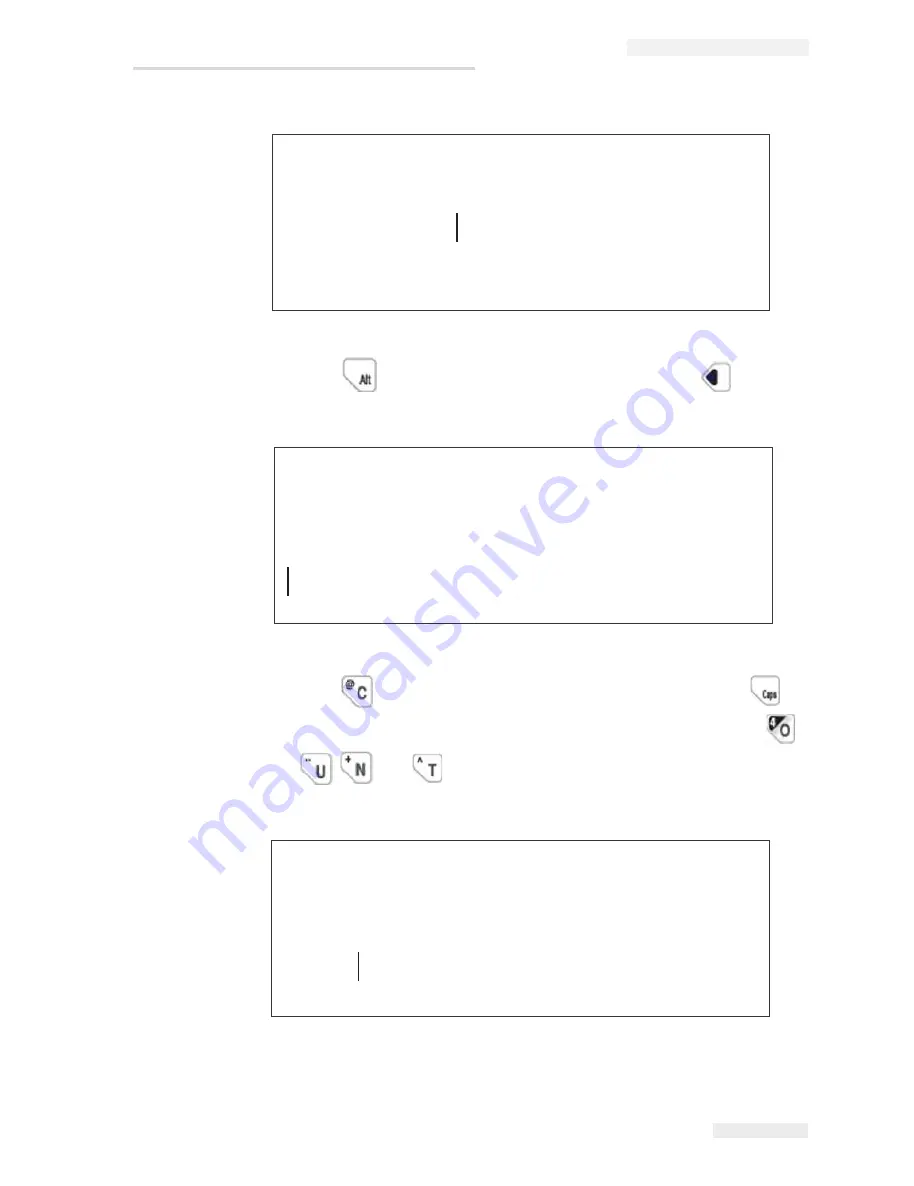
Press 

 to move the cursor to the second line. Press 

 to move 

the cursor to position (refer Figure 4-29). 

6

Press 

 to insert the letter 

‘

C

’

 to the current position. Press 

 to 

switch between the lowercase and uppercase input styles. Press 


and  

to 

insert 

‘

o

’

‘

u

’

‘

n

’

, and 

‘

t

’

 into the message, as 

shown in the Figure 4-30.

1IWWEKI

)HMXSV

)2

%

7IT

Figure 4-28: Message Editor - Current Day

1IWWEKI

)HMXSV

)2

%

7IT

Figure 4-29: Message Editor

1IWWEKI

)HMXSV

)2

%

7IT

'SYRX

Figure 4-30: Insert Character

All manuals and user guides at all-guides.com

Summary of Contents for QM1610

Page 1: ...QM1610 Large Character Ink jet Printer Operator Manual P N 462376 01 Revision AE May 2013 All manuals and user guides at all guides com a l l g u i d e s c o m...

Page 2: ...2013 Used with permission MSSC LLC 926 McDonough Lake Road Phone 618 343 1006 Collinsville Phone 800 854 8905 IL 62234 USA Fax 618 343 1016 www msscllc com All manuals and user guides at all guides co...

Page 3: ...ure 3 3 Chapter 4 Operation and Setup Overview 4 1 Keyboard Description 4 2 Print On Off 4 3 Dot Size 4 4 Purge 4 4 Print Delay 4 5 Character Width 4 5 Date 4 6 Time 4 6 Count Display 4 7 Number Speci...

Page 4: ...610 Operator Manual 2 Rev AE External Shell of the Printer 5 1 Maintenance of the Nozzle and the Internal Sensor 5 2 Startup Procedure 5 3 Shutdown Procedure 5 4 All manuals and user guides at all gui...

Page 5: ...s described in this manual All occurrences of the word printer are references to the QM1610 printer Warning PERSONAL INJURY If you wish to perform your own service and maintenance on the printer make...

Page 6: ...tic valid date printing Automatic shift setup a maximum of four shifts Automatic count setup a maximum of ten digits Print delay distance setup maximum delay of 50 cm Adjustable character width Integr...

Page 7: ...ther usage of the printer may result in injury to the operator Caution Read through this chapter before using the printer Warning PERSONAL INJURY While installing operating servicing or performing mai...

Page 8: ...goggles with side shields or a face mask It is also advisable to wear safety glasses when carrying out maintenance If solvent contaminates the skin rinse off with running water for at least 15 minute...

Page 9: ...owing components 1 QM1610 printer 2 Ink 230ml 3 Stainless steel tube outer diameter 1 inch and length 15 inches 4 Stainless steel tube outer diameter 1 inch and length 9 inches 5 Fastening and fixing...

Page 10: ...rinter 1 Controller 2 Printhead 3 Ink Inlet 4 Bracket 5 Keyboard 6 Screen 7 Externally connected sensor cover 8 External cable 9 Internal sensor 10 Nozzle block 11 DC 12V input Figure 3 2 Standard QM1...

Page 11: ...ion where there are guide bars on the conveyor If necessary install the guide bars This will keep the product at a correct distance from the printhead no further away than 6 mm and prevent any damage...

Page 12: ...Note For pictorial guidance on the installation steps refer to Figure 3 3 on page 3 3 1 Attach the aluminium clamp to the printer controller mounting frame using the two screws and two nuts Refer to F...

Page 13: ...steel tubes with an outer diameter of 2 5 cm 1 inch Note The conveyor side rails channel should be a 0 32 cm x 6 3 cm 1 8 inches x 2 5 inches or greater steel Note Make sure the QM1610 mounting brack...

Page 14: ...ust the printhead by loosening the cross clamp with the ratchet handles Note The QM1610 printhead should be perpendicular to the product If some nozzles are further away from the product than the othe...

Page 15: ...strate refer Figure 3 8 Prevent any strong wind like that from a fan from blowing onto the nozzle Note There are two methods of installing the printer brace This enables the printer to move forward an...

Page 16: ...shown in Figure 3 10 on page 3 9 a Follow direction 1 in the following figure to push the controller to release it from the rotation restriction b Follow direction 2 in the following figure to rotate...

Page 17: ...he protection cover from the sensor connecting end wire 2 Peel off 5 mm length of the external cover of the core wire 3 Open the cover of the externally connected sensor 4 Insert the wire of the exter...

Page 18: ...ote You must set the printer software properly while using the external photocell With an external photocell Auto Detect is not used to set speed or direction Use the Set Line option in the main menu...

Page 19: ...Figure 3 14 c Connect the power supply to an appropriate voltage power source Note Before printing fix the power supply adapter with the cable tie provided by MSSC or the customized brace as shown in...

Page 20: ...bottle through the orifice and position the mouth of the ink bottle towards the printhead b Push the ink bottle forward and twist it clock wise until it is tightly connected to the printer Figure 3 1...

Page 21: ...icinity of the equipment so that it is easily accessible Note Make sure that the power source for the QM1610 is free from surges and spikes The QM1610 like other computer equipment is sensitive to sur...

Page 22: ...3 14 Fast Installation Rev AE MSSC QM1610 Operator Manual Figure 3 18 Product Spacing All manuals and user guides at all guides com...

Page 23: ...nt messages as well as for the other functionalities 2 Function area Use to set up the special function and hot keys for inserting special functionalities into messages 3 Guide key area Use to move th...

Page 24: ...aracter width hot key 6 Date setup insert hot key 7 Time setup insert hot key 8 Count setup insert hot key 9 ESC Exit 10 Backspace delete 11 Left Shift 12 Input method switch 13 Capital lock 14 Right...

Page 25: ...er operations like edit select message etc if the customer needs to enter the main menu stop the printing press till the red indication light turns ON 1 Print on off 2 Dot size hot key 3 Purge hot key...

Page 26: ...ssing make sure that the proper collection devices are placed in front of the nozzle to prevent ink from spraying on other products Note If you have not used the printer for a while for example 3 days...

Page 27: ...sor to the nozzle is added to the print delay Note Changing the print delay value affects only the message that is currently selected for print and that delay value is stored with the message Note Pri...

Page 28: ...position to enter data and press to change the value Press to confirm the change Time Press to enter the following user interface Press to move the cursor to the correct position to enter data and pre...

Page 29: ...select the upper left characters press and for the upper right characters press Note QM1610 displays the lock status of the keys in the status display area on the right at the bottom of the screen Th...

Page 30: ...er interface This indicates the language input currently selected Capital Lock In the Edit Message interface if the current character input style is lowercase press to switch to the uppercase To switc...

Page 31: ...evice name language and software version number Main Menu Structure 51 4 Figure 4 11 Start Screen 1EMR 1IRY 7IPIGX 1IWWEKI VIEXI 1IWWEKI HMX 1IWWEKI Figure 4 12 Main Menu Screen 1 1EMR 1IRY 7IX 6SPPSZ...

Page 32: ...the interface Press to select a message for printing If there are more than three saved messages press to go to the next page If you wish to select a 1EMR 1IRY 7IX 0MRI 7SJX EVI IVWMSR 7IPIGX 0ERKYEK...

Page 33: ...nting function press till the green light turns ON Automatic spray printing starts once the sensor is triggered Create New Message In the main menu once Create New Message is highlighted press to ente...

Page 34: ...ge editing 1 Press to enter the following interface YYYY the Current Year insert is highlighted Press to insert 2009 The interface displays the following information 2I 1IWWEKI 2EQI 2 EFGH Figure 4 19...

Page 35: ...23 3 Press to enter the following interface Press till MMM Current is highlighted 1IWWEKI HMXSV 2 Figure 4 22 Message Editor Current Year 1IWWEKI HMXSV 2 Figure 4 23 Message Editor Space RWIVX EXI 7LM...

Page 36: ...till DD Current is highlighted Press to insert the current day For example 14 RWIVX EXI 7LMJX YVVIRX 11 T 111 11 7 8 111 Figure 4 25 Insert Month RWIVX EXI 7LMJX YVVIRX 111 11 T 111 11 7 8 Figure 4 2...

Page 37: ...etter C to the current position Press to switch between the lowercase and uppercase input styles Press and to insert o u n and t into the message as shown in the Figure 4 30 1IWWEKI HMXSV 2 7IT Figure...

Page 38: ...face Press the following buttons in sequence to set the initial count value as 0003313 Press to insert the count value into the message Figure 4 31 Insert Special Character Figure 4 32 Set Count Value...

Page 39: ...nu Edit Message In the main menu while Edit Message is highlighted press to enter the following interface The list of all saved messages is displayed Press to select the message you wish to edit If th...

Page 40: ...with a fixed format placed directly before the cursor After editing the message press to confirm the edit To save the edited message press till Yes is highlighted and then press to save the message a...

Page 41: ...Then press to return to the main menu without deleting the selected message Date Rollover Time In the main menu while Date Rollover Time is highlighted press to enter the following interface You can...

Page 42: ...ttons in sequence to set the initial count value as 0003313 After the value is set the end count value is the default value 999 9999 The number of digits is the same as that of the initial count value...

Page 43: ...tings and return to the main menu Set Production Line In the main menu while Set Line is highlighted press to enter the following interface Note Auto Detect option for speed and direction cannot be us...

Page 44: ...is adopted MSSC recommends that you set the production line speed settings to the fixed speed mode This improves the working stability of the printer 2 Select Set Direction and press to enter the foll...

Page 45: ...s select Internal and press to return to the main menu If there are external sensors select External and press to return to the main menu Note If the interference of the field environment is substanti...

Page 46: ...while Select Language is highlighted press to enter the following interface There are various language options Press to select the required language and press to return to the main menu 7SJX EVI IVWM...

Page 47: ...ance of the Keyboard and the External Shell of the Printer Keep the surface of the printer free of dust and other impurities Dip a clean soft cloth into some water Remove the excess water from the clo...

Page 48: ...ee of dust and other impurities Dip a clean cotton swab into some water and use it to clean the surface around the nozzle and sensor Note Make sure the nozzle surface is free of impurities from the co...

Page 49: ...n the products or the production line Warning PERSONAL INJURY Do not point the nozzle at the operator or other persons present near the printer Startup Procedure At the beginning of each shift perform...

Page 50: ...Also do not remove any ink that may have caked on the nozzle block This will keep contaminants from entering the nozzles When you restart the unit follow the daily maintenance procedures on Startup Pr...

Reviews: