background image

QM7500 Technical Manual

26     Parts List


QM31930/03093 Rev AD

Description

Part Number

Quantity per 

Package

Consumables – Porous

1. Ink, Porous Cartridge Black

QM20943

12

2. Ink, Porous Cartridge Red

QM20945

12

3. Solvent, Porous Cartridge

QM20947

12

Other Components

4. Cover, Controller Harsh Environment

QM16283

1

5. Cleaner, Nozzle

QMRP15943

1

6. Bracket Kit, Long Reach

QM15990

1

7. Bracket Kit, Remote

QM15916

1

8. Hanger, Power Supply

QMRP16568

1

9. Overlay, Keypad Greek

QM27392

1

10. Overlay, Keypad Arabic

QM27393

1

11. Overlay, Keypad Hebrew

QM27394

1

12. Manual, QM7500 Owners

QM32004

1

13. Manual, QM7500 Technical

QM31930

1

14. Card, QM7500 Quick Reference

QM32050

1

Summary of Contents for qm7500

Page 1: ...4ECHNICAL ANUAL 33 C ONOUGH AKE 2OAD OLLINSVILLE 5 3 4EL 4EL AX 33 LL 2IGHTS 2ESERVED 0RINTED IN 5 3 1 2EV...

Page 2: ......

Page 3: ...ng a Nozzle 10 Backflushing a Valve 11 Replacing the Nozzle Block 11 Optional 7 mm 15 mm and 20 mm Nozzle Blocks 12 Replacing a Valve 12 Replacing the Regulator 13 Replacing the Valve Photocell Board...

Page 4: ......

Page 5: ...UTION This manual is designed for use by qualified technicians only Any unauthorized repairs will void your warranty Unless you are a qualified technician do not attempt maintenance that is not discus...

Page 6: ...ty declines replace the ink bottle with solvent and purge solvent through the unit Shutdown If you are shutting down the unit for less than two weeks simply turn off the controller You do not need to...

Page 7: ...ocell board defective Replace the printhead photocell board See page 15 The machine resets itself Valve shorted out Replace the defective valve See page 12 The unit will purge but not print Wires loos...

Page 8: ...reset after the ZAP routine Note Always perform the ZAP routine after replacing software The dots are splattering on the print sample Printhead too far away from the product Position the printhead as...

Page 9: ...ameter settings dot size character width print delay These will need to be reset after the ZAP routine Message prints backwards or is too long One of the two photocells are dirty 1 Clean the photocell...

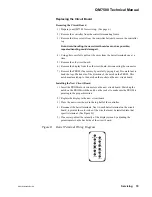
Page 10: ...to remove any ink from the system 3 Remove the QM7500 and power supply to a well lit static free workbench Special Notes for Reassembling the QM7500 Printhead Make sure the regulator is properly seat...

Page 11: ...QM7500 Technical Manual QM31930 03093 Rev AD Servicing 7 Standard QM7500 Assembly 1 2 3 4 5 1 Controller 2 Frame 3 Power Supply 4 Bracket Assembly 5 Printhead...

Page 12: ...ev AD Printhead Assembly 1 2 3 4 5 6 7 8 9 10 12 1 Valve Retaining Clip 2 Tubing Nozzle 3 Nozzle Block 4 Valve 5 Photocell Board 6 IDC Connector 7 Valve Board 8 Printhead Button 9 Regulator 10 Tubing...

Page 13: ...echnical Manual QM31930 03093 Rev AD Servicing 9 Controller Assembly 1 Gasket 2 Lens 3 Display 4 Tape 5 Controller Bottom Enclosure 6 Printed Circuit Board 7 Keypad 8 Controller Top Enclosure 1 2 3 4...

Page 14: ...ween the two boards to prevent damaging the cable connections 3 From a print sample locate the nozzle that needs backflushing 4 Slide out the photocell board 5 Disconnect the tubing connected between...

Page 15: ...assembly nozzle from the service kit on a bottle of solvent 8 Install tubing from the service kit on the cleaner assembly nozzle 9 Connect the tubing from the cleaner assembly nozzle to the outlet ce...

Page 16: ...e Figure B 2 Slide the newly connected nozzle block into its slot in the printhead 3 Replace the photocell board and printhead cover Be careful not to pinch any of the wires in the printhead 4 Install...

Page 17: ...ng 8 Disconnect the old valve from the valve board Installing the New Valve 1 Connect the tubing from the ink manifold to the intake off center port on the new valve 2 Connect the tubing from the nozz...

Page 18: ...tment will void your warranty and cause operating difficulties 1 Position the new regulator through the opening in the valve board 2 Using pliers carefully slide the tubing onto the regulator ports on...

Page 19: ...lexing of the cable between the two boards to prevent damaging the cable connections 3 Carefully lift the controller mounting frame off the bottom half of the printhead 4 Carefully pull the tubing off...

Page 20: ...e the nozzle block into position 4 Slide in the valve retaining clip and seat the valves 5 Reposition the regulator 6 Plug in the IDC connector 7 Pull the tubing back through the opening in the valve...

Page 21: ...oller top 4 Remove the tape that holds the display in place 5 Disconnect the display from the connector on the printed circuit board Installing the New Display 1 Plug the new display connector into th...

Page 22: ...Angaben des Herstellers Removing the Battery 1 Prepare your QM7500 for servicing See page 6 2 Remove the controller from the controller mounting frame 3 Remove the three screws from the controller bot...

Page 23: ...ake note of the direction of the notch on the PROM This notch must match up to the notch on the socket on the new circuit board Installing the New Circuit Board 1 Insert the PROM into its connector on...

Page 24: ...the Parts List to obtain whatever you might need to expand upgrade repair or maintain your system The Parts List includes exploded illustrations of system components with a textual parts listing To p...

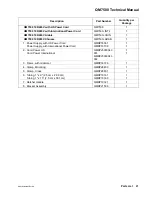
Page 25: ...00 100 240V Chinese QM7500 ARAB 1 1 Power Supply with US Power Cord Power Supply with International Power Cord QMRP16061 QMRP19706 1 1 2 Cord Power US Cord Power International QMRPJ5000043 001 QMRPJ50...

Page 26: ...QM7500 Technical Manual 22 Parts List QM31930 03093 Rev AD QM7500 Standard Assembly Description Part Number Quantity per Package 8 1 4 6 5 6 3 4 7 2...

Page 27: ...Valve Retaining QMRP16053 1 4 Regulator Assembly QMRP15884 1 5 Nozzle Block 10 mm Nozzle Block 7 mm Optional Nozzle Block 15 mm Optional Nozzle Block 20 mm Optional QMRP15895 QM22836 QM18154 QM18217...

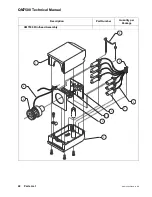
Page 28: ...QM7500 Technical Manual 24 Parts List QM31930 03093 Rev AD QM7500 Printhead Assembly Description Part Number Quantity per Package 3 8 7 6 5 4 1 6 2 10 9...

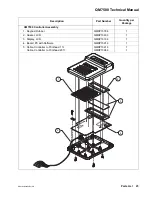
Page 29: ...umber Quantity per Package QM7500 Controller Assembly 1 Keypad Rubber QMRP15788 1 2 Gasket LCD QMRP15909 1 3 Display LCD QMRP16166 1 4 Board PC with Software QMRP15912 1 5 Cable Controller to Printhea...

Page 30: ...idge QM20947 12 Other Components 4 Cover Controller Harsh Environment QM16283 1 5 Cleaner Nozzle QMRP15943 1 6 Bracket Kit Long Reach QM15990 1 7 Bracket Kit Remote QM15916 1 8 Hanger Power Supply QMR...

Reviews: