background image

PROPULLATOR 13500-PRO

Max. load capacity

13500 lbs (6124 kg)

Engine

6 HP 12V

Control

Cable remote control and wireless remote 
control

Gearbox

3 stage epicyclic

Gear change

180° turn

Gear ratio

265:1

Break

Autamtically, installed in the drum

Cable diameter and lenght

9.5 mm diameter x 26 m

Drum size

Diameter 64 mm x 226 mm

Position of the screws

254 mm x 114.3 mm

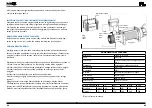
6.   Connect the positive pole of the red rope with the positive pole of the battery.
7.   The overload protection is in the black control box. The protector will stop the  
  motor, in case of overload. As soon as the motor is cooled down, you can operate  
  again.

long 

black 
cable

long red cable

thin
black 
cable

winch

short
black 
cable

short
red cable

control box

black cable with 

yellow jacket

Weight

kg

0

907

2722

4536

6124

Speed

Mpm*

6,8

4,2

2,8

1,8

1,2

Ampere

A

50

110

160

330

380

PROPULLATOR 9500-PRO

Max. load capacity

9500 lbs (4310 kg)

Engine

5.5 HP 12V

Control

Cable remote control and wireless remote 
control

Gearbox

3 stage epicyclic

Gear change

180° turn

Gear ratio

218:1

Break

Autamtically, installed in the drum

Cable diameter and lenght

8.3mm diameter x 28m 

Drum size

Diameter 64 mm x 226 mm

Position of the screws

254 mm x 114.3 mm

CARE AND MAINTENANCE

It is highly recommended to operate the winch regularly (at least once a month). It 
is sufficient to unwind the steel rope 15 meters under power, then unwind next 5 
meters without power and finally to wind up the the steel rope completely under 
power. This process will preserve all the components of the winch in good condition, 
so that you can rely on the winch whenever it is really needed. The winch should only 
be repaired by specialists. Use only original spare parts.

Weight

kg

0

907

1814

2722

4309

Speed

Mpm*

10,8

4,88

3,63

2,98

2,2

Ampere

A

78

130

190

240

350

*Mpm = Meter per minute

28

29

Summary of Contents for Propullator 13500-PRO

Page 1: ...NDEN PROPULLATOR 9500 Pro 13500 Pro User manual Manuel d utilisation Istruzioni per l uso Manual de instrucciones Instrukcja obsługi Bedienungsanleitung M S W M O T O R T E C H N I C S M S W M O T O R T E C H N I C S ...

Page 2: ...Propullator 13500 PRO 9500 PRO 2 3 INHALT CONTENU CONTENT CONTENUTO CONTENIDO TREŚĆ Deutsch English Polski Français 3 18 30 47 ...

Page 3: ...alle Personen ausreichend Abstand zur Seilwinde und zum Stahlseil halten während die Winde arbeitet Der Abstand sollte das 1 5 fache der Seillänge betragen Wenn das Stahlseil von der Last abspringt oder wenn es reißt peitscht es zurück oder zur Seite was Personen schwer verletzten oder töten könnte Treten Sie niemals auf oder über das gespannte Stahlseil Alle Besucher und an der Arbeit nicht betei...

Page 4: ...n sorgfältig durch bevor Sie mit der Seilwinde arbeiten Bewahren Sie dieses Handbuch auf damit Sie später darin nachlesen können 1 Das ungleichmäßige Aufspulen des Stahlseils während des Ziehens einer Last ist nicht gefährlich solange sich das Stahlseil nicht auf einer Seite der Trommel anhäuft Sollte dies der Fall sein unterbrechen Sie das Ziehen indem Sie auf Ent lasten umschalten und bewegen Si...

Page 5: ...nmittelbar abhängig von Umgang und Pflege Nach dem ersten Gebrauch und allen darauf folgenden Gebrauchen muss das Stahlseil unter einer Last von mindestens 230 kg auf die Trommel gewickelt werden andernfalls wird das Seil während der Arbeit erheblich beschädigt Der erste Gebrauch der Seilwinde sollte zur Eingewöhnung des Benutzers an die Funktionen des Gerätes dienen Spulen Sie das Stahlseil herau...

Page 6: ...Sie den Einrückhebel in die Position Engaged Nehmen Sie die Schutzabdeckung der Steckdose ab Stecken Sie den Stecker der Fernbedienung in die Steckdose Stellen Sie sich neben die Winde in sicherer Entfernung zum Seilkabel auf und betätigen Sie den In Schalter an der Fernbedienung Halten Sie diesen gedrückt Um die Drehrichtung zu ändern lassen Sie den Schalter los und warten sie ein paar Sekunden b...

Page 7: ...en Sie den Haken nicht am Stahlseil selbst Dies könnte die Last beim Ziehen beschädigen und das Seil ausfransen und beschädigen 3 Halten Sie Hände Füße Kleidung Haare und Schmuck fern von der Seilwinde und vom Stahlseil 4 Benutzen Sie die Seilwinde niemals mit einem kaputten ausgefransten oder geris senem Stahlseil 5 Erlauben Sie niemandem neben dem Stahlseil oder in einer Linie mit dem Stahlseil ...

Page 8: ...USS Eine elektrische Anlage ist für normale Arbeit mit der Seilwinde ausreichend Eine voll aufgeladene Batterie und unbeschädigte Kabel sind notwendig Der Fahrzeugmotor sollte während des Arbeitens laufen damit sich die Batterie nicht völlig entleert STROMVERBINDUNG Das vorhandene Stromsystem kann die normale Rettungsarbeit schaffen Die voll aufgeladene Batterie und die richtigeVerbindung sind die...

Page 9: ...iebe Gang einlegen 180 Drehung Getriebeübersetzung 218 1 Bremse Automatisch eingebaut in der Trommel Stahlseil 8 3mm Durchmesser x 28m Trommelgröße Durchmesser 64mm x 226mm Lage der Schrauben 254mm x 114 3mm WARTUNG UND PFLEGE Es wird sehr empfohlen die Seilwinde regelmäßig mindestens einmal im Monat zu betätigen Es genügt das Stahlseil 15 Meter unter Strom herauszuspulen dann 5 Meter ohne Strom f...

Page 10: ...00 Pro 13500 Pro Bedienungsanleitung Manuel d utilisation Istruzioni per l uso Manual de instrucciones Instrukcja obsługi User Manual M S W M O T O R T E C H N I C S M S W M O T O R T E C H N I C S Propullator 13500 PRO 9500 PRO ...

Page 11: ...in the other Pull gently on the cable during rewinding Begin by positioning yourself the farthest from the winch and in front of it Turn the winch on and slowly let the cable rewind The cable must not slip through your hands Do not approach the winch too Turn off the winch and finish rewinding by hand by turning the drum manually Remove the gear to activate the drum by hand If the winch is recesse...

Page 12: ... while using the winch it could cause an over load or damage the winch 19 Avoid to submit the wich to jerks it damages the cable and can lead to breakage 20 This winch is suitable for mounting it on a boat or a car for a non industrial use 21 Do not use the winch to lift weights 22 The winch is not designed for lifting people TIPS 1 Your battery must be in good condition 2 Make sure the cable is n...

Page 13: ... test run in advance Be careful with noise Learn to distinguish the noise when pulling a light load from that of a heavy load It will not take long and you will gain confidence in dealing with the winch The clutch is switched to free wheeling by rotating the control lever into the FREESPOOL position Grasp the rope at the rope hook unwind the rope to the desired length and attach to the object to b...

Page 14: ...bags 2 Winch mounting frames and or frontal protection systems are adapted to most vehicles Winch frames are packed with detailed installation instructions 3 If you want to build on your own a custom mounting plate you may use for your construction the dimensions given below It is recommended using a steel plate of 6 mm thickness The mounting brackets should be made of high quality stainless steel...

Page 15: ... 1 2 Ampere A 50 110 160 330 380 PROPULLATOR 9500 PRO Max load capacity 9500 lbs 4310 kg Engine 5 5 HP 12V Control Cable remote control and wireless remote control Gearbox 3 stage epicyclic Gear change 180 turn Gear ratio 218 1 Break Autamtically installed in the drum Cable diameter and lenght 8 3mm diameter x 28m Drum size Diameter 64 mm x 226 mm Position of the screws 254 mm x 114 3 mm CARE AND ...

Page 16: ... manual Manuel d utilisation Istruzioni per l uso Manual de instrucciones Instrukcja obsługi M S W M O T O R T E C H N I C S M S W M O T O R T E C H N I C S WYCIĄGARKI PROPULLATOR 9500 Pro 13500 Pro Propullator 13500 PRO 9500 PRO ...

Page 17: ...m przeciążonego silnika Dla dużych obciążeń koniecznie używaj zblocza aby zredukować obciążenie liny 1 Maksymalne obciążenie wyciągarki dotyczy pracy przy pojedynczej linie na pierwszym zwoju od strony bębna NIE PRZECIĄŻAJ URZĄDZENIA NIE CIĄGNIJ WIELKICH CIĘŻARÓW PRZEZ DŁUŻSZY OKRES Nie trzymaj włączonej wciągarki gdy silnik zatrzyma się na skutek przeciążenia Przeciążanie może zniszczyć wyciągark...

Page 18: ...teriał działa jak amortyzator tłumiący impet uderzenia liny 11 NIGDY NIE UŻYWAJ WYCIĄGARKI DO PODNOSZENIA LUB PRZESU WANIA LUDZI 12 Wyciągarka nie jest przeznaczona do podnoszenia przedmiotów do góry 13 UNIKAJ DŁUGIEJ PRACY POD EKSTERMALNYMI KĄTAMI rys poniżej gdyż powoduje to układanie się liny z jednej strony bębna Może to spowodować zaklino wanie się liny i doprowadzić do zniszczenia jej i same...

Page 19: ...zymane w czystości aby mogły zapewnić bezpieczna pracę UŻYTKOWANIE I UTRZYMANIE WYCIĄGARKI Okresowo sprawdzaj dokręcenie śrub mocujących i połączeń elektrycznych Usuń zabrudzenia i korozję z połączeń elektrycznych WSZELKIE NAPRAWY POWINNY BYĆ DOKONYWANE TYLKO W AUTORYZOWANYCH SERWISACH MSW NIE PRÓBUJ ODKRĘCAĆ SKRZYNI PRZEKŁADNI DEMONTAŻ TEGO ELEMENTU UNIEWAŻNIA GWARANCJĘ Przekładnia i jej elementy...

Page 20: ... pierwszym włączeniu 2 Wymienić przełącznik 3 Sprawdzić wadliwe połączenia 4 Zwrócić się do Autoryzowa nego Centrum Napraw MSW 5 Sprawdzić ścieżkę uziemienia pomiędzy ujemnym przewodem akumulatora a podstawą przekaźnika WYCIĄGARKA SIĘ NIE WYŁĄCZA 1 Przekaźnik zablokowany w pozycji włączony 1 Jeśli przekaźnik zablokuje się w pozycji włączony należy zmienić kierunek pracy liny aż przewód zasilający ...

Page 21: ... Clevis Rys 1 Rys 2 WSKAZÓWKI 1 Akumulator musi znajdować się w nienagannym stanie 2 Zadbaj o to by nie doszło do zmiażdżenia kabli Żaden kabel nie może być uszkod zony 3 Korozja połączeń elektrycznych w znacznym stopniu obniża przewodność elektryczną i może spowodować zwarcie 4 Zadbaj o to by wszystkie połączenia przede wszystkim te dotyczące urządzenia zdalnego i tulejek były wolne od zanieczysz...

Page 22: ...dnej linii z nią Gdyby bowiem doszło do zerwania liny to uderzyłaby ona w osoby przebywające w jej pobliżu i spowodowałaby poważne obrażenia u osób lub uszkodziłaby znajdujące się w pobliżu przedmioty W trakcie eksploatacji zawsze zachowuj bezpieczny odstęp do wciągarki i liny stalowej 6 Nie zasilaj wciągarki prądem elektrycznym jeśli nie jest to konieczne MAKSYMALNY UCIĄG Maksymalny uciąg tej wci...

Page 23: ...go zacisku silnika wciągarki 2 Krótki czarny kabel z żółtą otoczką podłączyć do żółtego zacisku silnika wciągarki 3 Krótki czarny kabel z czarną otoczką podłączyć do czarnego zacisku silnika wciągarki 4 Wąski czarny kabel podłączyć do zacisku na spodzie silnika 5 Koniec czarnego długiego kabla podłączyć do zacisku na spodzie silnika biegun ujemny 6 Biegun dodatni czerwonego kabla podłączyć do doda...

Page 24: ... specjalistom Należy używać tylko oryginalnych części zamiennych PROPULLATOR 9500 PRO Maks uciąg 9500 lbs 4310 kg Silnik 5 5 KM 12V Sterowanie Kablowa obsługa zdalna obsługa bezprzewo dowa Przekładnia 3 stopniowa przekładnia planetarna Zmiana biegu obrót 180 Przełożenie 218 1 Hamulce automatycznie wbudowane w bęben Lina stalowa 8 3 mm x 28 m Wielkość bębna 64mm x 226 mm Położenie śrub 254 mm x 114...

Page 25: ...Propullator 13500 PRO 9500 PRO TEILELISTE PROPULLATOR 9500 PRO 13500 PRO 48 49 ...

Page 26: ...tes Coupez l alimentation électrique si le moteur cale ou s enraye Ne dépassez pas la capacité de charge maximale Les chocs conditions difficiles collisions de fret et autres imprévus peuvent impacter sur la valeur de charge maximale Veuillez alors anticiper toute modification de poids lié à un facteur imprévisible 5 Evitez tout démarrage imprévu Lorsque vous n utilisez pas le treuil à câble l emb...

Page 27: ...t matériels 10 Tous les câbles présents dans les treuils sont équipés d un marquage rouge qui prévient que le câble est enroulé encore cinq fois autour du tambour Ce mar quage ne peut pas être dépassé afin d éviter tout accident voir p9 11 Nous recommandons d extraire un maximum de câble du treuil lorsqu il faut tracter les charges les plus lourdes car cette force de traction qui est la plus impor...

Page 28: ... imprévus sur le chargement sont très dangereux pendant une tractation Les impacts soudains et imprévus exercent une pression considérable sur le câble Sachez qu un véhicule en mouvement peut provoquer une secousse importante sur un câble non tendu 20 Sachez que ce treuil n a pas été conçu à des fins industrielles et ne peut être fixé que sur des véhicules ou des bateaux 21 N utilisez pas le treui...

Page 29: ...éhicule sur le châssis Nous vous informons par ailleurs que le treuil a été conçu pour effectuer des tractions horizontales et non pour soulever Avant la mise en service de l appareil Vérifiez si les câbles électriques sont cor rectement reliés INSTALLATION 1 Choisissez une plaque de montage appropriée Premièrement votre plaque de montage doit être adaptée à votre treuil Après installation le mote...

Page 30: ... de vitesse c Avant de commencer l installation du treuil assurez vous que les bases de fixations du treuil puissent supporter la capacité de charge maximale mais aussi que le système soit conforme à la tractation de charge d L aménagement du treuil et ou l installation d un système frontal de protection peut déclencher les airbags Le système de fixation doit être vérifié afin de déter miner s il ...

Page 31: ... La protection contre les surcharges électriques du moteur est dans la boîte de contrôle noire La protection arrête le moteur en cas de surcharge électrique Vous pouvez reprendre votre travail une fois le moteur refroidi long noir Câble Long câble rouge Fin mince noir Câble Treuil à câble court noir Câble court câble rouge Boîte de contrôle Câble noir avec la gaine jaune Batterie Propullator 13500...

Page 32: ...iquement Ce processus permet de garder en bon état tous les éléments du treuil à câble En respectant cette consigne vous pouvez vous fier à sa bonne fonctionnalité dans le temps Ne faites réparer votre treuil à câble que par des techniciens qualifiés N utilisez que des pièces de rechange identiques à celles d origines Poids kg 0 907 1814 2722 4309 Vitesse de traction Mpm 10 8 4 88 3 63 2 98 2 2 Am...

Page 33: ...64 65 ...

Page 34: ...ytych urządzeń Po zakończeniu okresu użytkowania nie wolno usuwać niniejszego produktu poprzez normalne odpady komunalne lecz należy go oddać do punktu zbiórki i recyklingu urządzeń elektrycznych i elektronicznych Informuje o tym symbol umieszczony na produkcie instrukcji obsługi lub opakowaniu Zastosowane w urządzeniu tworzywa nadają się do powtórnego użycia zgodnie z ich oznaczeniem Dzięki powtó...

Page 35: ...enen Altgeräte aus privaten Haushalten ihres Gebietes für Sie kostenfrei entgegengenommen werden Möglicherweise holen die rechtlichen Entsorgungsträger die Altgeräte auch bei den privaten Haushalten ab Bitte informieren Sie sich über Ihren lokalen Abfallkalender oder bei Ihrer Stadt oder Gemeindeverwaltung über die in Ihrem Gebiet zur Verfügung stehenden Möglichkeiten der Rückgabe oder Sammlung vo...

Reviews: