background image

769-07415 P00

12/11

Continue squeezing the 
throttle control and run unit for 
additional 30 to 60 seconds to 
complete warm up. The unit 
may be used during this time.

SQUEEZE

 and 

HOLD

 throttle 

control for 

ALL

 further steps. 

Quick Instructions  
to Replace  
Trimmer Line

For replacement line, call
1-800-800-7310 or go to an
authorized service dealer. 

For complete line installation, 
refer to Line Replacement
section of the unit’s manual. 

Quick Instructions to 
Assemble Straight 
Shaft String 
Trimmers

for complete instructions, refer to the 
Assembly Instructions of the unit’s 
manual.

IMPORTANT: READ THE OPERATOR’S MANUAL THOROUGHLY AND FOLLOW THE SAFE OPERATION PRACTICES WHILE OPERATING THE UNIT.

Read and understand all instruction, warning and danger labels on the unit.

Remove the cap and spacer 
from the boom. Push the 
bottom add-on into the coupler.  
Turn the knob clockwise to 
tighten.

Tip unit so that the back of the engine 
is facing up in a vertical position. 
Remove the oil fill plug from the 
crankcase and pour the entire bottle 
of 4-cycle oil into the oil fill hole.

NOTE:


Do not mix gas and oil

Insert each end of the 
replacement line into the 
holes on either side of 
retention hook.

Push the ends through 
until they stick out of the 
sides of the head.

Pull the ends through making 
sure that the ends are of 
equal length and the middle 
of the line is centered 
between the insertion holes. 

Push the trimmer line 
until it lies flat against the 
cutting head. Make sure 
the two lengths of cutting 
line are of equal length.

Place the 

shield 

onto the

mount bracket

. Securely screw the 

2 shield screws through the holes on 
the mount bracket and into the 
shield. Make sure the screws are 
tightened equally so there is a 
balanced gap between the bracket 
and the shield on each side.

Quick Instructions 
to Start Engine

for complete instructions, refer to the 
Starting/ Stopping Instructions of the 
unit’s manual.

Continue to squeeze 
throttle control and 
move the choke 
lever to 

Position 3

.

Move choke lever to 

Position 2

.

Pull starter rope 3 to 5 times. 
Making sure to keep throttle 
squeezed, run unit for 30-60 
seconds to warm up.

Choke Lever

Choke Lever

3 to 5 X

Fill fuel tank with fresh fuel.

Press primer bulb 10x

 and move 

choke lever to 

Position 1

.

Pull the rope 5 times.

Crouch in starting 
position.

5 X

Unleaded

Gasoline

Choke Lever

Primer

Bulb

DIDN’T START?

Repeat the starting instructions. If the unit 

still fails to start, refer to the operator’s 

manual for additional starting and 

troubleshooting information.

HOT RESTART

If the engine is hot:

 Move the choke lever to 

Position 2

, press the primer bulb 

10 times

squeeze the throttle control and pull the 

starter rope until the unit starts. Run the unit 

for 2-5 minutes. The unit may be used during 

this time. Then move the choke lever to 

Position 3

Loosen the bolt on the handle just 
enough to move it. While holding the
unit in the operating position move the 
D-handle to the location that provides
the best grip. Tighten the bolt until the 
D-handle is secure. 

Español — Page 11

English — Page 1

Français — Page 6

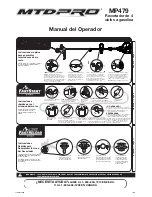
Operator’s Manual

NEED HELP?

CALL 1–800-800-7310 IN U.S. OR 1–800–668–1238 IN CANADA

MP479

4-Cycle Trimmer

Summary of Contents for MP479

Page 1: ...engths of cutting line are of equal length Place the shield onto the mount bracket Securely screw the 2 shield screws through the holes on the mount bracket and into the shield Make sure the screws ar...

Page 2: ...utting location to another If you strike or become entangled with a foreign object stop the engine immediately and check for damage Do not operate before repairing damage Do not operate the unit with...

Page 3: ...ce the unit on the ground or on a work bench 1 Turn knob counterclockwise to loosen Fig 5 2 While firmly holding the add on push it straight into the Rapid Link coupler Fig 4 NOTE Aligning the release...

Page 4: ...ngine repair establishment individual or authorized service dealer NOTE Maintenance replacement or repair of the emission control devices and system may be performed by any non road engine repair esta...

Page 5: ...ts such as kerosene can damage plastic housing or handle Wipe off any moisture with a soft cloth STORAGE Never store the unit with fuel in the tank where fumes may reach an open flame or spark Allow t...

Page 6: ...trangleur en position 3 Placez le levier d trangleur en Position 2 Tirez de 3 5 fois sur le cordon de d marrage En maintenant la pression sur la commande des gaz faites tourner l appareil pendant 30 6...

Page 7: ...btenez la liste des concessionnaires agr s appelez le 1 800 800 7310 aux tats Unis ou le 1 800 668 1238 au Canada Pour de plus amples informations propos de votre appareil visitez www mtdproducts com...

Page 8: ...ilencieux Commande Marche Arr t Accessoire de coupe Protecteur d accessoire de coupe Bouchon du carburant Rapid Link Bouchon de remplissage Levier d trangleur Poire d amor age Lame de coupe Renfonceme...

Page 9: ...nations d oxyde de carbone dans un endroit confin peuvent tre mortelles AVERTISSEMENT vitez tout d marrage accidentel Tenez vous en position de d marrage lorsque vous tirez sur la corde de d marrage F...

Page 10: ...po lb vitez de trop serrer MISE EN GARDE vitez de sabler gratter ou nettoyer les lectrodes car de la salet dans le moteur pourrait endommager le cylindre Fig 33 0 635 mm 0 025 po NETTOYAGE Nettoyez l...

Page 11: ...rranque de 3 a 5 veces Asegur ndose de mantener el regulador oprimido haga funcionar la unidad durante 30 a 60 segundos para calentarla 3 a 5 X Palanca del obturador Siga oprimiendo el control del reg...

Page 12: ...sado enfermo o bajo los efectos del alcohol drogas o medicamentos Los ni os y los adolescentes menores de 15 a os no deben operar las unidades excepto por los adolescentes guiados por un adulto Inspec...

Page 13: ...de aceite Anillo en O Tap n del aceite Fig 7 APPLICATIONS Utilisation comme d sherbeuse Coupe d herbe et de mauvaises herbes l g res Coupe de bordures Tailler autour des arbres des cl tures etc Rapid...

Page 14: ...ION Para evitar un desgaste excesivo del motor y el da o de la unidad mantenga siempre el nivel de aceite correcto en el c rter del cig e al No opere nunca la unidad con el aceite debajo del extremo i...

Page 15: ...re y el ajuste del tornillo de velocidad m nima debe resolver la mayor a de los problemas del motor Si esto no sucede y El motor no funciona en m nima El motor fluct a o se ahoga al acelerarlo Existe...

Page 16: ...eur marchande ou d adaptation une fin particuli re ne s applique apr s la p riode applicable de garantie expresse crite ci dessus concernant les pi ces qui sont identifi es Aucune autre garantie ou ca...

Reviews: