background image

9

S

ection

 2 — A

SSembly

 & S

et

-U

p

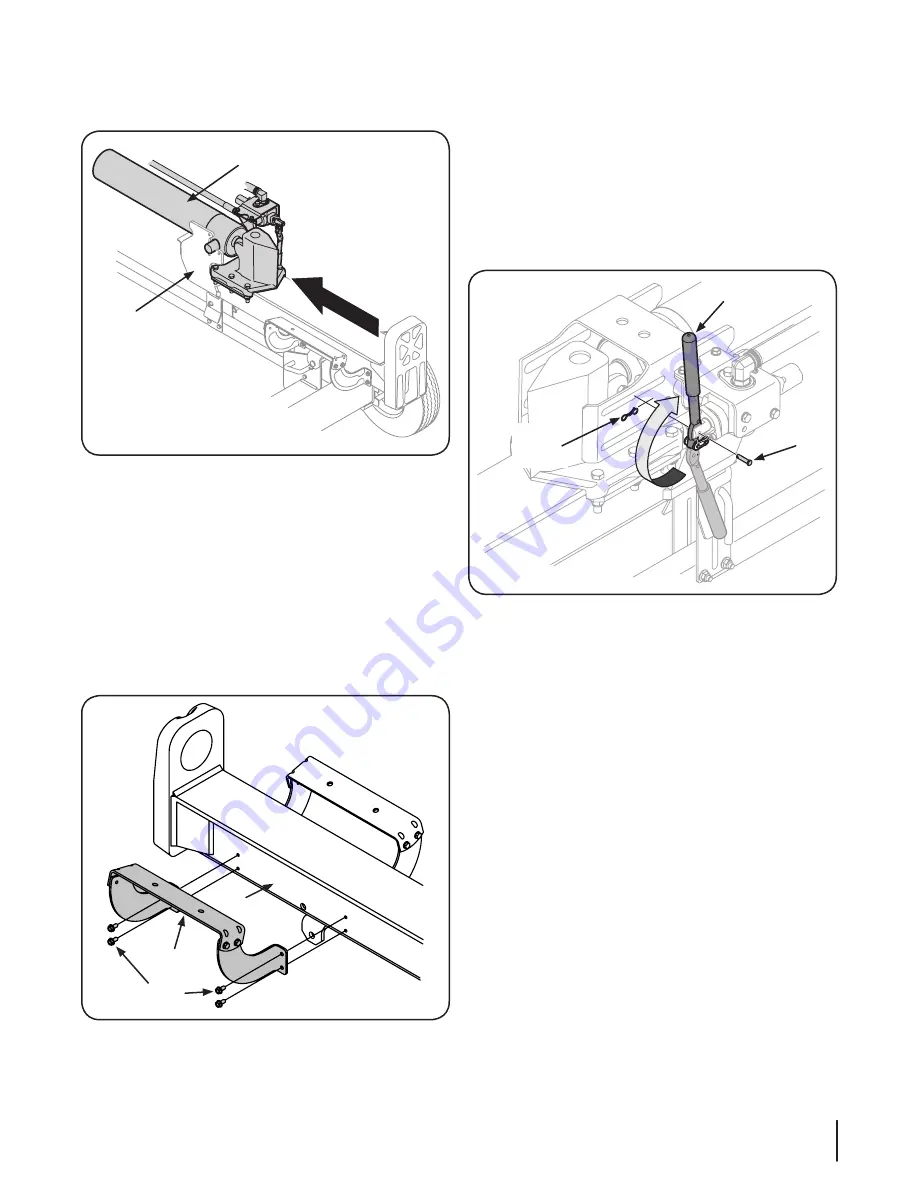
16.  Lift and slide the cylinder up to the top of beam and into 

the weld brackets. See Fig. 3-6.

Cylinder

Weld Brackets

Figure 1-6

17.  Attach the dislodger over the wedge assembly and secure 

it to the weld brackets with the previously removed 

hardware. See Fig. 3-4.

NOTE: 

Lift up on the cylinder when installing the hex 

screws.

NOTE: 

Once the six hex screws are tightened, there may be 

a slight gap between the dislodger and the weld brackets. 

This gap is normal.

18.  Insert all six bolts loosely into threaded holes of the log tray 

and the beam for alignment and assembly purposes. See 

Fig. 3-7.

Hex Washer

Screw

Log Tray

Beam

Figure 1-7

19. 

Securely tighten all six bolts once the proper alignment is 

achieved.

20.  Check for and remove any staples on the bottom of the 

crate that may puncture the tire. 

21.  Cut the metal strap securing the log splitter to the bottom 

of the crate and remove the wood under the engine and/or 

any other wood, then roll the log splitter off the bottom of 

the shipping crate.

22.  The control handle is shipped hanging from the valve on 

the handle link.

23.  Remove the clevis pin and bow-tie cotter pin from the 

control handle. See Fig. 3-8.

Bow-Tie

Cotter

Pin

Control Handle

Clevis

Pin

24.  Rotate the control handle into the operating position and 

secure with the clevis pin and bow-tie cotter pin removed 

in step 1. See Fig. 3-8.

Tail Light Installation (If so equipped)

The mounting brackets for the tail light are installed. Refer to the 

installation sheet included with the tail light kit to mount the 

lights and route the harness.

Summary of Contents for 25-Ton

Page 1: ...n Maintenance Service Troubleshooting Warranty WARNING READ AND FOLLOW ALL SAFETY RULES AND INSTRUCTIONS IN THIS MANUAL BEFORE ATTEMPTING TO OPERATE THIS MACHINE FAILURE TO COMPLY WITH THESE INSTRUCTI...

Page 2: ...roduct information available at the time of printing Review this manual frequently to familiarize yourself with the machine its features and operation Please be aware that this Operator s Manual may c...

Page 3: ...relieve hydraulic system pressure by cycling the valve control lever from forward to reverse several times while engine is not running returning to neutral before repairing or adjusting fittings hoses...

Page 4: ...ever overfill the fuel tank Fill tank to no more than 1 2 inch below bottom of filler neck to provide space for fuel expansion g Replace gasoline cap and tighten securely h If gasoline is spilled wipe...

Page 5: ...uctions Replace if damaged 4 Periodically check that all nuts and bolts hose clamps and hydraulic fittings are tight to be sure equipment is in safe working condition 5 Check all safety guards and shi...

Page 6: ...PRESSURIZED FLUID Never check for hose leaks with your hands High pressure fluid can escape through a pin hole leak and cause serious injury by puncturing the skin and causing blood poisoning EYE PROT...

Page 7: ...e crate the tongue assembly is attached on the inside of the crate with a cable tie Cut the cable tie to remove the tongue 4 Remove the large plastic cover and discard WARNING Do NOT remove any wood o...

Page 8: ...st be above the tongue assembly 11 The log splitter is shipped with the beam in a vertical position Remove any bolts or straps securing the end plate to the bottom of the crate 12 Pull out the vertica...

Page 9: ...olts once the proper alignment is achieved 20 Check for and remove any staples on the bottom of the crate that may puncture the tire 21 Cut the metal strap securing the log splitter to the bottom of t...

Page 10: ...gasoline and oil as instructed in the engine manual packed with your log splitter Read the instructions carefully WARNING Use extreme care when handling gasoline Gasoline is extremely flammable and t...

Page 11: ...dle has three positions Forward Neutral and Reverse See the Operation section for instructions Wedge The wedge is used to split the wood End Plate The end plate holds the log in place while the wedge...

Page 12: ...sible pinch points 4 To place the beam in the Vertical Position proceed as follows WARNING Always use the log splitter in the vertical position when splitting heavy logs a Pull the horizontal beam loc...

Page 13: ...way Splitting the Wood 1 Start the engine as instructed in the Engine Operator s manual included with the log splitter 2 Place the log against the end plate and only split the wood in the direction of...

Page 14: ...roved fluids include Shell Tellus S2 M 32 Hydraulic Fluid Dexron III Mercon automatic transmission fluid Pro Select AW 32 Hydraulic Oil or 10WAW ISO viscosity grade 32 hydraulic oil NOTE It is recomme...

Page 15: ...w 1 Place a suitable oil collection container under the tank 2 Disconnect the suction hose from the bottom of the reservoir tank See Fig 6 1 Suction Hose Inlet Filter Figure 1 1 3 Carefully unthread t...

Page 16: ...he reservoir within range marked on the dipstick See Fig 6 3 Dipstick MAX MIN Hydraulic Fluid Only Figure 1 3 12 Extend and retract the wedge 12 complete cycles to remove trapped air in the system the...

Page 17: ...the set screw using an allen wrench and slide the coupling half off the engine shaft 6 Slide the new engine coupling half onto the engine shaft until the end of the shaft is flush with the inner port...

Page 18: ...nd clean hydraulic system 8 Check oil level 9 See authorized service dealer 10 Flush and clean hydraulic system Slow cylinder shaft speed while extending and retracting 1 Gear sections damaged 2 Exces...

Page 19: ...grain 8 See authorized service dealer Leaking pump shaft seal 1 Broken drive shaft 2 Engine pump misalignment 3 Gear sections damaged 4 Damaged shaft seal 5 Plugged oil breather 1 See authorized serv...

Page 20: ...raulic Oil Filter 737 04308 Inlet Filter 727 04356 Inlet Hose 727 04288 Hydro Hose 727 0443 Return Hose 727 04362 Hydro Hose 726 0132 Hose Clamp 634 0186 Wheel Assembly 16 0 x 4 8 x 8 0 Phone 800 800...

Page 21: ...Notes 9 21...

Page 22: ...22 Section 9 Notes...

Page 23: ...23 Section 9 Notes...

Page 24: ...mited warranty does not provide coverage in the following cases a Log splitter pumps valves and cylinders have a separate one year warranty b Routine maintenance items such as lubricants filters blade...

Reviews: