background image

9

Before Starting Engine

Engine Oil

The engine is shipped with oil in it. Check the oil level 
before first use. 
1.  Stop engine and wait several minutes before checking 

oil level. Remove oil fill cap and dipstick.

2.  Wipe dipstick clean, insert it into oil fill hole and 

tighten securely.

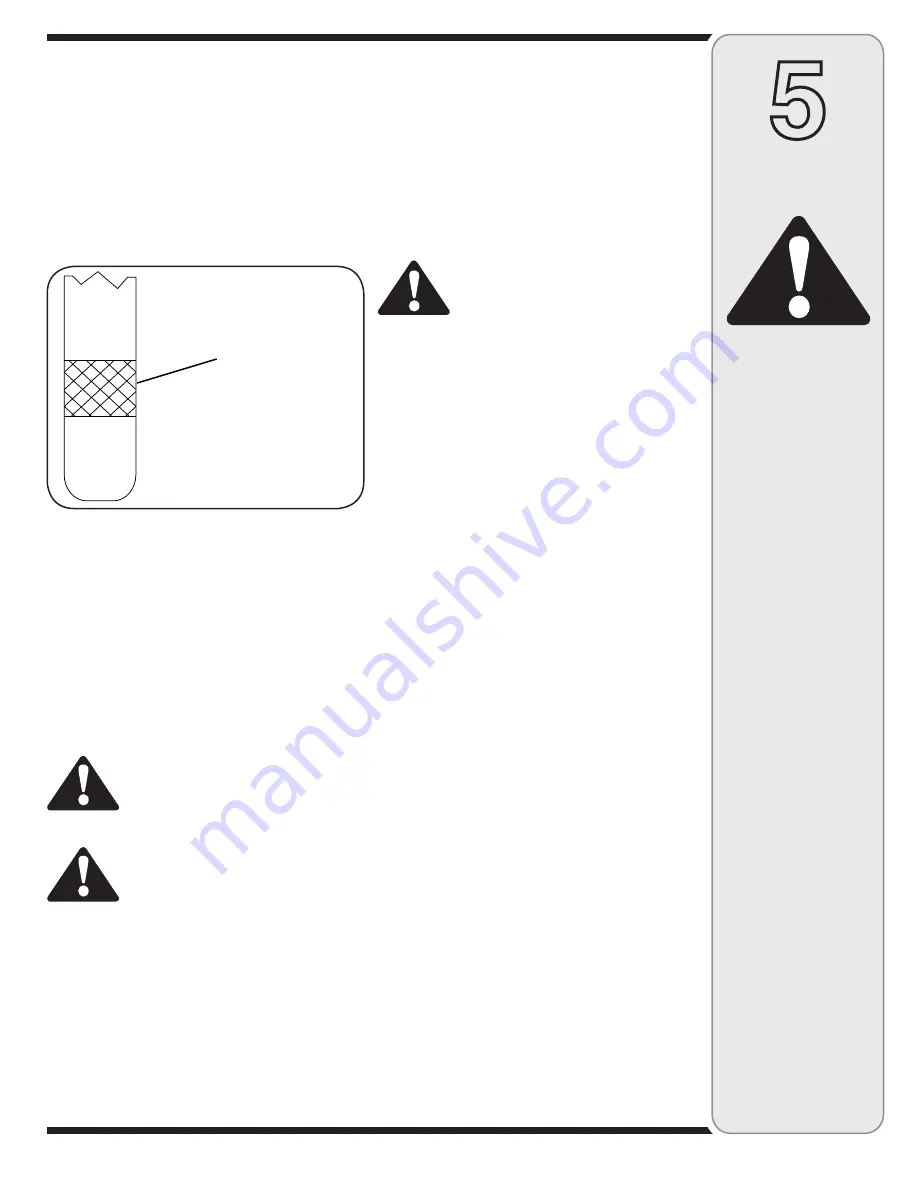
3.  With engine on level ground, oil must be to FULL mark 

on dipstick.  See Figure 8.  If oil level is low, add oil.

Adding Engine Oil

Be sure to use the grade of engine oil specified in engine 
manual. To add oil:
1.  Remove the dipstick from the oil fill. Pour fresh oil 

slowly through the plug. Replace dipstick. 

2.  Check and make sure that the level of oil is up to the 

FULL mark on the dipstick.

IMPORTANT:  

For complete detailed engine information, see 

the separate engine owner’s manual included with this unit.

Gasoline

WARNING: Gasoline is flammable and 
caution must be used when handling or 
storing it. Do not fill fuel tank while the 
snow thrower is running, when it is hot 
or when it is in an enclosed area.

WARNING: Keep your snow thrower away 
from any open flame or an electrical spark 
and do not smoke during fueling.

3.  Never fill the fuel tank completely. Fill the tank to 

no more than 1/2 inch below bottom of filler neck to 
provide space for expansion of fuel.

NOTE:


This unit may include a fuel plug, which is only 

used during assembly to keep dirt and debris out of fuel 
tank.  Discard the fuel plug before filling the fuel tank.
5.  Always use clean, fresh, unleaded grade automotive 

gasoline. Fill the fuel tank outdoors and use a funnel 
or spout to prevent spilling. Make sure that the 
container from which you pour the gasoline is clean 

5

Operation

Gasoline is flammable 

and caution must be 

used when handling 

or storing it. Do not 

fill fuel tank while 

the snow thrower is 

running, when it is 

hot or when it is in an 

enclosed area.

Keep your snow 

thrower away from 

any open flame or an 

electrical spark and 

do not smoke during 

fueling.

Be sure no one other 

than the operator is 

standing near the 

snow thrower while 

starting or operating. 

Do not operate this 

snow thrower unless 

the chute assembly 

has been properly 

installed and is 

secured.

The electric starter 

must be properly 

grounded at all 

times to avoid the 

possibility of electric 

shock to the operator. 

If your house wiring 

system is not a 

three-wire grounded 

system, do not use 

this electric starter 

under any conditions.

WARNING

and free from rust or other foreign particles. Make 
sure to wipe off any spilled fuel before starting the 
engine.

6.  At the end of the job, empty the fuel tank if the snow 

thrower is not going to be used for 30 days or longer. 
Store gasoline in a clean container and keep the cap 
in place on the container.

CAUTION: 

Never use engine or carburetor cleaner 

products in the fuel tank.

To Start Engine 

WARNING: Be sure no one other than 
the operator is standing near the snow 
thrower while starting or operating. Do 
not operate this snow thrower unless 
the chute assembly has been properly 
installed and is secured.

For location of all the engine controls referred to in this 
section, see the engine owner’s manual.

Recoil Starter - Cold Start

1.  Make sure that auger and drive controls are 

released. Attach spark plug wire to spark plug.

2.  Turn fuel valve on, if so equipped.
3.  Move throttle control to FAST position. 
4.  Push key into the ignition slot so that it snaps into 

place. Do not turn key. 

5.  Rotate choke control to FULL choke position.
6.  Push primer button while covering the vent hole. 

Remove your finger from the primer between primes. 
Do not prime if temperature is above 50º F; prime 
two times between 50º F and 15º F; and prime four 
times below 15º F.

7.  Grasp starter handle and pull rope out slowly until engine 

reaches start of compression cycle (rope will pull 
slightly harder at this point). Let the rope rewind slowly.

8.  Pull rope with a rapid, continuous, full arm stroke. 

Keeping a firm grip on the starter handle, let the rope 
return to the starter slowly. Repeat until engine starts.

9.  As the engine warms up, rotate the choke knob slowly 

to OFF position. If the engine falters, return to FULL 
choke, then slowly move to OFF choke position. 

10. Allow the engine to warm up for a few minutes 

because the engine will not develop full power until it 
reaches operating temperature.

11. Operate the engine at full throttle (FAST) when 

throwing snow. 

Warm Start:

1.  If restarting an engine after a temporary shut- down, 

rotate choke to OFF instead of FULL and do not 
prime. Pull starter handle as instructed before.

FULL

ADD

Maintain Oil Level

Between FULL and ADD

Figure 8

Summary of Contents for 3AA

Page 1: ...ed in effective working order by the operator In the State of California the above is required by law Section 4442 of the California Public Resources Code Other states may have similar laws Federal laws apply on federal lands A spark arrester for the muffler is available through your nearest engine authorized service dealer or contact the service department P O Box 361131 Cleveland Ohio 44136 0019...

Page 2: ...epare and maintain the unit for best performance Please read and understand what it says Customer Support If you have difficulty assembling this product or have any questions regarding the controls operation or maintenance of this unit you can seek help from the experts Choose from the options below 1 Visit mtdproducts com Click on the Service Support menu option 2 Phone a Customer Support Represe...

Page 3: ...ers Read and follow all instructions in this manual before at tempting to operate this machine Failure to comply with these instructions may result in personal injury When you see this symbol HEED ITS WARNING Your Responsibility Restrict the use of this power machine to persons who read understand and follow the warnings and instructions in this manual and on the machine ...

Page 4: ...e and machine adjust to outdoor temperature before starting to clear snow 9 To avoid personal injury or property damage use extreme care in handling gasoline Gasoline is extremely flammable and the vapors are explosive Serious personal injury can occur when gasoline is spilled on yourself or your clothes which can ignite Wash your skin and change clothes immediately a Use only an approved gasoline...

Page 5: ...fety devices Check their proper operation regularly Refer to the maintenance and adjust ment sections of this manual 2 Before cleaning repairing or inspecting machine disen gage all control levers and stop the engine Wait until the auger impeller come to a complete stop Disconnect the spark plug wire and ground against the engine to prevent unintended starting 3 Check bolts and screws for proper t...

Page 6: ...o Figure 1 Clean Out Tool This tool and the electric extension cord if so equipped may be fastened with a cable tie to the rear of the auger housing for shipping purposes In that case cut the cable tie and remove the extension cord now Final Adjustments IMPORTANT Check the adjustments as instructed and make any final adjustments necessary before operating the unit Check all nuts and bolts for tigh...

Page 7: ...d to avoid uneven wear on the skid shoes 3 Tighten nuts and bolts securely Routing The Drive Cable 1 Make sure that the drive cable is routed parallel to the left upper handle then across the top of the lower handle and finally parallel to the right lower handle See Figure 5 2 Three cable ties have been used to loosely tie the two control cables to the lower handle Two of these cable ties are on e...

Page 8: ...wing corresponds to the direction of the chute opening Use the chute handle to turn the chute assembly in the direction you wish to throw the snow Chute Knob The distance snow is thrown can be adjusted by either raising or lowering the upper chute Loosen the chute knob on the side of the upper chute to adjust Pivot the upper chute to desired position and retighten the chute knob Ignition Key The i...

Page 9: ...rounded at all times to avoid the possibility of electric shock to the operator If your house wiring system is not a three wire grounded system do not use this electric starter under any conditions WARNING and free from rust or other foreign particles Make sure to wipe off any spilled fuel before starting the engine 6 At the end of the job empty the fuel tank if the snow thrower is not going to be...

Page 10: ... button and slowly rotate the choke to OFF position If the engine falters rotate the choke to FULL and then gradually to OFF NOTE When engaging the electric starter a slight hesitation of a few seconds may occur before the engine starts to turn This is normal and is not harmful to the engine 14 Disconnect the power cord from the receptacle first and then from the switch box on the engine 15 Allow ...

Page 11: ...he drive control 6 As the snow thrower starts to move maintain a firm hold on the handle and guide the snow thrower along the path to be cleared 7 Release the auger and drive controls to stop the snow throwing action and forward motion NOTE Your unit is equipped with a clutch in the transmis sion If the wheels stop turning while trying to discharge large volumes of snow immediately disengage the d...

Page 12: ...install skid shoes Tighten securely Servicing Augers The augers are secured to the spiral shaft with four shear pins and cotter pins If you hit a foreign object or ice jam the snow thrower is designed so that the pins may shear Refer to Figure 9 If the augers do not turn check if the pins have sheared Replace if needed with proper shear pins Refer to item 42 on page 17 for part number IMPORTANT NE...

Page 13: ...g it forward and rolling in off of the pulley See Figure 12 2 Squeeze the auger control handle to release the auger brake which is the tab that holds the belt onto the auger pulley Remove the belt 3 Replace with new belt after replacing the drive belt Drive Belt NOTE Replace the drive belt before reassembling the new auger belt 1 Tip the snow thrower up and forward so that it rests on the auger ho...

Page 14: ...ower with fuel in tank indoors or in poorly ventilated areas where fuel fumes may reach an open flame spark or pilot light as on a furnace water heater clothes dryer or gas appliance NOTE It is important to prevent gum deposits from forming in essential fuel system parts of the engine such as the carburetor fuel filter fuel hose or tank during storage CAUTION Alcohol blended fuels called gasohol o...

Page 15: ...wire disconnected 5 Faulty spark plug 6 Engine not primed 7 Engine flooded from excessive priming Problem Possible Cause s Solution 1 Fill tank with clean fresh gasoline 2 Clean fuel line 3 Insert key See Ignition Key on Page 8 4 Connect wire to spark plug 5 Clean spark plug readjust gap or replace 6 Prime engine four times 7 Wait at least ten minutes before starting 1 Move choke lever to OFF posi...

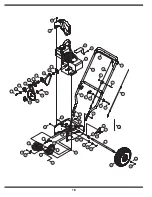
Page 16: ...e call 1 800 800 7310 or 1 330 220 4683 www mtdproducts com Part List Dual Stage Snow Thrower 4 9 18 34 22 32 47 33 28 20 30 31 24 25 27 10 38 3 21 15 12 13 16 46 3 20 45 23 35 8 5 17 11 14 20 3 26 19 44 29 41 43 36 42 39 40 37 20 7 6 3 2 1 ...

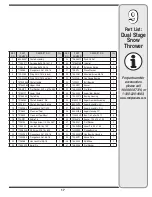
Page 17: ...e Lock Nut 3 8 16 1 22 712 0266 Hex Lock Nut 3 8 16 1 23 715 04020 Spiral Pin 2 For parts and or accessories please call 1 800 800 7310 or 1 330 220 4683 www mtdproducts com Part List Dual Stage Snow Thrower REF NO PART NUMBER DESCRIPTION Qty 24 726 04012 Push On Nut 2 25 731 04218B Impeller 1 26 732 0611 Extension Spring 1 27 736 0174 Wave Washer 1 28 738 0281 Shoulder Screw 3 8 16 1 29 741 0245 ...

Page 18: ...18 2 4 5 55 1 13 3 9 8 10 12 11 39 21 23 24 40 43 49 47 51 51 51 51 48 46 45 44 50 41 14 4 15 31 27 30 16 29 15 32 42 38 18 20 22 28 16 37 53 52 54 36 33 17 26 25 19 34 35 7 6 ...

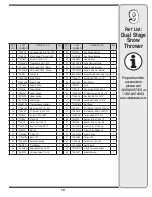
Page 19: ...1 For parts and or accessories please call 1 800 800 7310 or 1 330 220 4683 www mtdproducts com Part List Dual Stage Snow Thrower REF NO PART NUMBER DESCRIPTION Qty 28 741 0245 Hex Flange Bearing 2 29 741 04108 Hex Flange Bearing 2 30 756 0625 Cable Roller 1 31 784 0419B Drive Housing Frame 1 32 790 00223 Auger Cable Bracket 1 33 790 00224 Auger Cable Adj Bracket 1 34 634 0232A Wheel Assbly Snow H...

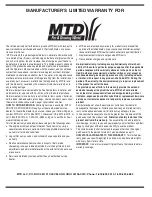
Page 20: ...f the exterior finish due to use or exposure d Service completed by someone other than an authorized service dealer e MTD does not extend any warranty for products sold or exported outside of the United States its possessions and territories except those sold through MTD s authorized channels of export distribution f Replacement parts that are not genuine MTD parts g Transportation charges and ser...

Reviews: