background image

1

9

Illustrated 

Parts List

Model 450 

Series

To order replacement 

parts, contact  

1 (800) 800-7310 

or visit 

www.mtdproducts.com 

Ref.

Part No.

Part Description

1.

747-1152

Shift Rod

2.

649-0041

Upper Handle Ass’y 

3.

649-0034

Lower Handle Ass’y

4.

710-3005

Hex Screw 3/8-16 x 1.25

5.

710-3056

Hex Screw 5/16-18 x 3.25

6.

711-0415

Clevis Pin 3/8-1.62

7.

712-0379

Flange Lock Nut 3/8-24

8.

712-0429

Hex Lock Nut 5/16-18

9.

714-0147

Cotter Pin

10.

720-0313

Grip

11.

720-0210A

T-Knob

12.

720-0278A

Foam Grip

14.

726-0317

Cable Tie

15.

735-0246

Plug

16.

736-0117

Flat Washer 3/8 ID x .620 OD

17.

736-0242

Bell Washer .340 ID x .872 OD

18.

738-0958

Shoulder Spacer

19.

784-0190

Handle Adjustment Crank

20.

784-0191

Hex Nut Retainer Bracket

21.

786-0120

Depth Stake

22.

747-1219

Bail Clutch 

23.

786-0181

Shift Lever Rod

24.

686-0044A

Tine Shield Cover Ass’y

25.

710-0176

Hex Cap Screw 5/16-18 x 2.75

26.

710-3008

Hex Cap Screw 5/16-18 x .750

27.

710-3097

Carriage Bolt 3/8-16 x 1.0

28.

712-0421

Wing Nut

29.

736-0169

Lock Washer 3/8

30.

712-04063

Flange Nut 5/16-18

31.

726-0106

Cap Nut

32.

738-0849

Hex Screw 5/16-18 x .75”

33.

747-0432

Rod

34.

750-0885A

Spacer .322 x .625 x 2.0

Ref.

Part No.

Part Description

35.

786-0090

Shoulder 

36.

786-0113

Tine Shield Hinge Flap

37.

786-0176

RH Handle Bracket

38.

786-0177

LH Handle Bracket

39.

786-0178

Tine Shield

40.

786-0179

Tine Shield Bracket

41.

786-0180

Shoulder Spacer Bracket

42.

686-0109

Shift Crank Ass’y

44.

710-1017

Screw 1/4-14 x .625

46.

715-0120

Spiral Pin 3/16 x 1.0

49.

784-0208C

Shift Cover

50.

711-0415

Clevis Pin 

51.

712-3054

Hex Nut 3/8-24 

53.

742-0305

13” Articulating Tine

54.

738-0689

Shoulder Bolt 

55.

736-0208

Flat Washer .51” ID x 1.50” OD

56.

736-0253

Bell Washer .515” ID x 1.14” OD

57.

738-0688

Shoulder Bolt 

58.

784-0160

Tine Adapter Ass’y 18”

59.

714-0149B

Internal Cotter Pin 

60.

735-0127

Rubber Washer

61.

714-0104

Cotter Pin 

62.

710-3022

Hex Screw 3/8-16 x 2.75”

63.

736-0204

Flat Washer

64.

712-04065

Flange Nut 3/8-16

65.

736-0169

Lock Washer

66.

712-3017

Hex Nut 3/8-16

67.

710-0946

Truss Screw 1/4-20 x .65

68.

712-0324

Hex Lock Nut 1/4-20

69.

726-0273

Battery Hose Clamp 5/16

70.

736-3090

Flat Washer .260 ID x .720 OD

71.

784-0161

Tine Adapter Plate

NOTE:

 Specifications are 

subject to change without 
notification or obligation.  
Images my not reflect your 
exact model and are for 
reference purposes only.

Summary of Contents for 450 Series

Page 1: ...ined in effective working order by the operator In the State of California the above is required by law Section 4442 of the California Public Resources Code Other states may have similar laws Federal laws apply on federal lands A spark arrester for the muffler is available through your nearest engine authorized service dealer or contact the service department P O Box 361131 Cleveland Ohio 44136 00...

Page 2: ... maintain the unit for best performance Please read and understand what it says Customer Support If you have difficulty assembling this product or have any questions regarding the controls operation or maintenance of this unit you can seek help from the experts Choose from the options below 1 Visit mtdproducts com Click on the Service Support menu option 2 Phone a Customer Support Representative a...

Page 3: ...W CHILDREN OR UNINSTRUCTED ADULTS TO OPERATE TILLER 5 SHUT OFF ENGINE BEFORE U NCLOGGING TINES OR MAKING REPAIRS 6 KEEP BYSTANDERS AWAY FROM M ACHINE KEEP AWAYFROM ROTATING PARTS 8 USE EXTREME CAUTION WHEN R EVERSING OR PULLING THE M ACHINE TOWARDS YOU S3 146 WARNING KEEP AWAY FROM ROTATING TINES ROTATING TINES WILL CAUSE INJURY C U T O U T DEPTH STAKE TRANSPORT 3 1 5 7 WARNING Hot surfaces can ca...

Page 4: ...d into neutral N before starting the engine Never leave this machine unattended with the engine running Never attempt to make any adjustments while engine is running except where specifically recommended in the operator s manual To avoid personal injury or property damage use extreme care in handling gasoline Gasoline is extremely flammable and the vapors are explosive Serious personal injury can ...

Page 5: ... this power machine to persons who read understand and follow the warnings and instructions in this manual and on the machine The safety labels on the tiller are shown in the Safety Labels section To ensure safe operation of the tiller follow the instructions on all labels closely After striking a foreign object stop the engine disconnect the spark plug wire and ground against the engine Thoroughl...

Page 6: ...ex bolt Tighten securely See Figure 3 1 Tip the tiller back down so it rests on the tines Attaching Handle Assembly Remove top two bolts and flange lock nuts from handle mounting brackets but do not remove the bottom bolt and nut See Figure 3 2 Place handle assembly in position between the handle mounting brackets Line up holes in handle with holes in bracket and secure with hardware previously re...

Page 7: ... the cable a few turns clockwise when standing in operator s position and then retighten the nut against the tube Now move the shift lever to FORWARD position Carefully engage the clutch by lifting the clutch control bail against the handle The wheels should spin If the wheels do not spin with the unit in forward adjust by unthreading the tube at the end of the cable a few turns counter clockwise ...

Page 8: ... forward tine drive when cultivating or tilling soft ground NOTE If difficulty is encountered in moving the gear selection handle refer to following helpful hints To shift into forward or reverse wheel drive move tiller forward slightly then backward to allow the gears to synchronize To shift into forward wheels and tine drive push forward slightly on the gear selection handle and slowly engage th...

Page 9: ...rimer Button If Equipped The primer button is located behind the air cleaner It is used to enrich the fuel mixture in the carburetor when starting a cold engine Depth Stake The depth stake controls the tilling depth Refer to Setting the Depth in the Operating Section Engine Controls See the separate engine manual for additional informa tion and functions of the engine controls This symbol points o...

Page 10: ...lace the engine speed control in the START position Move choke lever to CHOKE position or if equipped push primer two 2 or three 3 times Wait about two 2 seconds between each push NOTE A warm engine may not require choking or priming Stand at side of tiller Grasp the starter handle and pull out slowly until it pulls slightly harder Let rope rewind slowly Pull starter handle rapidly Do not allow ha...

Page 11: ...justments WARNING Do not move the gear selection handle with the wheels or tines engaged Make certain the unit is stopped completely before changing the gear selection A partial engagement may be necessary when engaging tines Do not push down on the handles so that the wheels are lifted off the ground while using the tine drive or the tiller could move backward and cause personal injury Never atte...

Page 12: ...te engine manual packed with your unit IMPORTANT Never run your engine without air cleaner completely assembled The spark plug should be cleaned and the gap reset every 25 hours of engine operation Spark plug replacement is recommended at the start of each tiller season check engine manual for correct plug type and gap specification Clean the engine regularly with a cloth or brush Keep the cooling...

Page 13: ... pressure washers will result in shortened life and reduce serviceability Refer to the engine manual for correct engine storage instructions Wipe tines with oiled rag to prevent rust Store tiller in a clean dry area Do not store next to corrosive materials such as fertilizer NOTE When storing any type of power equipment in an unventilated or metal storage shed care should be taken to rustproof the...

Page 14: ... 13 29 35 16 53 35 16 46 31 28 12 45 17 17 44 36 6 3 33 15 27 5 36 43 4 20 40 21 1 34 18 10 42 23 7 22 36 8 47 32 37 50 25 10 9 24 36 51 34 45 26 41 36 35 16 29 19 49 44 33 14 35 16 2 14 28 35 16 14 11 48 14 ...

Page 15: ...Shifting Fork 22 717 1582 Spur Gear 44T 23 717 1583 Spur Gear 30T 24 717 1584 Spur Gear 30T 25 717 1585 Spur Gear 44T 26 717 1587 Spur Gear 44T Ref Part No Part Description 27 717 1594 Spur Gear 16T 28 721 0378 Seal 1 0 Shaft 29 721 0379 Seal 75 Shaft 31 726 0277 Taper Cap Ring 32 732 0496 Compression Spring 50 Leg 33 736 0163 Thrust Wash 1 03 I D X 1 62 34 736 0351 Fl Wash 76 I D x 1 5 O D 35 736...

Page 16: ... 23 10 1 60 61 37 62 25 34 27 64 30 39 63 26 32 36 33 31 29 66 26 41 30 30 24 28 35 40 26 49 44 50 59 51 65 53 55 56 54 57 58 44 46 42 4 9 11 16 6 3 14 7 19 5 17 2 60 61 12 15 12 38 21 22 67 70 70 68 69 27 26 71 ...

Page 17: ... 738 0849 Hex Screw 5 16 18 x 75 33 747 0432 Rod 34 750 0885A Spacer 322 x 625 x 2 0 Ref Part No Part Description 35 786 0090 Shoulder 36 786 0113 Tine Shield Hinge Flap 37 786 0176 RH Handle Bracket 38 786 0177 LH Handle Bracket 39 786 0178 Tine Shield 40 786 0179 Tine Shield Bracket 41 786 0180 Shoulder Spacer Bracket 42 686 0109 Shift Crank Ass y 44 710 1017 Screw 1 4 14 x 625 46 715 0120 Spira...

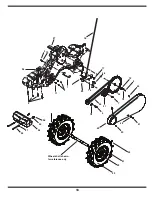
Page 18: ...18 33 35 38 3 34 4 41 3 16 15 13 1 5 14 1 11 4 8 6 5 39 0 31 3 9 Wheel shaft shown for reference only 36 18 1 6 43 4 1 8 40 9 ...

Page 19: ...gine Pulley Half 24 756 1162 Input Pulley 25 786 0064A Idler Bracket 26 786 0185 Belt Keeper Bracket 27 786 0187 Shift Cover Bracket 28 786 0193 Idler Belt Keeper 29 634 04231 Wheel Assembly 16 0 x 4 6 x 8 734 0808 Tire Only 16 2 x 4 6 30 634 04230 Wheel Rim Assembly 31 734 0255 Air Valve 32 710 0606 Hex Head Screw 1 4 20 33 712 04064 Flange Lock Nut 1 4 20 34 710 0382 Hex Bolt 1 2 13 x 5 0 35 712...

Page 20: ...4 Clear vent 5 Drain fuel tank Refill with fresh fuel 6 Clean following engine manual 7 Refer to engine manual 1 Spark plug wire loose 2 Unit running on CHOKE 3 Blocked fuel line or stale fuel 4 Vent plugged 5 Water or dirt in fuel system 6 Dirty air cleaner 7 Carburetor out of adjustment Engine overheats 1 Fill crankcase with proper oil 2 Clean air cleaner 3 Remove blower housing and clean 4 Refe...

Page 21: ...or 1 330 220 4683 www mtdproducts com NOTES Use this page to make notes and write down important information NOTE Specifications are subject to change without notification or obligation Images my not reflect your exact model and are for reference purposes only ...

Page 22: ...or 1 330 220 4683 www mtdproducts com NOTES Use this page to make notes and write down important information NOTE Specifications are subject to change without notification or obligation Images my not reflect your exact model and are for reference purposes only ...

Page 23: ...or 1 330 220 4683 www mtdproducts com NOTES Use this page to make notes and write down important information NOTE Specifications are subject to change without notification or obligation Images my not reflect your exact model and are for reference purposes only ...

Page 24: ... of the exterior finish due to use or exposure d Service completed by someone other than an authorized service dealer e MTD does not extend any warranty for products sold or exported outside of the United States its possessions and territories except those sold through MTD s authorized channels of export distribution f Replacement parts that are not genuine MTD parts g Transportation charges and s...

Reviews: