Operating manual for snow thrower
English
11
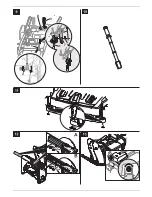
Replacing shear bolt
Fig. 7
The worm drives (3) are attached to
the drive shaft (4) with shearing pins (1)
and safety split pins (2). The bolts are
designed to break (shear) if the auger
hits solid debris, thereby preventing
damage to the unit. Replace these
parts with original spare parts only.
Replacement shearing pins and safety
split pins are optionally included in the
product package.
Remove sheared pin and split pin,
clean and lubricate attachment
point.
Use new shearing pin as well
as new safety split pin.
Note
Depending on the model, the replace-
ment shearing pins and safety split
pins can be attached to the dash-
board (Fig. 11).
Replacing the clearing plate
Note
Depending on the model, the skids
must be removed beforehand
(see “Replace skids”).
Fig. 6
Remove bolts (5), washers (6),
depending on model) and nuts (7).
Replace clearing plate (8).
Attach new snow blade firmly
to housing using bolts, washers
(depending on model) and nuts.
Replace skids
Fig. 6
Remove bolts (4), washers (3),
depending on model) and nuts (2).
Replace skids (1) on both sides
of the housing.
Adjust new skids (see “Adjust
the skids”).
Setting pretension of the
chute adjuster (optional)
Fig. 13
If the chute adjuster moves too
freely or stiffly, it can be adjusted
Chute adjuster moves too freely:
Turn nut gradually clockwise.
Chute adjuster moves too stiffly:
Turn nut gradually anti-clockwise.
Note
When the setting is correct, the
discharge chute should not move
by itself during operation.
Preparing the machine
for non-use
a~åÖÉê=çÑ=Å~ìëáåÖ=~å=
Éñéäçëáçå=Äó=ÑìÉä=ÑìãÉë=áÖåáíáåÖ
_ÉÑçêÉ=óçì=éêÉé~êÉ=íÜÉ=ã~ÅÜáåÉ=Ñçê=
åçåJìëÉI=Éãéíó=íÜÉ=ÑìÉä=í~åâ=áåíç=
~=ëìáí~ÄäÉ=Åçåí~áåÉê=áå=íÜÉ=çéÉå=
~áê=EëÉÉ=
l
båÖáåÉ=áåëíêìÅíáçåëÒFK
When the machine is not to be used
for more than a month, e.g. after
the winter:
Prepare engine (see “Engine
instructions”).
Clean the machine.
To protect from rust, wipe over
all metal parts with an oily cloth
or spray with spray lubricant.
Park the machine in a clean,
dry enclosed space.
Warranty
The warranty terms issued by our
company or importer are valid
in every country.
Faults will be repaired free of charge
within the framework of the guaran-
tee, provided that they have been
caused by a material defect
or manufacturing error.
Should you need to call upon the
warranty, please apply to the vendor
of your machine or to the nearest
agency.
Engine
The manufacturer of the engine is
liable for all engine-related problems
with respect to output power, power
measurement, specifications,
warranties, and service.
More detailed information can
be found in the owner/operator
handbook provided separately
by the engine manufacturer.
Troubleshooting
oáëâ=çÑ=áåàìêó=Ñêçã=ëí~êíáåÖ=
íÜÉ=ã~ÅÜáåÉ=Äó=ãáëí~âÉ
_ÉÑçêÉ=ÇçáåÖ=~åó=ïçêâ=çå=íÜáë=
ã~ÅÜáåÉ
Ó qìêå=çÑÑ=íÜÉ=ÉåÖáåÉK
Ó t~áí=ìåíáä=~ää=ãçîáåÖ=é~êíë=Ü~îÉ=
ÅçãÉ=íç=~=ëí~åÇëíáääX=íÜÉ=ÉåÖáåÉ=
ãìëí=Ü~îÉ=ÅççäÉÇ=ÇçïåK
Ó oÉãçîÉ=íÜÉ=áÖåáíáçå=âÉó=~åÇ=
íÜÉ=ëé~êâJéäìÖ=ÅçååÉÅíçêK
`~ìíáçå
c~ìäíë=ÉåÅçìåíÉêÉÇ=ïÜÉå=çéÉê~íáåÖ=
íÜÉ=ã~ÅÜáåÉ=ëçãÉíáãÉë=Ü~îÉ=ëáãéäÉ=
Å~ìëÉë=ïÜáÅÜ=óçì=Å~å=êÉãÉÇó=óçìêJ
ëÉäÑK=fÑ=óçì=~êÉ=áå=~åó=ÇçìÄíI=çê=áÑ=
ÉñéêÉëëäó=áåëíêìÅíÉÇ=íç=Çç=ëçI=ëÉÉâ=
íÜÉ=ÜÉäé=çÑ=~=ëéÉÅá~äáëí=ïçêâëÜçéK=
e~îÉ=êÉé~áê=ïçêâ=Å~êêáÉÇ=çìí=çåäó=
Äó=~=ëéÉÅá~äáëí=ïçêâëÜçé=ïÜáÅÜ=ïáää=
ìëÉ=çêáÖáå~ä=êÉéä~ÅÉãÉåí=é~êíëK
!
!
Summary of Contents for Cub Cadet E 22
Page 1: ...769 20912B MTD Products Aktiengesellschaft Saarbrücken Germany E 22 ...
Page 2: ......
Page 3: ...E D C A B A B 1 2 A A ...
Page 4: ...9 10mm max ...
Page 5: ...3 8 2 6 1 7 5 4 1 ...
Page 6: ...Typ 1 Typ 2 Typ 3 109 111 113 ...
Page 7: ...4 13 24 34 44 54 63 72 81 90 99 ...
Page 113: ...1 66 Typ 5 Typ 1 109 ...
Page 114: ...A B Typ 5 Typ 1 110 ...
Page 115: ...1 66 Typ 5 Typ 2 111 ...
Page 116: ...A B Typ 5 Typ 2 112 ...
Page 117: ...1 66 Typ 3 113 ...
Page 118: ...A B Typ 5 Typ 3 114 ...


