English
2SHUDWLQJ LQVWUXFWLRQV 0RWRU +RHV
6
Always keep the fuel in suitable con-
tainers provided exclusively for fuel.
■
Fill up with normal lead-free petrol.
■
Check the oil level (see engine
instructions).
7XEVXMRKXLIIRKMRI
%PWSJSPPS[XLIMRWXVYGXMSRWMRXLI
IRKMRILERHFSSO
(ERKIV
)RWYVIXLEXXLIVIMWRSSRIRIEVXLI
QEGLMRI
;LIRWXEVXMRKXLIQEGLMRIIRWYVI
XLEX]SYLEZIEJMVQJSSXMRK
7XEVXXLIIRKMRISYXHSSVWSRP]
Figure
■
Check fuel and oil levels, if
necessary fill up with oil and fuel
(see engine instructions).
■
Open the fuel tap (depending on
model).
■
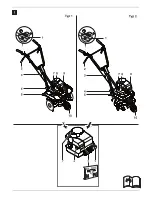
Connect spark plug terminal (9)
to spark plug.
■
Set throttle (1) to
/
QE\
.
■
*SVYRMXW[MXLGLSOIPIZIV
set choke lever (6) to
/
',3/)
for cold start or to
/
692
for
warm start.
■
*SVYRMXW[MXLSYXGLSOIPIZIV
Forcefully press primer (8) 3–5
times (required when starting cold
engine only).
■
Support yourself with one hand on
the guiding bar and slowly draw
on the pull starter (7) until
resistance is felt and then quickly
and powerfully draw it further.
Do not let it rebound, but guide it
back slowly.
■
When the engine is running
– set choke lever (depending on
model) to "RUN".
– set throttle (1) to the required
speed.
7XSTTMRKXLIIRKMRI
Fig.
■
Set the throttle lever (1)
to
/STOP.
■
Turn off the petrol tap
(depending on model).
;SVOMRK[MXLXLIQEGLMRI
(ERKIVSJMRNYV]
/IITTIVWSRWIWTIGMEPP]GLMPHVIR
[IPPGPIEVSJXLIHERKIV^SRI
3RP]STIVEXIXLIQEGLMRIMJMXMWMR
E JEYPXPIWWWXEXI
%ZSMHSTIRJMVIJSVQEXMSRSJWTEVOW
ERHHSRSXWQSOI[LMPWX[SVOMRK
[MXLXLIQEGLMRI
'LIGOXLIXIVVEMRSR[LMGLXLI
QEGLMRIMWXSFIYWIHERHVIQSZI
EPPSFNIGXW[LMGLGSYPHFIXLVS[R
SYXF]XLIQEGLMRI
3RP][SVO[LIRXLIVIMWWYJJMGMIRX
PMKLXERH[SVOWPS[P]ERHGEVIJYPP]
(SRSXLSIMRXLIZMGMRMX]SJHMXGLIW
ERHFEROW
%P[E]WQEMRXEMREWEJIHMWXERGI
JVSQXLIVSXEXMRKXSSPF]QIERW
SJ XLIKYMHMRKFEV
2IZIVTPEGI]SYVLERHWJIIX
SV SXLIVTEVXWSJXLIFSH]RIEV
VSXEXMRKTEVXW
2IZIVPMJXSVGEVV]XLIETTPMERGI
[LIRXLIIRKMRIMWVYRRMRK
7[MXGLSJJXLIIRKMRIERHTYPPSYX
XLIWTEVOTPYKFIJSVIGLIGOMRK
WIXXMRKGPIERMRKSV[SVOMRKSRXLI
YRMX
(ERKIVSJMRNYV]JVSQXMTTMRK
SZIV
%P[E]W[SVOWPS[P]ERHGEVIJYPP]
TEVXMGYPEVP][LIR]SYGLERKIXLI
HMVIGXMSRSJQSZIQIRX
3RP]KYMHIXLIQEGLMRIHMEKSREPP]
EGVSWWXLIWPSTIRIZIVYT[EVHWSV
HS[R[EVHW
;EXGLSYXJSVSFWXEGPIWHSRSXLSI
MRXLIZMGMRMX]SJVSGOW
(SRSXYWIXLIQEGLMRISRWPSTIW
[MXLEKVEHMIRXKVIEXIVXLER
*MVIHERKIV
/IITXLIIRKMRIERHI\LEYWXJVII
JVSQTPERXHIFVMWERHIWGETMRKSMP
3TIVEXMRKXMQIW
Comply with the national/municipal
regulations concerning the times
when the mower may be used
(if required, contact your local
authority).
,SIMRK
'EYXMSR
4SWWMFPIHEQEKIXSXLIQEGLMRI
SVMRXLIEVIESJYWI
(SRSX[SVOSRER]WYVJEGIWFIPS[
[LMGLKEWSVTS[IVPMRIWSVWMQMPEV
EVIPSGEXIH
(SRSX[SVOGPSWIXSXVIIWSXLIV[MWI
XLIQEGLMRIQE]GYXXLVSYKLXLI
VSSXW(SRSX[SVOSRWSKK]
KVSYRHPYQTWSJIEVXLGERFI
GEYKLXF]XLILSIMRKEWWIQFP]ERH
XLVS[RSYX
-JJSVIMKRFSHMIWIKWXSRIWEVI
IRGSYRXIVIHF]XLILSIMRKHIZMGI
WXSTXLIQEGLMRIW[MXGLMXSJJERH
GLIGOMXJSVHEQEKI
Repeated and progressive depth
hoeing gives the best results. This
allows previously-deposited
compost to be absorbed into the
soil. A harvested field is recultivated
with the remaining plant remains.
■
Set the hoeing depth according to
the ground conditions (see “Set
the hoeing depth”). Hoe hard
ground in progressive stages.
■
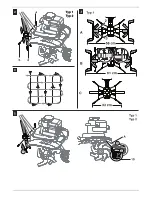
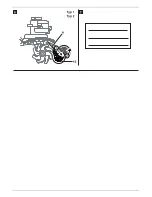
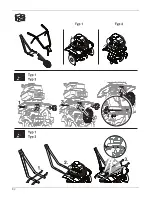
Move the transportation wheel (10)
into the tilling position (see
„Setting the transportation
wheel").
■
Start the engine (see “Starting the
engine”).
■
Pull or press clutch lever (2)
against the bar handle and grip it.
■
The hoeing depth and speed are
influenced by lowering or raising
the guiding bar or handle:
lowered, to hoe deeper and more
slowly, or raised for the opposite.
■
Work the surface in a criss-cross
pattern (see Figure
).
'YPXMZEXMSR
■
Set a shallow hoeing depth in
order to protect the root system
of cultivated plants.
7[MXGLMRKSJJXLIYRMX
Fig.
■
Release the clutch lever (2).
■
Set the throttle lever (1)
to /
7834
.
■
Turn off the petrol tap
(depending on model).
!
!
!
!
Summary of Contents for Tiller
Page 1: ...18 4VSHYGXW OXMIRKIWIPPWGLEJX 7EEVFVµGOIR IVQER 361 23 ...
Page 2: ......
Page 3: ......
Page 4: ......
Page 5: ......
Page 6: ... RKPMWL VER EMW IYXWGL 2IHIVPERHW XEPMERS WTE SP 7ZIRWOE ERWO 2SVWO 7YSQM 4SVXYKYÂW r w ...
Page 7: ... ...
Page 8: ... ...


