background image

NOTE:

The blade retainer must be installed on the
output shaft in the position shown for the
cutting head to work correctly.

6.

Remove the locking rod.

7.

Install the cutting head guard. See Removing and
Installing Cutting Head Guard 
instructions.

WARNING: To avoid serious personal injury,
the cutting head guard MUST be in place at all
times while operating the unit as a grass
trimmer. 

6.

Align the shaft bushing hole with the locking rod 
slot and insert the locking rod into the bushing hole,
Figure 8.

7.

Put the blade retainer and nut on the output shaft.
Make sure that the blade is installed correctly. 

8.

Tighten nut counterclockwise against the blade while
holding the locking rod:

If using a torque wrench and an 5/8 inch socket
tighten to:

37 - 38 N•m; 325 - 335 in•lb; 27 - 28 ft.•lb.

Without a torque wrench, use a 5/8 inch closed-end or
socket wrench, turning the nut until the blade retainer is
snug against the shaft bushing. Make sure that the blade
is installed correctly, then rotate the nut an additional 1/4
to 1/2 turn counterclockwise, Figure 13.

FIGURE 13

9.

Remove the locking rod from the locking rod slot.

WARNING: To avoid serious personal injury or
damage to the unit, do not start or operate this
unit with the locking rod in the locking rod slot.

WARNING: Do not sharpen the cutting blade.
Sharpening the blade can cause the blade tip
to break off while in use. This can result in
severe personal injury. Replace the blade.

REMOVING THE CUTTING BLADE AND

INSTALLING THE CUTTING HEAD

Remove the Cutting Blade

WARNING: To avoid serious personal injury,
always wear gloves while handling or installing
the blade.

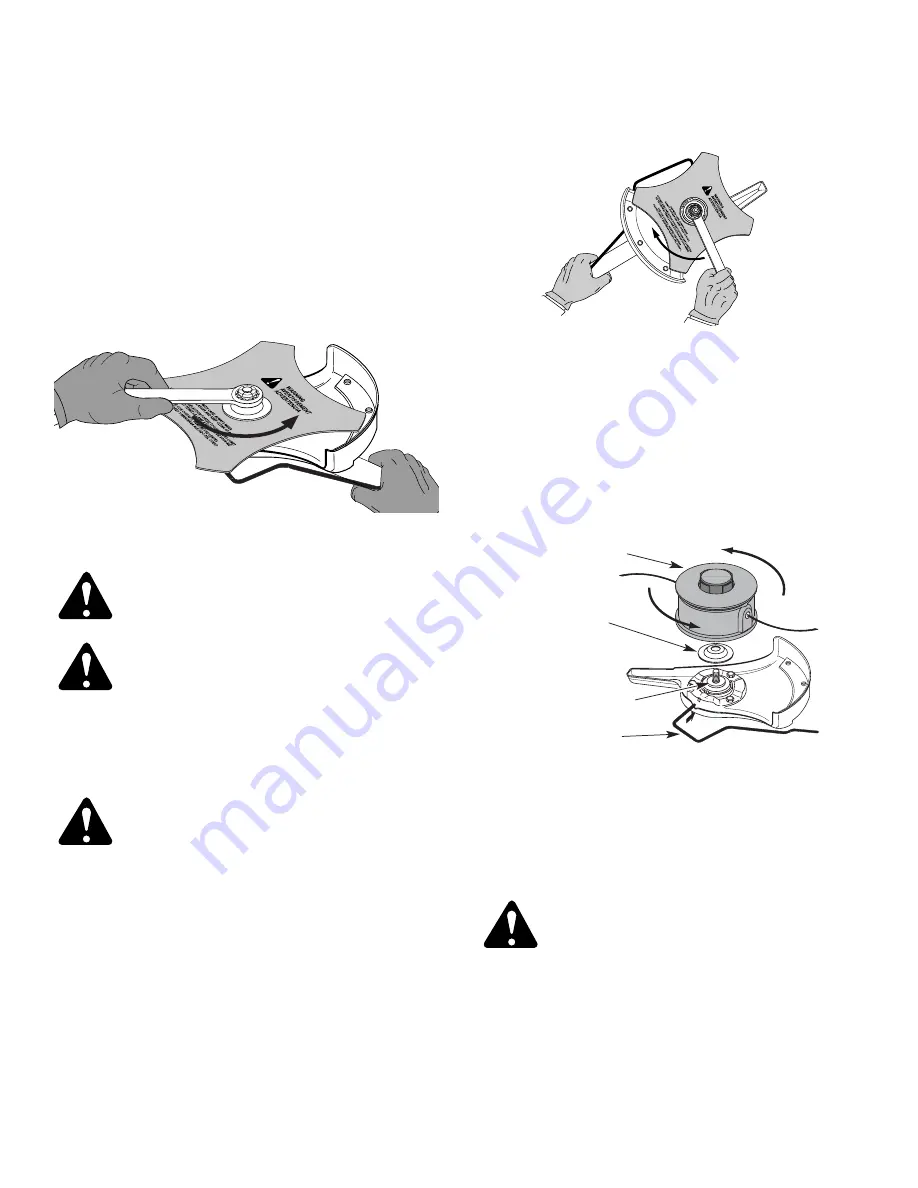
1.

Align the shaft bushing hole with the locking rod 
slot and insert the locking rod into the bushing hole,
Figure 8.

2.

Hold the locking rod in place by grasping it next to
the boom of the unit, Figure 14.

3.

While holding the locking rod, loosen the nut on 
the blade by turning it clockwise with a 5/8 inch
closed-end or socket wrench, Figure 14. 

Clockwise

Cutting Head

Locking Rod

Blade Retainer

Output Shaft Bushing

1/4-1/2 turn

Counterclockwise

4.

Remove the nut, blade retainer, and blade. Store the
nut and blade together for future use in a secure
place. Store out of reach of children.

Install the Cutting Head

5.

Align the shaft bushing hole with the locking rod slot and
insert the locking rod into the shaft bushing hole,
Figure 8. Place the blade retainer on the output shaft with
the flat surface against the output shaft bushing as
shown in Figure 15. Screw the cutting head
counterclockwise onto the output shaft. Tighten securely.

FIGURE 14

FIGURE 15

10

Summary of Contents for Yard Machines LT31CS

Page 1: ...1CS 2 Cycle Petrol Trimmer Brushcutter IMPORTANT Read safety rules and instructions carefully before operating equipment MTD SOUTHWEST 550 N 54TH STREET CHANDLER ARIZONA 85226 2434 PRINTED IN U S A PA...

Page 2: ...ling your new equipment please locate the model plate on the unit and copy the information from it to the space provided below The information on the model plate is very important if you need help fro...

Page 3: ...riginal equipment replacement line Never use metal reinforced line wire or rope etc These can break off and become a dangerous projectile Be aware of risk of injury to head hands and feet Clear the ar...

Page 4: ...es excessive grease or carbon build up WHILE OPERATING WITH CUTTING BLADE Read and understand all safety warnings before operating this unit Always use the shoulder harness when using the brush blade...

Page 5: ...arning or caution May be used in conjunction with other symbols or pictographs WARNING READ OPERATOR S MANUAL Read the Operator s Manual s and follow all warnings and safety instructions Failure to do...

Page 6: ...ir Filter Muffler Cover Spark Plug Muffler Cutting Head Guard Fuel Cap Throttle Control J Handle Cutting Head Gear Housing Shaft Grip On Off Stop Control Shaft Housing Starter Rope Grip Blade Shield G...

Page 7: ...ews through the top clamp and into middle clamp NOTE The holes in the top and middle clamp will line up only when assembled correctly 4 Place the clamps and the J handle over the shaft housing and ont...

Page 8: ...d guard before removing or installing the blade Remove the cutting head guard from the guard mount by removing the three 3 screws with a flat blade screwdriver Figure 7 Store parts for future use NOTE...

Page 9: ...t shaft Figure 10 Store the cutting head for future use NOTE The blade retainer under the cutting head will be used when installing the cutting blade Install the Cutting Blade WARNING To avoid serious...

Page 10: ...t or operate this unit with the locking rod in the locking rod slot WARNING Do not sharpen the cutting blade Sharpening the blade can cause the blade tip to break off while in use This can result in s...

Page 11: ...he instructions carefully for the proper fuel oil mixture NOTE Alcohol blended fuel absorbs moisture water As little as 1 moisture in the fuel can cause fuel and oil to separate and form acids when st...

Page 12: ...the fifth pull proceed to step 6 NOTE The engine will not run in the FULL choke A position 6 Place the choke lever in the PARTIAL choke B position Figure 17 7 Pull starter rope briskly 1 to 3 times t...

Page 13: ...grass and weeds are dry The life of your cutting line is dependent upon Following the previous trimming techniques What vegetation is being cut Where it s being cut 13 FIGURE 19 FIGURE 20 HOLDING THE...

Page 14: ...e hearing foot body protection and the strap to reduce the risk of injury when operating this unit WARNING Do not use the cutting blade for edging or as an edger severe personal injury to yourself or...

Page 15: ...If you notice lost RPM poor performance or general lack of acceleration this service may be required If you feel your engine is need of this inspection refer service to an authorized servicing dealer...

Page 16: ...ne into the open hole in the inner reel and pull the line tight to make the loop as small as possible Figure 30 10 Before winding split the line back about 6 inches 11 Wind the line in tight even laye...

Page 17: ...or T20 Torx bit screwdriver 3 Pull the cover from the engine Do not force Choke Lever Screws Screws Partial Choke Position B FIGURE 33 Cleaning the Air Filter WARNING To avoid serious personal injury...

Page 18: ...the air fuel mixture This is often mistaken for an out of adjustment carburetor Check the condition of the air filter before adjusting the idle speed screw Refer to Air Filter Maintenance Adjusting t...

Page 19: ...bolts into muffler s front side Figure 40 8 Place muffler with exhaust gasket in place and bolts inserted against the engine aligning the bolt holes Tighten the bolts to secure muffler to the engine I...

Page 20: ...t of the reach of children LONG TERM STORAGE If the unit will be stored for an extended time 1 Drain all fuel from the fuel tank into a container Do not use fuel that has been stored for more than 60...

Page 21: ...tor adjustment Take to an authorized service dealer for carburetor adjustment ENGINE LACKS POWER OR STALLS WHEN UNDER LOAD CAUSE ACTION Old or improperly mixed fuel Drain gas tank Add fresh fuel mixtu...

Page 22: ...ing Steel Throttle Control Finger Tip Trigger w Lock Out Unit Weight No fuel with cutting head cutting head guard and D handle 6 69 kg 14 75 lbs Cutting Mechanism 4 Tooth Cutting Blade Dual String Cut...

Page 23: ...SECTION 9 NOTES 23...

Page 24: ...OPERATOR S MANUAL PART NO 769 00304 8 02 PRINTED IN THE USA SECTION 9 NOTES Cont...

Reviews: