Installation and Operational Manual
•
Boutique Collection
•
SculptureStone® Tubs
4 / mtibaths.com
Installation Instructions
Freestanding Tubs with Integral Overflow
The integral overflow tubs by MTI Baths require only the waste to be installed. The P-trap will be located directly below the drain. See
rough-in chart by model in this manual or the tub specification sheet at mtibaths.com. The tub comes equipped with a toe tap drain and
PVC drain fitting.
With Subfloor Access
1.
Install drain assembly on tub using clear silicone under metal waste flange and on both sides of the gray rubber gasket on underside
of the tub. MTI recommends using a small amount of clear silicone on the female threads of the PVC drain fitting to act as a thread
sealant. Tighten until it seats, plus one half turn.
Do not overtighten and do not exceed 7ft-lbs maximum. Product damage will occur. ¹
2.
Adhere tub to the finished floor using 1/2” bead of clear silicone. Make sure that tub is precisely located where desired and that the
hole in the floor for the waste pipe aligns with the tub drain. Immediately wipe off any excess silicone that may be on the floor or
exterior of the tub.
3.
Finish drain installation from below.
4.
Allow time for adhesives to cure and water test for leaks. Many products are ready to test in as little as 30 minutes. Please refer to
product label(s) for details.
Without Subfloor
1.
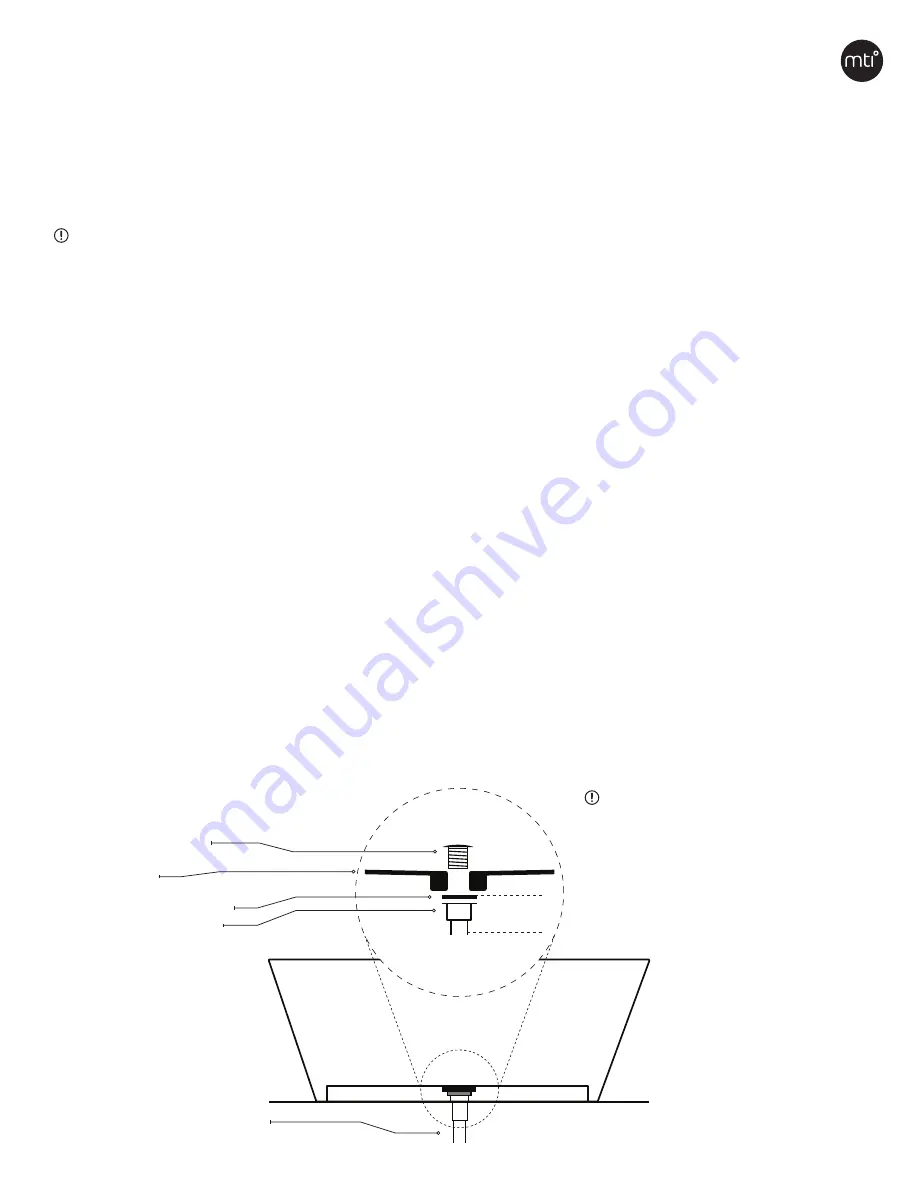
Stub out drain and P-trap with 1 1/2 schedule 40 PVC pipe at least 1” above finished floor. Because the height will vary slightly from
tub to tub, box out around the pipe to allow trimming this pipe below grade upon installing the MTI supplied fitting. The fitting is
approximately 3” in diameter.
2.
Determine gap between underside of tub (at drain) and the floor. Shorten 1 1/2 inch pipe to allow for the overall height of the the
supplied PVC drain fitting and gasket above the finished floor. Dry fit drain fitting to pipe to insure proper height is acheived before
setting the tub.
The weight of the tub must not rest on the drain pipe.
3.
Glue fitting to pipe using PVC cement and adhere the rubber gasket to the top of flange with clear silicone.
4.
Apply another bead of silicone on top of gasket and a small amount of silicone in the top threads of PVC drain fitting to act as a thread
sealant.
5.
Adhere tub to the finished floor using 1/2” bead of clear silicone. Make sure that the drain hole, gasket and flange align so that the
waste flange can be threaded in from inside the tub. Immediately wipe off any excess silicone that may be on the floor or exterior of
the tub.
6.
Place a small bead of silicone under the metal waste flange and thread into PVC drain fitting from inside the tub. Tighten until it seats
plus one quarter turn.
7.
Allow time for silicone and water test for leaks. Many products are ready to test in as little as 30 minutes. Please refer to product label
for details.
Waste Flange
Tub
1 1/2” schedule 40 PVC pipe
(Inserts approximately 3/4” into PVC drain fitting)
PVC Drain Fitting
(approx. 3” overall diameter”)
Rubber Gasket (3/8”)
2 3/4” H
(Includes gasket)
MTI Recommends using clear 100% silicone sealant. Do Not use plumber’s putty.
Adhere tub to the floor with at least
1/2” bead of silicone.
Summary of Contents for Boutique SculptureStone 131
Page 22: ...NOTES...


