background image

FREEDOM MICRO

®

 II POWER


MANUAL

2

 MTI P/N 063-00425 rev A ©2022 MTI All Rights Reserved

www.MTIGS.com  |  T:800.426.6844

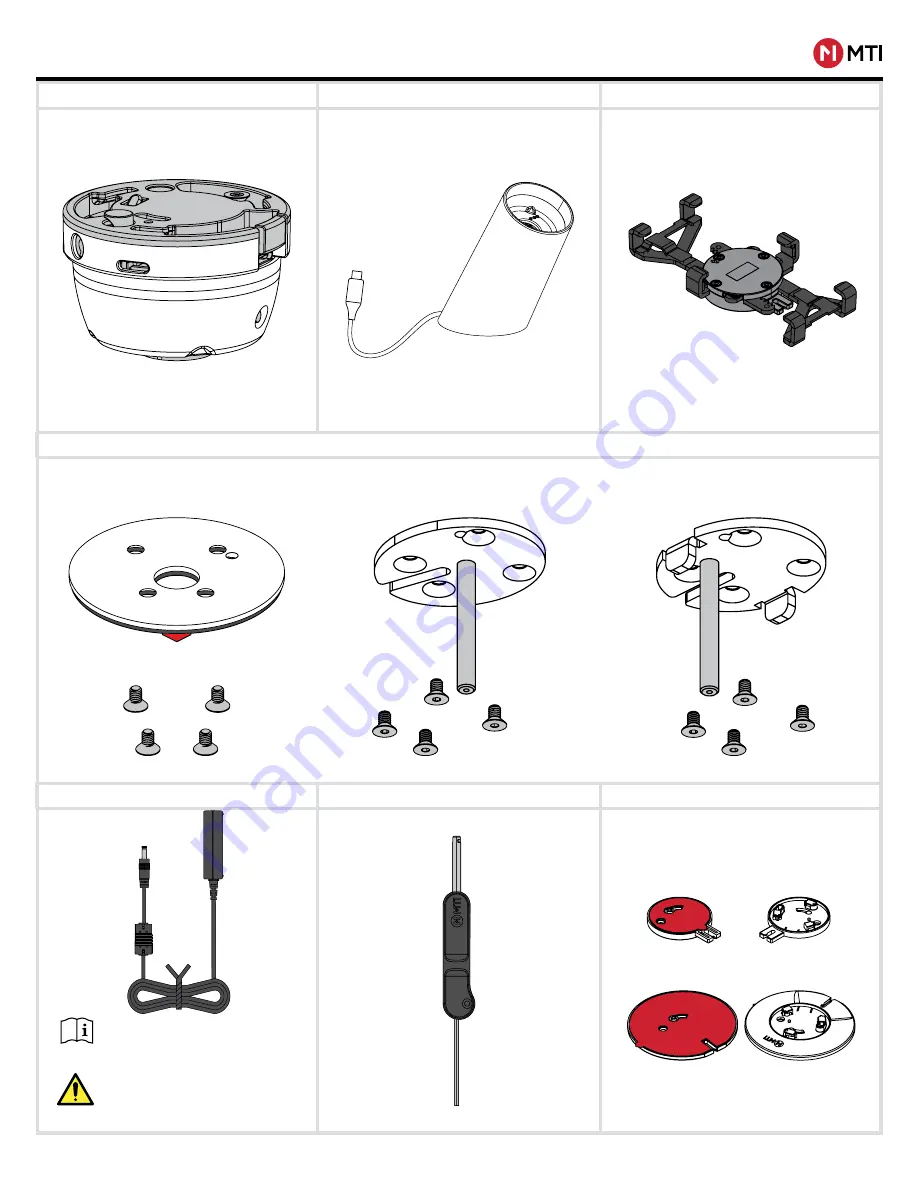
COMPONENTS AND ACCESSORIES

SpeedBracket™

Slot Mounting

Through Hole Mounting

VHB Mounting

SpeedPlate™ Options

Power Supply

Freedom Micro

®

 II Tool

Mounting Options

Freedom Micro

®

 II Riser

Freedom Micro

®

 II Puck

Phones

Only use USB-C standard power supply

Tablets

Summary of Contents for FREEDOM MICRO II

Page 1: ...ate Options 3 3 Speedplate Merchandising 5 4 Speedbracket Merchandising 8 5 SmartCable Merchandising 10 6 Technical Data 11 For additional support please reach out to our Contact Center at 800 426 6844 CONTENTS WARNING MTI products contains chemicals known to the State of California to cause cancer and birth defects or other reproductive harm Proposition 65 California Health Safety Code Section 25...

Page 2: ... www MTIGS com T 800 426 6844 COMPONENTS AND ACCESSORIES SpeedBracket Slot Mounting Through Hole Mounting VHB Mounting SpeedPlate Options Power Supply Freedom Micro II Tool Mounting Options Freedom Micro II Riser Freedom Micro II Puck Phones Only use USB C standard power supply Tablets ...

Page 3: ...ress down on the base plate for 10 seconds for full adhesive contact Allow 24 hours for full adhesion Use the individual power supply and plug it into the nearest outlet The socket outlet shall be installed near the equipment and shall be easily accessible Utilisez l alimentation individuelle et branchez la dans la prise la plus proche La prise de courant doit être installée à proximité de l équip...

Page 4: ...ttom plate then slide it up over the slot adapter post Insert the Freedom Micro II position into the slot or hole Secure the Freedom Micro II position with the knob Use the individual power supply and plug it into the nearest outlet Use an outlet installed near the equipment that is easily accessible Utilisez l alimentation individuelle et branchez la dans la prise la plus proche La prise de coura...

Page 5: ...G Peel red backing off of the adhesive on the SpeedPlate Clean the device with an alcohol wipe Apply the SpeedPlate to the phone with the cable retainer towards the charge port of the phone Use the SpeedPlate cable retainer as alignment reference Place the device onto the puck and rotate the device clockwise on the puck until it locks into place ...

Page 6: ... Micro II Puck then release and remove the Freedom Micro II tool With the Freedom Micro II tool held in the twisted position rotate the SpeedPlate counterclockwise Twist the Freedom Micro II tool clockwise 45 degrees and hold it in place Insert the crescent end of the Freedom Micro II tool into the opening to the right of the LED REMOVING SPEEDPLATE FROM PUCK ...

Page 7: ...lockwise in relation to the tether Lift the puck off of tether connection Lift puck out of riser insert the crescent end of the Freedom Micro II tool into the opening below the charge port on the puck Twist the Freedom Micro II tool counterclockwise to unlock the puck from the tether Place the VHB removal tool around the SpeedPlate Pull the tool working it back and forth like a saw until the Speed...

Page 8: ... the center screw on the universal bracket to loosen the bracket arms Place the phone into the universal bracket Extend the bracket arms as far as needed The bracket arms move simultaneously in pairs top bottom and left right Adjust the universal bracket to fit the device snugly Open the top and bottom bracket arms then the side arms in that order 1 2 2 1 ...

Page 9: ...ANDISING Tighten the center screw on the SpeedBracket to secure the bracket arms in place around the device After tightening screw wiggle the arms to ensure they have fully engaged the lock teeth then re check screw for tightness Place device back onto puck Rotate the device and bracket clockwise on the puck until it locks into place click ...

Page 10: ...nate solid white when plugged in Twist the device and bracket off of the position The loose cable can be clipped into SpeedBracket for easy storage Insert SmartCable into the charge port on the puck The hooks on cable should click when fully seated Insert the crescent end of the Freedom Micro II tool into the opening to the right of the LED Twist the Freedom Micro II tool clockwise 45 degrees and ...

Page 11: ...er or qualified service personnel 3 Only use accessories specified by the manufacturer 4 Do not expose to excessive heat sources Disposal All electrical and electronic products including batteries should be disposed of separately from the municipal waste stream via designated collection facilities appointed by the government or the local authorities 1 Pour une utilisation en intérieur uniquement L...

Reviews: