background image

23

Winch Operation

All Mudd-Ox’s come standard with a front winch and optional rear. It is important to understand the abilities and limits of your winch. For 

information of your exact winch and proper use of snatch block, refer to the manufacturer’s specifications and owner’s manual.

Operation

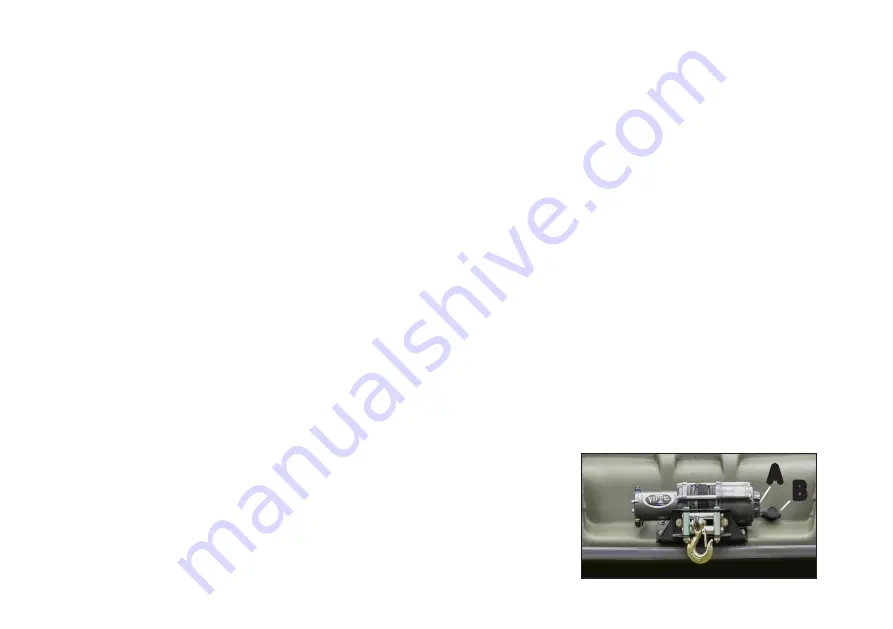
Control switch: Located on the instrument panel is a momentary switch. It is labeled “Winch” (See pages 15-16). This switch allows the op-

erator to control the winch while inside the vehicle. For operation outside the vehicle, there is an external winch controller plugin labeled 

“B” in Figure-1.

Free spool: On the driver side of the winch itself there is a large, twistable knob (See “A” in Figure-1). It engages/disengages the winch motor 

from the spool. When the motor is disengaged, it is known as “free spooling.” This allows operators to grab onto the winch hook and extend 

the winch line without having to hold the switch. 

Note:

 After extending the winch line to your desired length, remember to twist the knob 

to engage the winch motor, or else the winch will not operate.

Warning

•  Put a weighted object over winch line. In the event of the line snapping apart, it will prevent the line from whipping into the air.

•  Do not attempt to move other objects with the winch. It is intended only for recovering the Mudd-Ox.

•  If the winch begins to stall, do not continue holding the operating switch. This will ruin the motor.

•  Always keep at least 5 wraps of winch line on the spool to prevent the line from pulling off.

•  Never let the winch line slide across bare hands. Broken strands can cause severe injury.

•  Each winch has a duty cycle. Do not overheat or overwork winch.

•  Do not use winch as a tie down when transporting the Mudd-Ox.

•  Ensure people are clear of winch line during operation.

•  Keep debris out of line and spool

•  Prevent winch line from kinking. If there is already a kink, unkink immediately.

Figure-1

A

B

Summary of Contents for GT 45 HP

Page 1: ...MUDD OX INC WWW MUDDOX NET 8525 W 750 N SHIPSHEWANA IN 46565 260 768 7221 MADE IN THE USA GT XL 45 HP OWNER S MANUAL...

Page 2: ......

Page 3: ...to include the Mudd Ox GT XL Fort Mac and Vengeance to suit all your outdoor needs Our journey has continued to be full of adventure Safety is the number one concern at Mudd Ox Inc Please be sure to...

Page 4: ......

Page 5: ...Warranty 7 Safety 9 Instrument Panel 13 Drive the Mudd Ox 17 Operation 19 Accessing the Mudd Ox 25 General Maintenance 34 Track Installation 35 Towing 36 Maintenance 37 Transportation 55 Jack Points...

Page 6: ...mation is vital for identifying each individual Mudd Ox and obtaining a state issued title Do not remove the PIN plate from the Mudd Ox Locating the PIN On the interior of the Mudd Ox in front of the...

Page 7: ...Write down the Model and PIN information just as it displays on the PIN plate to document your individual Mudd Ox Model _______________________________________________________________ PIN ___________...

Page 8: ...essory listing and weight A Top speed depends on terrain conditions and drive train options Specifications are subject to change without notice Warranty GT XL 63 Wide 68 Wide 2 090 lbs 119 Long 2 190...

Page 9: ...N A Cargo Liner XL in Cargo Frame 31 lbs N A Chevron Track GT Metal Keepers 280 lbs 560 lbs Chevron Track GT Plastic Keepers 210 lbs 420 lbs Chevron Track GT Plastic Keepers C Channel Track Steel 249...

Page 10: ...Air Transmission Fluid 3 quarts GM Auto Trak II Air AW 46 Diesel Fuel Tire Pressure Maintenance Schedule Axle Bearings Grease every 25 hours or after each use in water mud whichever comes first Chain...

Page 11: ...24 27 37 41 52 58 31 33 29 31 26 27 1 2 37 41 57 64 80 90 43 45 40 42 35 37 9 16 53 59 82 91 115 129 57 63 53 58 47 51 5 8 73 83 112 128 159 180 93 104 86 96 76 85 3 4 125 138 200 223 282 315 128 124...

Page 12: ...Customer Service Department may be contacted using the following methods by calling 1 260 768 7221 in person or by mail at Mudd Ox Inc 8525 W 750 N Shipshewana IN 46565 or online at www muddox net The...

Page 13: ...ose that exceed the obligations and time limitations specified in this warrant are hereby disclaimed by Mudd Ox and excluded from this warranty Additionally this warranty excludes any incidental or co...

Page 14: ...n manual and all warning labels displayed on this page and on the vehicle before operation Please keep a copy in the glove box for operators to review as needed Note Vehicle load capacities vary throu...

Page 15: ...Safety Equipment All occupants must wear a DOT certified helmet There are seat belts for the front two passengers Use the seat belts at all times on land and ensure the ROPS system is up Any time the...

Page 16: ...istributed on land and in water Towing Capacity With a trailer attached to the rear of the Mudd Ox you can haul a maximum combined 2 500 lbs with trailer and cargo Prepare Your Trip The Mudd Ox is cap...

Page 17: ...onal effect Wind Speed in MPH Danger from freezing of exposed flesh Equivalent Temperature F Actual Thermometer Reading F GREAT DANGER LITTLE DANGER INCREASED DANGER Wind chill is the feeling of colde...

Page 18: ...13 1 2 3 4 5 8 9 10 11 6 7 13 14 15 16 17 18 12...

Page 19: ...ox 10 seconds this will preheat the engine glow plugs Then turn completely clockwise to start engine release once started Turn key to middle position to shut off engine If the engine fails to start af...

Page 20: ...15 1 2 3 4 5 8 9 10 11 6 7 13 14 15 16 17 18 12...

Page 21: ...diagnose charging system immediately to prevent over charging of battery 14 USB Ports Under the weatherproof cover are 2 12V USB ports These may be used to power accessories such as a cell phone 15 C...

Page 22: ...out care could cause the vehicle start and immediately move depending on operator stick location Engine Startup Turn key completely counterclockwise and hold for approx 10 seconds this will preheat th...

Page 23: ...rds To counter rotate the vehicle carefully operate the levers in opposite directions Please note that smooth minor movements on the controls are all that is needed to drive the Mudd Ox Climbing Steep...

Page 24: ...oming from the Mudd Ox inspect immediately Never drive into remote areas alone Notify someone about your entire trip schedule including departure route and return plans They should call emergency serv...

Page 25: ...by driving into deep ruts or too deep of snow Always look for alternative routes if you encounter these circumstances Winter Mudd Ox is capable of operating in cold climates Check the engine manufact...

Page 26: ...le exit locations in case of emergency If there is an emergency all occupants are to leave the vehicle quickly and get to safety Entering Water Ensure drain plugs are installed Page 22 Figure 1 Mudd O...

Page 27: ...o so immediately Exiting Water Locate hard packed shoreline at a 10 degree angle or less Point the Mudd Ox straight Slowly and gently drive the vehicle out of the water Too much throttle will cause th...

Page 28: ...hook and extend the winch line without having to hold the switch Note After extending the winch line to your desired length remember to twist the knob to engage the winch motor or else the winch will...

Page 29: ...free spool 5 For additional safety place a weighted object over the winch line such as a blanket In the event the winch line snaps it will prevent the line from whipping in the air and causing serious...

Page 30: ...was designed with ease of maintenance in mind We understand the need for quick and painless access to all compo nents of the machine Listed on the next few pages are detailed photographs displaying t...

Page 31: ...26 Overview of the rear chassis Hydraulic drivetrain under the operator s seat Open engine compartment Quickly removed parts without tools...

Page 32: ...y lift the engine cover out of its track and pull straight back Rear Seat Back Removal If a rear seat back is installed simply flip the lower seat cushion forward Then remove the two clips holding the...

Page 33: ...k cover To gain access to the fuel filter and fuel pump with rear seat simply flip the lower seat cushion forward If equipped with fuel tank cover and no rear seat remove the bolts holding the fuel ta...

Page 34: ...is a number This dic tates the number of amps it is rated for Always replace a fuse with the same amp rating Relay Pictured is a relay removed from its mount Each relay has terminals extending from t...

Page 35: ...system The 3rd relay is for the engine glow plug system Location 4 There is also 1 relay per engine cooling fan thus 2 total Each one is located on its respected roll bar leg next to the radiator Loc...

Page 36: ...rds the front of the Mudd Ox and hold it or use a zip tie to secure the valve forward When finished return valve back to its normal position Kubota Oil Filter On the right side of the Kubota 45 HP eng...

Page 37: ...air filter system Always check inside the air filter to ensure it is clean and not clogged with dirt Clogging may cause the engine to not run correctly or not run at all Replace the air filter when d...

Page 38: ...changing hydraulic oil always change the oil filters as well Ensure they are secure and do not leak See pages 50 52 Hydraulic Tank Oil Filter Behind the oil tank towards the operator seat is a bright...

Page 39: ...d rust It is easiest to use a sprayable chain lubricant across the entire length of the chain Do not leave sections dry Always lubricate chains after exposure to water mud leaves and other elements Ti...

Page 40: ...direction 4 Drive the Mudd Ox onto the tracks 5 Roll the overhanging track over the tires so the open ends are on the top side between the middle two wheels The ends of the ratchet straps should be c...

Page 41: ...he Mudd Ox you must relieve the brakes on the 2 inline hydraulic pumps This is a simple task On the bottom of each pump there is 1 towing bolt thus 2 total Loosen them by turning 1 to 1 1 2 turns coun...

Page 42: ...if it is blown On the inside of a fuse is a small metal strand If it is broken and or the fuse is discolored it is blown If the strand appears whole it may not be blown or the strand is broken in an...

Page 43: ...he fuse relay simply went bad If this solution did not fix the problem move to step 4 4 Remove the battery Trace all the wires connected to the fuse or relay and component that is non operational A wi...

Page 44: ...ly twist the valves to close Figure 2 D Coolant Change 1 Ensure engine is completely cool Remove engine cover 2 Locate the lower radiator hose as shown on Figure 1 C 3 Holding the hose onto the engine...

Page 45: ...e the driver front side of the Mudd Ox You may raise just enough to lift the first axle off the ground or both It does not matter 4 Now you can manually rotate the raised tires They will not rotate mo...

Page 46: ...too loose turn the tensioner nut clockwise and vise versa Adjust until approx 1 4 slack is achieved 5 Once adequate tension is achieved tighten the jam nut Repeat steps 3 6 on page 40 and 3 5 above fo...

Page 47: ...42 A A A A B B A B Chain Tensioner Locations...

Page 48: ...ster link is visible 3 Next it s time to loosen the chain adjuster This will remove tension on the chain making removal and reinstallation easier Reverse steps 2 4 on page 53 4 After finding the maste...

Page 49: ...low arrows These display the chain s direction of travel when the Mudd Ox is driving forward The top section of the chain moves towards the front of the vehicle while the bottom section moves towards...

Page 50: ...Total 3 bearings per axle Figure 1 2 Each bearing is encapsulated by bearing flanges There is both an inner and an outer Only the outer flange will be easily visible Located on the outer bearing flan...

Page 51: ...46 Inner Axle Bearings 8 total Outer Axle Bearings 16 total X B B Mudd Ox Axle Bearing Locations X X X X X X X X X X X...

Page 52: ...ustment remaining at one location it must be adjusted at the other If both locations are out of adjustment a new steering cable is required A Remove the lower operator seat seat back and seat L bracke...

Page 53: ...he driver side brake caliper Towards the inside of the Mudd Ox there is a bolt with jam nut Use an 11 16 wrench to loosen the jam nut 4 Then use a 7 16 wrench to turn the bolt clockwise This will tigh...

Page 54: ...ully spin the filter counterclockwise to remove Note If you cannot remove the filter by hand a pair of oil filter pliers may be required The filter may be partially filled with oil Carefully remove fr...

Page 55: ...the oil for proper disposal 4 After the tank is drained locate the 1 inline hydraulic oil filter Figure 2 shows the oil tank from front view the opposite orientation of Figure 1 Figure 2 E shows the...

Page 56: ...ine off immediately Wait a minute then try again It may take a few attempts before oil begins to pull into the system 14 This step is extremelly important to do execute perfectly It s time to run the...

Page 57: ...levers in reverse Then slowly move control levers backward Continue to move the control levers with varying degrees of stroke Note It is very important to not drive against the air as this will damage...

Page 58: ...as the engine still has water Attempting to turn over the engine may be catastrophic You will complete these steps later 3 Now prepare the engine Remove the air filter drain any water inside the inta...

Page 59: ...the fuel tank This means the fuel system is properly cycled 13 Now complete steps 14 16 on page 51 Due to the physical properties of water and oil naturally separating it may take a significant amoun...

Page 60: ...ations Improper Techniques and Consequences Not tying down the Mudd Ox may cause it to move around the trailer and or fall off during transport Possible serious injury or death to persons near the veh...

Page 61: ...56 Transportation Cont Tie Down Accessory Standard Setup Figure 1 Figure 2 Figure 3 X X X X...

Page 62: ...hicle as shown in Figure 1 Raise enough so the wheels are not touching the ground Note Do not attempt to raise more than one end of the Mudd Ox at a time instability can occur and cause serious injury...

Page 63: ...the Mudd Ox is completely clean grease each fitting as described on page 45 4 Fully charge the battery Then disconnect or install a battery tender 5 Completely drain fuel or add fuel stabilizer See pa...

Page 64: ...59...

Page 65: ...60 PARTS MANUAL...

Page 66: ...61 2 1 7 8 3 5 10 6 9 4...

Page 67: ...r Body 3 1 M 1005 GT Front Upper Seat M 2949 XL Front Upper Seat 4 2 M 3239 Mudd Ox Roll Bar Sticker 5 1 M 1006 GT Rollbar M 1448 XL Rollbar 6 1 M 1006 R GT Rear Rollbar M 1857 XL Rear Rollbar 7 1 M 1...

Page 68: ...63 1 4 5 6 9 3 2 8 7 10 11 12...

Page 69: ...1 M 1354 5 000 lb Winch 5 1 M 1860 Roller Fairlead 6 1 M 1559 Winch Plate 7 1 M 3350 Remote Winch Plug 8 1 M 1169 Brush Guard Standard M 1991 Brush Guard XL 9 1 M 1035 G Driver Headlight Cover Green...

Page 70: ...65 1 3 4 8 9 6 7 5 2...

Page 71: ...1 M 1008 GT Rear Upper Seat Back M 2984 XL Rear Supper Seat Back 3 1 M 1022 GT Rear Seat Mount Hoop M 1447 XL Rear Seat Back Hoop 4 2 M 1027 Tail Light Grommet 5 2 M 1023 Tail Light 6 1 M 1026 Rub Ra...

Page 72: ...67 9 6 10 8 7 12 13 11 5 14 1 2 3 4 15 16...

Page 73: ...1014 Grab Handle 7 1 M 3169 Bilge Outlet 8 1 M 1919 Screen GT M 1691 Screen XL 9 2 M 1013 Grab Handle 10 2 M 1920 Screen GT M 1692 Screen XL 11 1 M 1101 Exhaust 45hp Kubota 12 2 M 1011 Seat Belt Retr...

Page 74: ...69 12 13 18 1 3 17 16 15 2 14 7 8 6 11 10 5 4 9...

Page 75: ...044 T Bar Handle 8 1 M 1043 Weight Limit Warning Label 9 1 M 1926 Floor Pan Warning Label 10 1 M 1049 Hitch pin 11 1 M 1044 2 T Bar Handle Sleeve 12 1 M 2272 GT Lower Front Seat M 2948 XL Lower Front...

Page 76: ...71 3 1 6 4 13 10 11 9 7 8 12 5 2...

Page 77: ...ight 4 2 M 1221 Disc Brake 5 1 M 1382 Brake Cable 84 6 1 M 1422 1 GT L Seat Panel M 1423 1 XL L Seat Panel 7 2 M 1019 Seat Belt Latch 8 1 M 1012 Parking Brake Handle 9 1 M 1150 Parking Brake Tube Asse...

Page 78: ...73 5 4 3 2 15 13 12 14 1 6 7 10 9 8 11...

Page 79: ...Detent Base 5 2 M 1232 Lower Detent Plate 6 2 M 2726 Neutral Safety Switch 7 1 M 1206 F Front Z Bar 8 2 M 1933 Dampener 9 2 M 1077 2 Ball Stud 10 1 M 1206 R Rear Z Bar 11 2 M 3218 Steering Cable 12 4...

Page 80: ...75 24 22 20 19 17 23 11 12 8 9 6 3 2 18 1 7 13 15 10 14 16 4 5 21...

Page 81: ...10 1 M 3415 Coolant Hose 11 1 M 1101 Diesel Exhaust 12 1 M 1099 Plastic Coolant Reservoir Canister 13 1 M 3403 Coolant Hose 14 1 M 3398 Hydraulic Line 15 1 M 3407 Coolant Hose 16 1 M 3402 Coolant Hose...

Page 82: ...77 21 18 17 11 9 15 8 14 16 10 7 12 13 4 5 6 3 2 1 19 20...

Page 83: ...t 8 1 M 3260 Fuel Sending Unit 9 1 M 1841 XL Fuel Tank Standard 10 1 M 1092 RH Rear Seat 11 1 M 1089 Fuel Tank Cap Non Vented 12 1 M 1390 Electric Fuel Pump Kubota 13 1 M 1913 Inline Diesel Fuel Filte...

Page 84: ...79 6 5 2 7 9 8 10 11 12 4 3 1...

Page 85: ...XL Axle Tube Spacer 1 900 4 8 M 2202 18 Tooth Sprocket 5 4 M 3511 94 Pitch 60 2 Chain 6 6 M 1386 60 2 Master Link 7 2 M 1052 Front Chain Tensioner 8 2 M 1278 Front Tensioner Jam Nut 9 2 M 1057 Front T...

Page 86: ...81 10 9 15 2 3 4 1 5 6 8 7 13 12 14 11...

Page 87: ...et 4 4 M 1321 24T D60 Sprocket 5 8 M 2459 207 Flange Inner 6 8 M 2458 207 Flange Outer 7 8 M 2455 Inner Axle Bearing 8 8 M 1441 XL Axle End Washer 9 8 M 2042 Axle Nut 10 40 M 1401 1 2 20 Lug Bolt 11 8...

Page 88: ...83 Mudd Ox XL Dimensions on Vendetta 26x14x12 Tires...

Page 89: ...84 Mudd Ox XL Dimensions on Vendetta 26x14x12 Tires w Chevron Tracks...

Page 90: ...85...

Page 91: ...ormed on everything Mudd Ox If you have additional questions or inquiries please contact your nearest dealer or Mudd Ox directly 8525 W 750 N Shipshewana IN 46565 1 260 768 7221 www muddox net info mu...

Page 92: ...Address Phone Web 8525 W 750 N Shipshewana IN 46565 1 260 768 7221 www muddox net Mudd Ox Inc Ver 200603 All specifications subject to change without notice...

Reviews: