background image

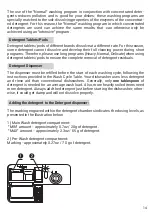
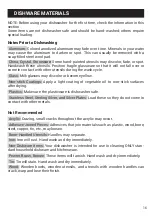
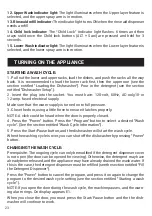
TURNING ON THE APPLIANCE

12. Upper Wash indicator light: 

The light illuminates when the Upper layer feature is 

selected, and the upper spray arm is in motion.

13. Rinse aid refill indicator: 

The indicator light turns ON when the rinse aid dispenser 

needs a refill.

14. Child lock indicator: 

The “Child Lock” indicator light flashes 6 times and then 

stays solid once the Child lock buttons (ALT + Sani) are pressed and held for 3 

seconds.

15. Lower Wash indicator light: 

The light illuminates when the Lower layer feature is 

selected, and the lower spray arm is in motion.

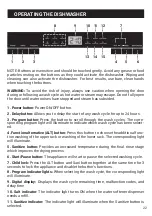
STARTING A WASH CYCLE:

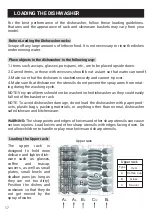
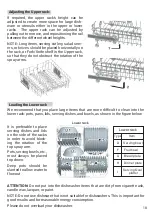
1. Pull out the lower and upper racks, load the dishes, and push the racks all the way 

back.  It  is  recommended  to  load  the  lower  rack  first,  then  the  upper  one  (see  the 

section entitled "Loading the Dishwasher"). Pour in the detergent (see the section 

entitled "Dishwasher Setup"). 
2. Insert the plug into the socket. You must have: 120-volt, 60Hz, AC-only,10-or 

12-amp, fused electrical supply. 
Make sure that the water supply is turned on to full pressure. 
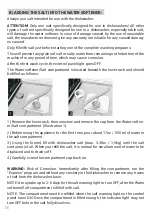
3. Close the door, using a little force to ensure it latches properly. 
NOTE: A click could be heard when the door is properly closed. 
4. Press the "Power" button. Press the "Program" button to select a desired "Wash 

cycle". (See the section entitled "Wash Cycle Information"). 
5. Press the Start/Pause button, and the dishwasher will start the wash cycle. 
When the washing cycle is over, you can shut off the dishwasher by pressing "Power" 

button.

CHANGING THE WASH CYCLE:

Prerequisite: The ongoing cycle can only be modified if the detergent dispenser cover 

is not open (the door can be opened for viewing). Otherwise, the detergent may have 

already been released, and the appliance may have already drained the wash water. If 

this is the case, the detergent dispenser must be refilled (see the section entitled "Fill 

the Detergent Dispenser"). 
Press the "Power" button to cancel the program, and press it on again to change the 

program to the desired wash cycle setting (see the section entitled "Starting a wash 

cycle" ). 
NOTE: If you open the door during the wash cycle, the machine pauses, and the warn-

ing alarm rings. On display appears E1. 
When you close the door, you must press the Start/Pause button and the the dish-

washer will continue to work.

23

Summary of Contents for DW-2400 Professional

Page 1: ...24 Built In Dishwasher Professional Series USER M ANUAL Model DW 2400 HOUSEHOLD USE ONLY ...

Page 2: ...mpletely satisfied with our Professional Series 24 Built In Dishwasher please let us know We ll help make it work for you or we ll refund your money __________________________________ pg 2 __________________________________ pg 2 __________________________________ pg 3 __________________________________ pg 3 __________________________________ pg 4 __________________________________ pg 7 ____________...

Page 3: ...ishwasher If it is necessary to open the door hold the top of the dishwasher securely with one hand and hold the door with the other hand WARNING DO NOT LIFT OR CARRY THE DISHWASHER BY THE DOOR OR CONTROL PANEL Keep the appliance at room temperature for at least 8 hours after receiving the prod uct in the winter season Remove any packaging including cable ties on the drainage pipe and power cord c...

Page 4: ...instructions for correct installation Installation of this dishwasher requires basic mechanical and electrical skills Proper installation is the responsibility of the installer Product failure due to improper installation is not covered under the Appliance Warranty Before installation make sure that the voltage and frequency listed on the rating label correspond with the household electrical suppl...

Page 5: ...iance to electricity Extension cords do not guarantee the required safety of the appliance To reduce the risk of injury immediately replace loose or defective power cords loose plugs and or power outlets Do not operate this appliance unless all enclosure panels are properly in place Before servicing disconnect the water intake hose and power supply Under no circumstance open the outer casing or co...

Page 6: ...hwasher safe dishware and kitchenware Knives and other sharp utensils with sharp points must be loaded in the basket with their points facing downwards or placed in a horizontal position Ensure no sharp items are not close to the front of the dishwasher to prevent acci dental piercing of the door seal Utensils will be hot after washing Allow 30 minutes to cool off before taking out Always use caut...

Page 7: ... discarded we recommend that you store the unit out of reach of children and remove its door This will reduce the risk of injury to children Hydrogen gas may be produced if the water heater has not been used in more than two weeks This could be explosive and can explode under certain circumstances If this is the case before using this appliance turn on all the hot water faucets and let the hot wat...

Page 8: ...ments up to 24 hours Securely holds light weight plastic accessories cups lids etc Illuminates to indicate Salt is low Illuminates to indicate Rinse Aid is low Illuminates to indicate sanitation requirements are met ENERGY STAR certified If you need to pre rinse dishes to avoid odors let the dishwasher do the work for you Place unrinsed dishes inside dishwasher and select the Rinse cycle Uses less ...

Page 9: ...er Rack Detergent Dispenser Fork Knife Shelf Water Softener Compartment Cutlery Basket with Cutlery Guide Top Rack Spray Arms 1 10 9 3 Filters 8 4 Lower rack Spray Arms 5 6 Rinse Aid Dispenser Funnel For Water Softener Compartment 7 2 ...

Page 10: ...r C Fill the Rinse aid dispenser D Fill the Detergent dispenser A WATER SOFTENER The water softener is designed to remove minerals and salts from the water which would have a detrimental or adverse effect on the operation of the appliance The higher the content of these minerals and salts the harder the water is The softener should be adjusted according to the hardness of the water in your area Yo...

Page 11: ...for 5 seconds The buzzer rings one time and H flashes on the digital display Factory setting is H0 To change the settings 1 Press the Delay button Each time the button is pressed the set value increases by one level when the value of H7 has been reached the display goes back to H0 off 2 When you have adjusted to the desired level press the Program button The chosen setting has now been stored Clar...

Page 12: ...e filled as follows 1 Remove the lower rack then unscrew and remove the cap from the Water soften er Salt compartment illustration 1 2 Before using the appliance for the first time pour about 17oz 500 ml of water in the salt compartment 3 Using the funnel fill with dishwasher salt max 3 3lbs 1 5kg until the salt container is full When you refill the salt it is normal for small amount of water to be di...

Page 13: ...aning agent liquid deter gent This will damage the appliance When to refill the Rinse aid dispenser The Rinse aid compartment must be refilled when the warning light on the control panel turns ON You can also judge the amount of rinse aid by the color of the optical level rinse aid indicator located next to the cap When the rinse aid container is full the whole indicator will be dark As the rinse ai...

Page 14: ...enser set on 2 If spots and poor drying problems appear increase the amount of rinse aid dispensed by removing the dispenser lid and rotating the dial to 3 If the dishes are still not drying properly or are spotted adjust the dial to the next highest number until your dishes are spot free D FILL THE DETERGENT DISPENSER Function of the Detergent Detergents with their chemical ingredients are necess...

Page 15: ...s pods to ensure the complete removal of detergent residuals Detergent Dispenser The dispenser must be refilled before the start of each washing cycle following the instructions provided in the Wash Cycle Table Your dishwasher uses less detergent and rinse aid than conventional dishwashers Generally only one tablespoon of detergent is needed for an average wash load Also more heavily soiled items n...

Page 16: ...n There could still be detergent residues in the dispenser Only add detergent just before starting the program and close the door activating the safety lock NOTE Use only detergent specifically made for use in dishwashers Keep your deter gent fresh and dry Don t put powder detergent into the dispenser until you re ready to wash dishes Please be aware that according to the level of soiling and the s...

Page 17: ...stick Coatings Apply a light coating of vegetable oil to non stick surfaces after drying Plastics Make sure the plasticware is dishwasher safe Stainless Steel Sterling Silver and Silver Plates Load these so they do not come in contact with other metals Not Recommended Acrylic Crazing small cracks throughout the acrylic may occur Adhesive Joined Pieces Adhesives that join materials such as plastic ...

Page 18: ...le NOTE Very small items should not be washed in the dishwasher as they could easily fall out of the basket or rack NOTE To avoid dishwasher damage do not load the dishwasher with paper prod ucts plastic bags packing materials or anything other than normal dishwasher safe dishware and kitchenware WARNING The sharp points and edges of knives and other sharp utensils can cause serious injuries Load ...

Page 19: ...re more difficult to clean into the lower rack pots pans lids serving dishes and bowls as shown in the figure below ATTENTION Do not put into the dishwasher items that are dirty from cigarette ash candle wax lacquer or paint NOTE Do not use dishware that is not suitable for dishwashers This is important for good results and for reasonable energy consumption Please do not overload your dishwasher It ...

Page 20: ...e cutlery basket with handles at the bottom Any long knives or utensils should not be placed in the cutlery basket Instead place horizon tally in the Upper Rack or the designated Fork Knife shelf in the Upper rack ATTENTION Ensure that the cutlery does not impede the rotation of the spray arms ATTENTION LONG BLADED KNIVES STORED IN AN UPRIGHT POSITION ARE A POTENTIAL HAZARD LONG AND OR SHARP ITEMS...

Page 21: ...based on this cycle and option combination Delicate Provides a light wash and gentle dry for delicate items such as china and crystal Light Cleans lightly soiled dishes and reduces overall wash time Use this cycle to clean glasses and dessert dishware that may need to be reused at the event Express When you need fast results the Express Wash cycle will clean your dishes using slightly more water a...

Page 22: ...duration is based on average soil loads and 120 F water intake temperature and will vary based on the actual conditions WASH CYCLE INFORMATION 21 175min 70min 70min 144min 180min 175min 144min 154min 50 53 122 127 50 53 122 127 50 53 122 127 ...

Page 23: ... wash cycle has been select ed 4 Function alternative ALT button Press this button to choose the additional func tion washing of the upper rack or washing of the lower rack The corresponding light will illuminate 5 Sanitize button Provides an increased temperature during the final rinse stage which improves the drying process 6 Start Pause button The appliance will start or pause the selected washi...

Page 24: ...re 3 Close the door using a little force to ensure it latches properly NOTE A click could be heard when the door is properly closed 4 Press the Power button Press the Program button to select a desired Wash cycle See the section entitled Wash Cycle Information 5 Press the Start Pause button and the dishwasher will start the wash cycle When the washing cycle is over you can shut off the dishwasher ...

Page 25: ...hwasher will continue the wash cycle after ten seconds WARNING It is dangerous to open the door during the washing cycle because the hot water may scald you END OF THE WASHING CYCLE Once the washing cycle has finished the buzzer of the dishwasher will ring 6 times and then it will go off Turn off the appliance using the Power button shut off the water supply and open the door of the dishwasher ajar...

Page 26: ...rom the wash water allowing it to be recirculated during the cycle For best performance and dishwashing results it is therefore recommended to inspect and clean the filter assembly for any obstruc tions or residue after every wash cycle once the dishwasher has cooled 1 For everyday cleaning slide the Lower Rack forward and then remove the Coarse Filter by gently squeezing the tabs located at the to...

Page 27: ... Micro Filter by pushing in until tabs are securely positioned Then reinsert the Micro Filter back into the filter hole pressing down wards and turning clockwise to secure Note Do not reinsert the Micro Filter upside down 6 Thorough cleaning of the filter assembly should be carried out once a week with regular use of the dish washer WARNING THE DISHWASHER MUST NEVER BE USED WITHOUT THE FILTERS IMPRO...

Page 28: ...ithin the door seals Clean periodically with a damp sponge Do not use abrasive substances or scouring pads that could affect the seal PROTECT AGAINST FREEZING If your dishwasher is to be left in an unheated location during the winter we recom mend the following steps be taken with the assistance of a service professional 1 Disconnect the electrical power to the dishwasher 2 Turn off the water supp...

Page 29: ...ing in the appliance If the appliance must be moved try to keep it in the vertical position If absolutely necessary it can be positioned on its back TROUBLESHOOTING TIPS ERROR CODES When some malfunctions happen the appliance will display error codes to warn you WARNING If overflow occurs turn off the main water supply before calling for service If there is water in the base interior of the dishwa...

Page 30: ...ishwasher then start the pre rinse wash cycle to drain out the water Repeat if necessary Spilled rinse agent Always wipe up rinse agent spills immediately Stained tub interior Detergent with colorant was used Make sure that the detergent is one without colorant Dishes and flatware not clean Improper program Select a stronger program Improper basket loading Make sure that the action of the detergen...

Page 31: ...an the detergent dispenser and catch thoroughly Avoid using tablets pods for short programs Detergent left in dispenser cups Dishes block detergent Cups Re load the dishes properly Use of tablet pods Only use tablets pods for Heavy Normal Delicate programs Steam Normal phenomenon There is some steam coming through the vent by the door latch during drying and water draining Black or gray marks on d...

Page 32: ... 888 632 9981 with your feedback or questions and we will do our best to make things right for you Your purchase comes with a 100 satisfaction guarantee from Müeller 168 Mason Way Unit 4A City of Industry CA 91746 Telephone 888 632 9981 E mail support muellerdirect com Web www muellerhome us Müeller USA ...

Reviews: