4
Assembly, Disassembly & Maintenance Instructions
HG-3 FLUSHING SYSTEM
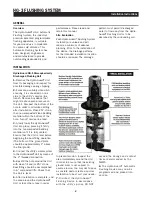
where rod passes though Erosion
Controlling Ground Plate so that rod
can be properly guided through hole
when reassembling unit.
5.
Use HG-A104 Security Wrench
to remove four security bolts from
Erosion Controlling Ground Plate.
6.
Lift upper assembly up and
off pipe leading down into lower
in-ground part of unit, taking care
not to stretch wiring and poly-tube
sampling line.
7.
Rotate downward two handles
of Cam-Lock Release mechanism
to disengage and remove internal
assembly.
Reassembly
1.
Return internal assembly to
proper location and lock the Cam-
Lock handles in place on the
female side of the Cam-Lock.
2.
Pull up on internal assembly
to be sure it is locked in place
(recommen dation: use a zip-tie
to hold two Cam- Lock handles in
position to assure they remain
locked in place during operation of
the unit).
3.
Gently lift upper section, making
certain to not stretch wires or
poly tube, and place it over pipe
and lower it onto top of In-ground
section of unit.
4.
Line up four holes of Ground
Plate with brackets of in-ground
Protective Sleeve.
CAUTION: DO NOT rotate
the plate more than 90' in either
direction, which could stretch
wiring or poly-tube.
5.
Reinstall four Security Screws
and use HG-A 104 Security Wrench
to tighten them securely.
6.
Lower Dechlorination Chamber
Bracket to original position and
retighten two nuts securely.
7.
Reinstall Knob onto Sampling
Valve Push Rod.
Although the Hydro-Guard® Unit was
delivered completely assembled,
it may be necessary or desirable
to disassemble portions of the
Unit, or the Unit in its entirety, In
order to allow for required service
and maintenance, If disassembly
is necessary, please follow the
directions below. Always close the
curb stop before working on the unit
making sure the supply line is shut
off and secured.
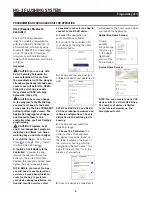
HG-3 Battery Replacement
1.
Shut off water supply to unit.
2.
Use HG-A2023 Security Tool
to unlock and remove protective
Exterior Housing Cover.
3.
Unscrew protective cap from gray
Programming Interface, which is
located at top of unit.
4.
Extract battery harness and
remove old battery (dispose of
battery appropriately).
5.
Connect fresh industrial grade
9-volt lithium or alkaline battery
and reinsert it with harness Into
Programmer.
6.
Screw protective cap back into
place and hand tighten securely.
7.
Use Hand held Controller to
reset all programs and assure
flushing sequence is correct prior to
returning the HG-3 Unit to service.
8.
Reinstall Exterior Housing Cover
and restore water supply to unit.
Disassembly
1.
Shut off water supply to unit.
2.
Use HG-A2023 Security Tool
to unlock and remove protective
Exterior Housing Cover.
3.
Loosen, DO NOT remove, two
stainless steel nuts in Bracket
holding Dechlorination Chamber
Covers in place.
4.
Remove Black Knob from
Push Rod that is part of Sampling
Valve assembly and observe hole
8.
Check battery life of Battery
in Programming Interface or
on board Programmer (according to
model of unit), replace and restore
programming If necessary.
9.
Align Lock on Exterior Housing
Cover with Locking Bracket on
lower assembly of unit and reinstall
Exterior Housing Cover (lock will
engage when cover Is properly
seated).
10.
Restore water supply to unit.
Reloading Dechlorination Chambers
1.
Follow Instructions "HG-3
Machine Disassembly, steps 1-3.
2.
Slide Bracket upward as far as
possible and remove Dechlorination
Chamber Covers.
3.
Check for partially dissolved
chlorine tablets or residues and
clean the chamber as needed.
4.
Insert up to four 3" chlorine
tables in each chamber.
5.
Reinstall chamber covers,
lower bracket to secure them and
retighten two nuts securely.
6.
Follow Instruction #9 above to
reinstall Exterior Housing Cover, and
restore water supply to unit.
HG-3 DISASSEMBLY AND REASSEMBLY INSTRUCTIONS
!
TOOLS NEEDED: HG-A 104 Security Wrench, HG-A2023 Security Tool, Philips screwdriver, flat-head screwdriver


