background image

18

Zipper sewing

secure the button.
6.  Rotate the Hand Wheel (23) to raise the Needle to the highest point then 

raise the Presser foot lifter (33).
7. Pull out the fabric and cut the threads.

NOTE:

 If you are having difficulties removing the fabric from underneath the 

Feed dog (12), push and hold the Thread clamp (17) to the left while pulling 

the fabric at the same time. Alternatively, you can rotate the Hand Wheel 

(23) counterclockwise (toward you) until you pull the thread and take out 

the fabric.
8.  To ensure that the button stays attached to the fabric, bring all the loose 

threads to the back of the fabric. You can do that by passing them (one by 

one) through the eye of a regular sewing needle and pushing the needle 

through to the back of the fabric. 
9.  Tie a knot with the loose threads to secure the button and then cut off the 

excess threads.
10.  Repeat steps 5-9 on the remaining holes if the button has more holes.

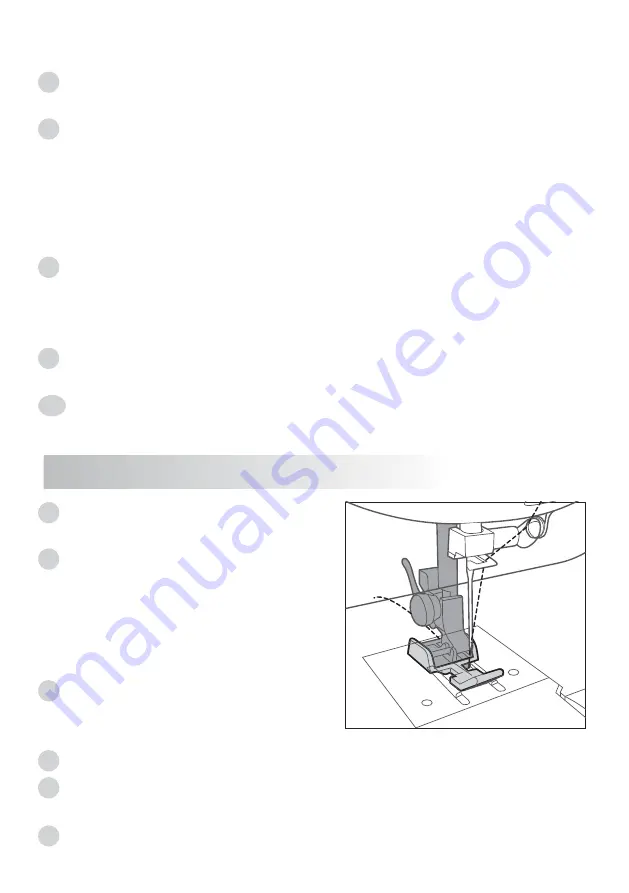
1. Pin or baste the zipper (not included) 

to the fabric.
2. Remove the Presser foot (4) - for 

instructions on how to remove the 

Presser foot, refer to the section 

“Removing or attaching the Presser 

foot” on page 20 of this instruction 

manual 
3. Attach the right side of the Zipper 

presser foot (38) to the Presser foot 

holder (3).
4. Set the sewing machine to stitch pattern 1A, 2A, or 3A.
5.  Align the teeth of the zipper next to the right edge of the Zipper presser 

foot (38).
6.  Sew a seam all the way down the zipper. Take out the fabric and cut the 

threads.

Summary of Contents for ULTRA-STITCH SM-1100

Page 1: ...el SM 1100white Your satisfaction is guaranteed If you are not completely satisfied with our Ultra Stitch Sewing Machine and the results it brings we insist that you let us know We ll help make the Sewing Machine work for you or we ll refund your money ...

Page 2: ...ing the thread tension 11 SEWING 13 Selecting the stitch pattern 13 Basic sewing 14 Removing the fabric and cutting the threads 15 Reverse sewing 15 Using the seam ripper 16 Buttonhole sewing 16 4 Step Buttonhole sewing process 17 Button sewing 17 Zipper sewing 18 Replacing the needle 19 Removing or attaching the Presser foot 20 Removing or attaching the Presser foot holder 21 CLEANING AND MAINTEN...

Page 3: ...en with reduced physical sensory or mental capabilities or lack of experience and knowl edge unless they have been given supervision or instruction concerning use of the appliance by a person responsible for their safety Use this appliance only for its intended use as described in this instruction manual Only use attachments provided and recommended by the manufacturer Never operate this sewing ma...

Page 4: ...Then pull down the cover of the storage compartment using the two slots on the sides to remove the accessories BEFORE FIRST USE Switch the sewing machine to OFF position O when making any adjustments in the needle area such as threading the needle changing the needle threading the bobbin or changing the presser foot etc Do not use the machine if it is wet Do not operate the appliance with wet hand...

Page 5: ... hole 12 Feed dog 9 Needle clamp screw 10 Needle clamp 11 Needle size 14 90 13 Removable accessory storage extension table 14 Thread cutter 15 LED light switch 16 Thread tension dial 17 Thread clamp 18 Thread guide 19 Tension disk 1 20 Tension disk 2 21 Take up lever 22 Pattern selector dial primary 23 Pattern selector dial secondary 24 Hand wheel 25 Stitch indication panel ...

Page 6: ...ing spindle 32 Spool holders 33 Presser foot lifter Parts located in the removable accessories storage extension table 36 Buttonhole presser foot 37 Needle threader 38 Zipper presser foot 39 Lint brush 40 Seam ripper 42 Power adapter 41 Foot pedal 34 Bobbin x4 35 Button sewing plate Pack of 6 needles size 14 90 ...

Page 7: ...t Turn ON the power switch to turn on the machine The symbol I on the switch indicates the ON position After use always turn OFF the power switch and unplug the machine from the wall outlet WARNING While in operation always keep your eyes on the sewing area and do not touch any moving parts such as the Take up lever 21 Hand wheel 24 or Needle 11 Always turn OFF the power switch and unplug from the...

Page 8: ...o the right towards the Bobbin stopper 30 5 While holding the free end of the thread step on the Foot pedal 41 to start winding After winding a few layers release the Foot pedal and cut off the free end of the thread 6 Step on the Foot pedal again to continue filling the Bobbin 34 The winding motion slows down when the Bobbin is full Cut the thread and push the Bobbin winding spindle 31 to the lef...

Page 9: ...hread is running in a clockwise direction 4 Pull the thread so there is at least 4 inches 10 cm of loose thread NOTE Do not place the Bobbin cover back until the full threading process is complete Threading the upper thread 1 Turn the Hand wheel 24 coun terclockwise toward you to raise the needle 11 to the highest point and then raise the Presser foot lifter 33 NOTE For safety reasons it is strong...

Page 10: ...n Tension disk 1 19 to the bottom and then pull it up into Tension disk 2 20 5 Loop it up to the top of the Tension disk 2 20 before pulling back down and threading through the slotted eye of the Take up lever 21 from left to right 6 Pull the thread back down and pass it through the Thread hole 8 and then behind the Needle clamp 10 and then down to the needle which should be threaded from front to...

Page 11: ...eedle is now threaded Using the needle threader 1 Hold the end of the upper thread and turn the Hand wheel 23 towards you counterclockwise lowering then raising the needle 2 Gently pull on the upper thread to bring the bobbin thread up through the stitch hole of the Presser foot 4 Drawing up the Bobbin thread Note For safety reasons it is strongly suggested you turn off the power before threading ...

Page 12: ...e Bobbin cover 6 The thread tension should be adjusted depending on the sewing materials layers of fabric and sewing method To adjust the tension of the upper thread use the Thread tension dial 16 To increase the tension rotate the Thread tension dial to a higher number To reduce the tension rotate the Thread tension dial to a lower number Adjusting the thread tension 1 4 1 2 1 2 1 1 1 0 9 8 7 6 5...

Page 13: ...read will appear on the right side top side of the fabric Loosen the needle thread tension by rotating the dial to a lower number Useful tips Proper setting of tension is important for good sewing There is no single tension setting appropriate for all stitch functions thread or fabric A balanced tension identical stitches both top and bottom is usually only desirable for straight stitch constructi...

Page 14: ... C to choose the desired stitch pattern CAUTION Do not turn the Pattern selection dials when the needle is down into the fabric Otherwise the needle may bend or break SEWING Selecting the stitch pattern Needle to the left Needle to the middle Needle to the right If you are not sure which stitch pattern to select we recommend trying different stitches on a piece of test fabric ...

Page 15: ...o secure the fabric in place 4 Rotate the Hand wheel 23 coun terclockwise toward you to lower the Needle 11 into the fabric 5 Turn ON the machine and then press your foot gently on the Foot pedal 41 to start sewing using your hands to guide the fabric through Basic sewing 1 4 1 2 1 2 1 1 1 0 9 8 7 6 5 4 3 2 1 1 4 1 2 1 2 1 1 1 0 9 8 7 6 5 4 3 2 1 NOTE Do not pull or push the fabric while sewing as...

Page 16: ...ou until you pull the thread and take out the fabric 3 Bring the threads to the Thread cutter 14 and cut the threads using a down ward motion Removing the fabric and cutting the threads Reverse sewing Reverse sewing is used to secure the beginning and the end of a seam or to reinforce places that need extra strength The Feed dog s 12 move ment reverses to move back the cloth while sewing to make a...

Page 17: ...hole on the fabric 4 Place the fabric under the Presser foot 4 and set the Presser foot lifter 33 down to secure the fabric in place aligning the distance set on the presser foot to the length of the marked fabric 5 Follow the 4 Step Buttonhole sewing sequence instructions in the next section of this manual changing from one step to another with the Pattern selector dial primary 22 and the Pattern...

Page 18: ...ng 1 Rotate the Hand wheel 23 counterclockwise toward you to raise the needle 11 to the high est point Raise the Presser foot lifter 33 2 Attach the Button sewing plate 35 to the holes on the Needle plate 5 Attaching the Button sewing plate stops the fabric and button from moving up while sewing 3 Place the fabric and the button in position on the Button sewing plate 35 Lower the Presser foot lift...

Page 19: ...sing them one by one through the eye of a regular sewing needle and pushing the needle through to the back of the fabric 9 Tie a knot with the loose threads to secure the button and then cut off the excess threads 10 Repeat steps 5 9 on the remaining holes if the button has more holes 1 Pin or baste the zipper not included to the fabric 2 Remove the Presser foot 4 for instructions on how to remove...

Page 20: ...traight and sharp 1 Turn the Hand wheel 23 coun terclockwise toward you to raise the Needle 11 to the highest point and then lower the Presser foot lifter 33 2 Turn the Needle clamp screw 9 counterclockwise to loosen it and remove the needle from the Needle clamp 10 7 Attach the left side of the Zipper presser foot 38 to the Presser foot holder 3 8 Set the product to stitch pattern 1A 2A or 3A 9 A...

Page 21: ...s under the Presser foot before sewing NOTE Use these instructions to install the Presser foot 4 the Buttonhole presser foot 36 and the Zipper presser foot 38 To remove Turn the Hand wheel 23 counterclockwise toward you to raise the Needle 11 to the highest point Raise the Presser foot lifter 33 Press the Presser foot locking lever 1 The Presser foot drops off To attach Place the desired presser f...

Page 22: ...older To remove Turn the Hand wheel 23 counterclockwise toward you to raise the needle 11 to the highest point Raise the Presser foot lifter 33 Loosen the Presser set screw 2 by turning it with an appropriate sized screwdriver not included counterclockwise Remove the Presser foot holder 3 To attach Place back the Presser foot holder 3 and secure it by turning the Presser set screw 2 clockwise with...

Page 23: ...detergents wire brushes abrasive scourers metal or sharp utensils to clean the machine Cleaning the area inside the bobbin cover Lint and bits of thread may accumulate under the Bobbin cover 6 Check regularly and clean it with the Lint brush 39 when necessary Storage Store the product in its original packaging in a dry area Keep away from children and pets Store accessories in the Removable access...

Page 24: ...hread tension is not properly adjusted The needle is bent or blunt or incorrectly inserted The upper thread and the bobbin thread are not drawn to the rear and set properly under the presser foot when starting sewing There is lint in the bobbin case The needle and or thread are not suitable for the fabric being sewn Adjust the thread tension according to the stitch pattern and the type of fabric R...

Page 25: ...thread is running in the clockwise direction Check if there is any lint collected in the bobbin case Clean with the lint brush Re thread the bobbin Choose a needle and thread type suitable for the fabric Replace the bobbin The needle is bent or blunt or incorrectly inserted The Presser foot is not attached correctly The needle and or thread are not suitable for the fabric being sewn The needle is ...

Page 26: ...25 SPECIFICATIONS Rated voltage 12 V Current consumption 1 5 A Power consumption 18W Input voltage 100 240 V 50 60 Hz ...

Page 27: ......

Page 28: ...Web www muellerdirect com Müeller USA If you are not happy with the product for any reason please contact us at support muellerdirect com or 888 632 9981 with your feedback or questions and we will do our best to make things right for you Your purchase comes with a 100 satisfaction guarantee from Müeller ...

Reviews: