background image

M

UGNAI N I

®

MUGNAINI SERIES 

GAS FIRED OVEN MANUAL

Mugnaini Imports, Inc. 

11 Hangar Way, Watsonville CA 95076 

888.887.7206  │  831.761.7167  │  Fax:  831.728.5570


www.mugnaini.com  │  mugnaini@mugnaini.com

PAGE 8

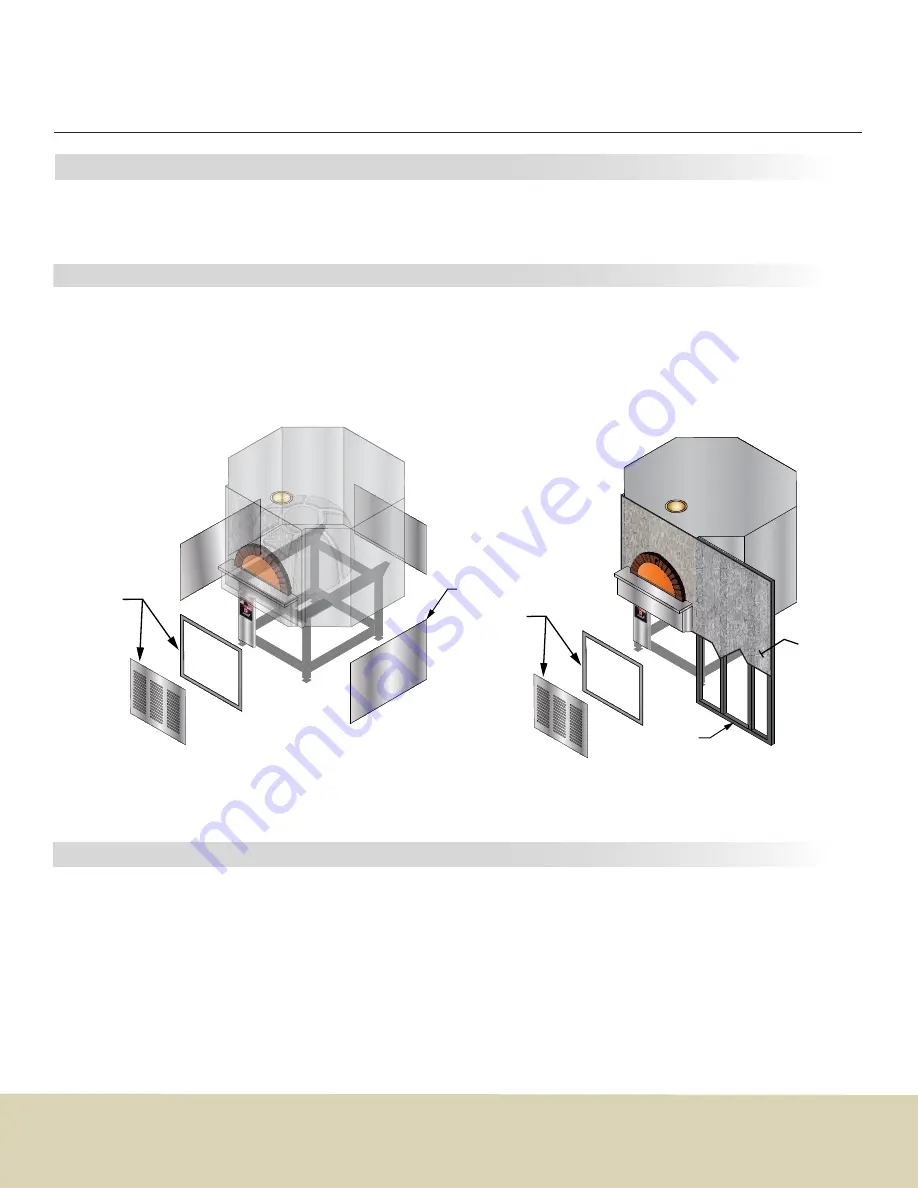
3.3  INSTALLATION ACCESSORIES

Side panels are available from Mugnaini to frame in the stand on freestanding ovens. If the base of the 
oven is to be completely enclosed; use the optional Gas Cover Panel Kit to ensure adequate combustion 
air reaches the burner.

3.4  FINISH MATERIALS

Use only non-combustible materials such as tile, brick or stone, to finish your installation. You may attach 
1/2” concrete board directly to the oven’s metal enclosure. Use metal framing braced to the oven in order 
to build a facade wall or transition to combustible construction.
Framing for a facade wall or site built side panel should be assembled using metal studs and 1/2” concrete 
board. Non-combustible finish materials may be applied to the concrete board.

Optional side 

panels

Optional Gas 

Cover Panel Kit

Metal stud framing with 1/2” 

concrete board

Optional Gas 

Cover Panel Kit

Metal stud 

framing

1/2” Concrete 

board

Side panels for free standing ovens 

attach to the oven stand.

3.5  COVERING THE ARCH

The arch is not removable but may be covered with ceramic tile or similar non-combustible material. 
Remove the paint on the arch to create a proper bonding surface. Use Thinset or other cement based 
product to mount tiles. Do not use adhesives or glue to attach finish materials to front panel or arch.

CHECK WITH LOCAL HEALTH DEPARTMENT REGARDING ACCEPTABLE MATERIALS FOR THE ARCH 

OR FRONT PANEL.

Summary of Contents for G100 PA

Page 1: ...REQUIRED CLEARANCES AIR SPACES TO COMBUSTIBLE MATERIALS IT IS OF UTMOST IMPORTANCE THAT THIS OVEN BE INSTALLED ONLY IN ACCORDANCE WITH THESE INSTRUCTIONS MUGNAINI I T A L Y S O R I G I N A L P I Z Z A O V E N MUGNAINI I T A L Y S O R I G I N A L P I Z Z A O V E N Mugnaini Series COMMERCIAL GAS FIRED OVEN MUGNAINI Mugnaini Imports Inc 11 Hangar Way Watsonville CA 95076 888 887 7206 831 761 7167 Fax...

Page 2: ...LT IN PROPERTY DAMAGE BODILY INJURY AND EVEN DEATH WARNING DO NOT PACK THE REQUIRED 1 AIR SPACES WITH INSULATION OR OTHER MATERIAL INSTALLATION OF THE EXHAUST VENT SHALL BE IN ACCORDANCE WITH THE STANDARD FOR VENTILATION CONTROL AND FIRE PROTECTION OF COMMERCIAL COOKING OPERATIONS NFPA96 SEEK OUT QUALIFIED INSTALLERS IN YOUR AREA AND OBTAIN THE PROPER PERMITS IN THE ABSENCE OF LOCAL CODES USE NATI...

Page 3: ...S FOR CANADA 10 5 3 OVEN FLUE OUTLET 10 5 4 CONNECTING FACTORY BUILT CHIMNEY TO OVEN 10 6 DIRECT VENTING WITH FACTORY BUILT GREASE DUCT 6 1 DIRECT VENT REQUIREMENTS USING FACTORY BUILT GREASE DUCT 11 6 2 ADDITIONAL REQUIREMENTS FOR CANADA 11 6 3 OVEN FLUE OUTLET 11 6 4 CONNECTING FACTORY BUILT GREASE DUCT TO OVEN 11 7 INDIRECT VENTING 7 1 INDIRECT VENTING REQUIREMENTS 12 7 2 TYPE 1 HOOD 12 OPERATI...

Page 4: ...sure to take into account the size of your oven and entry into your building It is common to remove doors windows or open walls to gain access Seek out a qualified professional to ensure you are prepared for your installation The trucker will require a flat level surface safe from traffic A forklift will need to maneuver to remove the crated oven from the truck and place it on the ground for uncra...

Page 5: ...ect the oven Note any damage to the crate oven or accessories DO NOT SIGN THE DELIVERY BILL UNTIL THE OVEN HAS BEEN INSPECTED AND ANY DAMAGE NOTED ON THE DELIVERY BILL CALL OUR OFFICE IMMEDIATELY IF THERE ARE ANY SIGNS OF DAMAGE 888 887 7206 2 2 OPENING THE CRATE The oven crate is wrapped in plastic and metal banding Parts and any accessories will be strapped to the base and sides of the crate The...

Page 6: ...steel stand hang below The stand can be removed if necessary Once the oven has been placed near or inside of the restaurant use the pallet jack to move the oven to the installation location It may be necessary to place steel bars or heavy wood beams across the forks of the pallet jack to fully engage the pallet jack Move into place and slowly lower You can make fine adjustments using a long pry ba...

Page 7: ...s a minimum of 3 8 diameter Insert at least one fastener appropriate for the floor per steel mounting foot embedded 2 minimum 3 2 CLEARANCES TO COMBUSTIBLE CONSTRUCTION The oven requires a 1 clearance on back wall and side walls to any combustible materials Do not pack the air gap with insulation or other material You may bridge the gap between the oven and façade wall with metal stud framing and ...

Page 8: ...o build a facade wall or transition to combustible construction Framing for a facade wall or site built side panel should be assembled using metal studs and 1 2 concrete board Non combustible finish materials may be applied to the concrete board Optional side panels Optional Gas Cover Panel Kit Metal stud framing with 1 2 concrete board Optional Gas Cover Panel Kit Metal stud framing 1 2 Concrete ...

Page 9: ...DEPARTMENTS REQUIRE MECHANICAL DRAWINGS OF THE VENTING SYSTEM DEMONSTRATING CODE COMPLIANCE 4 2 EXHAUST VENT REQUIREMENTS Installation of the exhaust vent shall be in accordance with the Standard for Ventilation Control and Fire Protection of Commercial Cooking Operations NFPA 96 This code references UL 737 for direct venting and UL 2162 for indirect venting The oven may be vented in either of the...

Page 10: ...y must terminate to an approved chimney cap with spark arrestor screen mesh Chimney lengths 25 feet or longer may require an exhaust fan The Enervex GSV series fan is listed for use with a wood burning pizza oven see http www greasefans com Applicable for pizza and bread products only 5 2 ADDITIONAL REQUIREMENTS FOR CANADA The use of smoke detectors is highly recommended The chimney connector shal...

Page 11: ... must terminate to an approved chimney cap with spark arrestor screen mesh Chimney lengths 25 feet or longer may require an exhaust fan The Enervex GSV series fan is listed for use with a wood burning pizza oven see http www greasefans com Applicable for any menus including cooking meat 6 2 ADDITIONAL REQUIREMENTS FOR CANADA The use of smoke detectors is highly recommended The chimney connector sh...

Page 12: ... be sure to place fusible link appropriately May be vented with single wall grease duct or insulated factory built grease duct list to UL 1978 Example grease duct Metal Fab G Series www metal fabinc com Exhaust fan listed for use with a wood burning oven is recommended The Enervex GSV series fan is listed for use with a wood burning pizza oven see http www greasefans com 7 2 TYPE 1 HOOD Minimum Ty...

Page 13: ... for 4 hours After 4 hours turn the power off and place the door in the fully closed position Leave overnight to allow heat to saturate oven components Do not continue to fire the oven for more than 4 hours or at a higher temperature Day 2 Fire the oven on the lowest setting and then raise temperature hourly for 6 hours Turn the power on and select Min setting Fire for one hour Select Auto press S...

Page 14: ...wing these instructions PRECAUTIONS READ ALL INSTRUCTIONS CAREFULLY IMPROPER USE OF THIS APPLIANCE MAY RESULT IN A BUILDING FIRE OR PERSONAL INJURY INSTRUCTIONS SHOULD BE THOROUGHLY UNDERSTOOD BY ALL OPERATING AND SUPERVISING PERSONNEL THIS OVEN IS INTENDED FOR OPERATION BY TRAINED AND QUALIFIED PERSONNEL ONLY DO NOT OVER FIRE IF FLAMES EXTEND BEYOND THE OVEN DOOR OPENING YOU ARE OVER FIRING DO NO...

Page 15: ...point Press Set again to lock in the set point The Spitfire burner will automatically raise and lower the flame to maintain that temperature NOTE The actual temperature inside the oven will be different than the temperature displayed on the control box This Set Point should be used in conjunction with an infrared thermometer to balance the oven for the desired cooking environment Test various set ...

Page 16: ...r set point Pressing the Set button will display the set point Press and hold the Set button to change the set point using the up and down arrows Press Set again to lock in the set point Remember the set point is used to regulate the burner and is not an accurate measurement of the cooking surface so just use it as a guide 9 7 MANUAL MODE Press the Min button to fire the oven with the lowest flame...

Page 17: ...floor temperature Expect to adjust the flame manually or use the automatic system as service changes throughout the day The door is removed for pizza service FLOOR TEMP use infrared thermometer FLAME SIZE use Fire Control arrows to adjust PIZZA BAKE TIME approx range 750 F or more Reaching past the middle of dome 1 minutes 650 F Reaching the middle of dome 2 minutes 550 F Reaching up the side dome...

Page 18: ...as been determined by a qualified technician 10 2 DAILY MAINTENANCE The oven exhaust hood and grease filters if Type 1 hood is used should be cleaned on a daily basis The grease filters can be removed and cleaned in a dishwasher or sink Follow exhaust hood manufacturer s recommendations or NFPA 96 requirements for inspection maintenance and cleaning 10 3 MONTHLY MAINTENANCE Seek out a qualified ch...

Page 19: ... AND ALL OTHER OBLIGATIONS OR LIABILITIES ON THE PART OF MUGNAINI UNLESS SUCH OTHER WARRANTIES OBLIGATIONS OR LIABILITIES ARE EXPRESSLY AGREED TO IN WRITING BY MUGNAINI This warranty shall not apply a to any Oven or related equipment or accessory that is improperly installed or maintained b to products resold in other than Mugnaini original packaging or to Ovens modified or altered by the Original ...

Page 20: ...ATION OF STATUTE OR REGULATION STRICT PRODUCTS LIABILITY CONSUMER PROTECTION STATUTES OR DECEPTIVE TRADE PRACTICES STATUTES OR 2 DAMAGES INCLUDING SETTLEMENTS JUDGMENTS AND AWARDS AND COSTS INCLUDING ATTORNEYS FEES AND EXPENSES INCURRED IN DEFENDING CLAIMS ARISING OUT OF THE OVEN SHALL NOT BE GREATER THAN THE ACTUAL PRICE OF THE OVEN WITH RESPECT TO WHICH THE WARRANTY CLAIM OR DAMAGES ARISES UNDER...

Reviews: