7
EN: MUTICOOKER |
Instruction Manual
ATTENTION: Never use the appliance without the inner pot.
5.
Place the appliance on a horizontal , stable and heat resistance surface.
6.
Take out the power cord from the storage compartment.
7.
Connect the one side of the cord to the appliance power adapter and the other side, plug in into grounded socket outlet.
8.
You will hear a beep signal, the display will show “ - - - - ” and all indicators will lights up for a second. The appliance is
going to stand by mode and is ready for use.
ATTENTION:
1. Never use the inner pot as a container in which to prepare cooking products. Always prepare the products in
other container and then add it into the inner pot.
2. Never use metal utensils to the inner pot. Always use plastic or wood utensils.
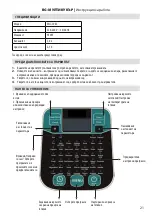
FUNCTIONAL BUTTONS
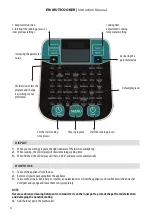
1.
MENU
When you turn on the multicooker, press the “MENU” button to select a program. Each time you press the button, you will go
through the default programs. The indicator light will indicate which program you are on. After selecting the program, the LED
display will show the default cooking time.
2.
START BUTTON
After you choose and set the program, press the “Start” button to start the cooking process.
3.
TIMER/TEMP. BUTTON
• When you choose the program, you can press the “Timer/Temp.” button. to adjust the time or temperature by pressing the
right or left arrow. Pressing the button ones, you can adjust the time, if you press the button 2ed time, you can adjust the
temperature. The time or the temperature will appear on the LED display.
4.
PRESET BUTTON
• Pressing the “Preset” button you are going to time delay function.
• Pressing the ‘+’ or ‘-‘ button you can increase or decrees the time.
• Delayed start time is up to 24h at 1h intervals.
NOTE: The preset time is showing the start cooking time.
• In order to avoid bad taste of the food. The preset cannot be too long, it’s better not exceed 12hours.
Example:
• Press the“Menu”button and go to “Porridge”program, The default time is 1 hour. If you want to adjust the cooking time,
press the “Preset” button, the indicator light is on. Adjust the time by pressing the ‘+’ or ‘-‘. buttons
• After set up the program, press the “Start” button to start the cooking process.
Note: If the delay time is less than the cooking time, the appliance will not enter the «Preset» function, it will
work directly without preset settings.
5.
KEEP WARM/CANCEL BUTTON
• The cooker will start to cook as you set and the display will show the cooking time.
• After the cooking process finished, the cooker will enter to ‘keep warm’ function automatically.
• If you want to stop the cooking process and turn to keep warm directly when the cooker working, press the „КЕЕР WARM/


