background image


Multicom MUL-HDENC-C-100-NA User Manual


www.multicominc.com


                                           (800) 423-2594 


                                All Rights Reserved © 2019 Multicom, Inc. 

(407) 331-7779 


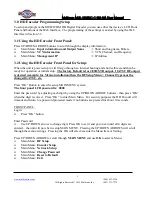
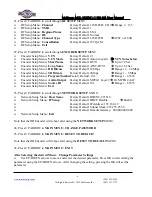
#1. Press UP ARROW to scroll through 

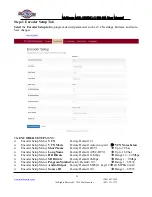
RF SETUP 

MENU: 


RF Setup Menu:  

Channel


Factory Default: J.83B:STD: CH 2

 Range 2 - 135 


RF Setup Menu:  

TSID


Factory Default: 1 


RF Setup Menu:  

Regional Name


Factory Default: USA 


RF Setup Menu:  

RF


Factory Default: Normal 


RF Setup Menu:  

Channel Type


Factory Default: J.83B:STD 

ATSC or J.83B 


RF Setup Menu:  

Constellation


Factory Default: 256 QAM 


RF Setup Menu:  

Exit


#2. Press UP ARROW to scroll through 

ENCODER SETUP 

MENU: 


Encoder Setup Menu:  

VCN


Factory Default: 2.1 


Encoder Setup Menu:  

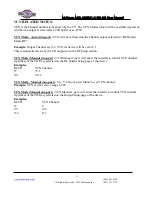
VCN Mode


Factory Default: Auto(two-part)  

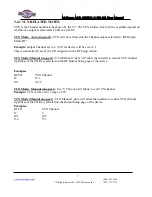
 VCN Notes below


Encoder Setup Menu:  

Short Name


Factory Default: DTV1  


 Up to 7 Char 


Encoder Setup Menu:  

Long Name


Factory Default: ATSC-DTV1  

 Up to 16 Char 


Encoder Setup Menu:  

HD Bitrate


Factory Default: 18Mbps    

 Range 12 – 24 Mbps 


Encoder Setup Menu:  

SD Bitrate


Factory Default: 4Mbps    

 Range 1 – 9 Mbps 


Encoder Setup Menu:  

ProgramNumber

Factory Default: 101    


 Range 1 - 65534 


Encoder Setup Menu:  

Audio Output


Factory Default: MPEG1 Layer 2 

 Or MPEG4 AAC 


Encoder Setup Menu:  

Source ID


Factory Default: 101    


 Range 1 - 65535 


Encoder Setup Menu:  

Exit


#3. Press UP ARROW to scroll through 

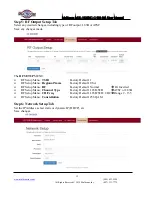
NETWORK SETUP

 MENU: 


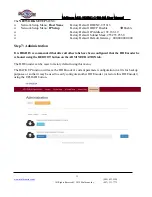
Network Setup Menu:  

Host Name


Factory Default: HDENC-271616 


Network Setup Menu:  

IP Setup


Factory Default: DHCP Disable   

 Enable 


Factory Default: IP Address: 192.168.1.9 


Factory Default: Subnet Mask: 255.255.255.0 


Factory Default: Default Gateway:  000.000.000.000 


Network Setup Menu:  

Exit


Note that the HD Encoder will reboot after using the 

NETWORK SETUP

 MENU. 

 
#4. Press UP ARROW to 

MAIN MENU:


 CHANGE PASSWORD


#5. Press UP ARROW to 

MAIN MENU:


RESET TO DEFAULT 

 
Note that the HD Encoder will reboot after using the 

RESET TO DEFAULT

 MENU. 

 
#6. Press UP ARROW to 

MAIN MENU:


EXIT 

 
After Selecting the desired Menu – Change Parameter Settings 


Use UP/DOWN arrows to move and select the desired parameter, Press OK to start editing the 

parameter using the UP/DOWN arrows.  After changing the setting, pressing the OK will set the 
parameter. 

Summary of Contents for MUL-HDENC-C-100-NA

Page 1: ... intended solely for use by purchasers of Multicom Inc HD Digital Encoders and their qualified service technicians This document is the property of Multicom Inc and incorporates proprietary subject material and information The use of all design manufacture reproduction and all other rights regarding these contents in whole or part without Multicom Inc written consent is expressly prohibited Multic...

Page 2: ...nt consistent with its operating temperature specifications Placement next to heating devices and ducts is to be avoided as doing so may cause damage The device should not be placed in areas of high humidity DO NOT cover any of the device s ventilation openings If the device has been in a cold environment allow it to warm to room temperature for at least 2 hours before connecting to an AC outlet I...

Page 3: ...crypted HDMI input of up to 1080i 1080p into a J 83B QAM 64 QAM 256 RF or ATSC 8VSB output The Multicom MUL HDENC C 100 NA is feature rich very flexible powerful user friendly and is easy to use for both Residential and Commercial applications The high quality HD performance allows action packed movies and sports channels on any HDTV FRONT VIEW REAR VIEW LCD Display Reset use pin paperclip Power L...

Page 4: ...SC 8VSB 8VSB 19 390Mbps Output Impedance 75 ohm RF Output Return Loss 10 dB Typical VCN Auto Major Minor Manual Major Minor Manual One Part Video Audio Encoding Profile Video Video Codecs MPEG 2 VBR Bitrate Adjustable J 83 Annex B HD 12 0 24 0 Mbps SD 1 0 9 0 Mbps ATSC 8VSB HD 12 0 18 0 Mbps SD 1 0 9 0 Mbps Resolution Output Same as input except 1080p60 in 1080p30 out 1080p50 in 1080p25 out 1080p3...

Page 5: ...lt is for J 83B STD output If ATSC RF output is desired example for Mexico installation then the RF Setup Menu Channel Type must be changed to ATSC etc Press OK Button to enter the setup MAIN MENU system The front panel LCD password is 0000 Enter the password by adjusting each digit by using the UP DOWN ARROW buttons then press OK when the digit is correct Press OK to enter Main Menu For security ...

Page 6: ...ry Default 4Mbps Range 1 9 Mbps Encoder Setup Menu ProgramNumberFactory Default 101 Range 1 65534 Encoder Setup Menu Audio Output Factory Default MPEG1 Layer 2 Or MPEG4 AAC Encoder Setup Menu Source ID Factory Default 101 Range 1 65535 Encoder Setup Menu Exit 3 Press UP ARROW to scroll through NETWORK SETUP MENU Network Setup Menu Host Name Factory Default HDENC 271616 Network Setup Menu IP Setup ...

Page 7: ...for device will be set at 2 1 This is automatically set by the CH output set in the RF Setup section VCN Mode Manual two part VCN Manual 2 part will allow the installer to control VCN channel regardless of the CH freq selected on the RF Output Setup page of the device Examples RF CH VCN Channel 57 55 1 101 101 2 VCN Mode Manual one part Use VCN one part Menu to set VCN channel Example VCN can be s...

Page 8: ...vice 6 Verify parameters have changed and then end your web session As an alternative the HD ENCODER static IP Address may be configured or DHCP enabled on the front panel and then the Web Browser can be used for all other configuration changes by using the IP Address which will be displayed on the LCD BE VERY CAREFUL WHEN USING THE DEFAULT IP ADDRESS AND CONNECTING TO AN EXISTING NETWORK THERE MA...

Page 9: ...the current settings MAC address Firmware version etc The other tabs Encoder Setup RF Output Setup Network Setup and Administration are used to change the HD Encoder settings and operating parameters It is HIGHLY recommended that after all other tabs have been configured that the HD Encoder be rebooted using the REBOOT button on the ADMINISTRATION tab ...

Page 10: ...Setup Menu VCN Mode Factory Default Auto two part VCN Notes below Encoder Setup Menu Short Name Factory Default DTV1 Up to 7 Char Encoder Setup Menu Long Name Factory Default ATSC DTV1 Up to 16 Char Encoder Setup Menu HD Bitrate Factory Default 12Mbps Range 12 24 Mbps Encoder Setup Menu SD Bitrate Factory Default 4Mbps Range 1 9 Mbps Encoder Setup Menu ProgramNumberFactory Default 101 Range 1 6553...

Page 11: ...or device will be set at 2 1 This is automatically set by the CH output set in the RF Setup section VCN Mode Manual two part VCN Manual 2 part will allow the installer to control VCN channel regardless of the CH freq selected on the RF Output Setup page of the device Examples RF CH VCN Channel 57 55 1 101 101 2 VCN Mode Manual one part Use VCN one part Menu to set VCN channel Example VCN can be se...

Page 12: ...es made The RF SETUP MENU RF Setup Menu TSID Factory Default 1 RF Setup Menu Regional Name Factory Default USA RF Setup Menu RF Factory Default Normal Or Inverted RF Setup Menu Channel Type Factory Default J 83B STD ATSC or J 83B RF Setup Menu CH Freq Factory Default J 83B STD CH2 Range 2 135 RF Setup Menu Constellation Factory Default 256 QAM Step 6 Network Setup Tab Set the IP Address select sta...

Page 13: ...et Mask 255 255 255 0 Factory Default Default Gateway 000 000 000 000 Step 7 Administration It is HIGHLY recommended that after all other tabs have been configured that the HD Encoder be rebooted using the REBOOT button on the ADMINISTRATION tab The HD Encoder can be reset to factory default using this menu The BACKUP function will save the HD Encoder s current parameter configuration in a file fo...

Page 14: ...cluded AC power adapter cord to the HD Encoder s 12VDC Power receptacle at the rear 4 Connect the AC adapter to an appropriately rated AC power outlet 5 Test the RF output with a CATV meter to ensure that it is within the input range of the connected TV s 6 Connect to the coaxial distribution using the F connector at the rear of the HD Encoder Use a high quality 75Ω coaxial cable with compression ...

Page 15: ...tings are selected in the HD Encoder and the TVs No Display on TV HD Encoder or TV not setup completely or not correctly 1 Ensure the source and the HD Encoder are powered on 2 Ensure that there is output from the video source direct connect the source with a HDMI to a TV 3 Ensure that there is output from the HD Encoder output bit rate should be shown on LCD 4 Ensure that the correct HD Encoder o...

Page 16: ... DVD Blu Ray Player Occasionally No Input message will appear on TV HD Encoder output will stop output if no Player input is available 1 See note above about HDCP content restrictions 2 Player output will stop when it is overly slow to read data old dirty player 3 Make sure the DVD Blu Ray media is clean no scratches no fingerprints etc Noise on TV Occasionally compression artifacts appear 1 Ensur...

Page 17: ...s damaged MULTICOM will not be responsible for free maintenance or free replacements 6 Disclaimer MULTICOM reserves the right to change any products described herein at any time and without prior notice MULTICOM assumes no responsibility or liability arising from the use of the products described herein except as expressly agreed to in writing by MULTICOM The use and purchase of this product does ...

Reviews: