background image

3

Note:

 The first time you use the soldering iron, it may smoke slightly as the heating 

element dries out. This is normal and should only last for a few minutes. 

ONLY USE FOR ELECTRICAL WORK 

- Acidic solder will damage the iron tip.

• 

Connect the plug on the soldering iron lead to the socket(s) on the lower front of 

the station.

• 

Place the iron(s) in their holders.

• 

Connect the mains lead to the socket on the rear and connect to the mains supply 

and turn on the power using the switch on the rear of the station. The LCD will 

illuminate when the power is on.

• 

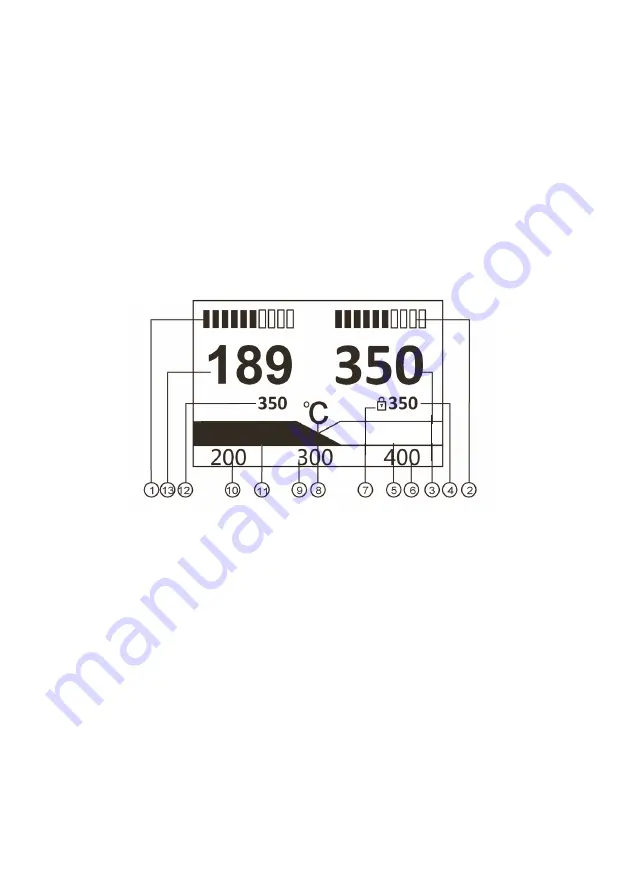
After a short initial self test display indicating system version number the LCD will 

display the last set temperature for each channel. 

1.  Channel 1 power bar / product working status / abnormal code.

2.  Channel 2 power bar / product working status / abnormal code.

3.  Actual tip temperature display of channel 2. 

4.  Set temperature display of channel 2.

5.  Soldering tool model identification of channel 2. 

6.  Quick access preset temperature setting 3.

7.  Indicator to show temperature is locked for channel 2. 

8.  Temperature Centigrade/Fahrenheit setting display .

9.  Quick access preset temperature setting 2.

10.  Quick access preset temperature setting 1.

11.  Soldering tool model identification of channel 1.

12.  Set temperature display for channel 1.

13.  Actual tip temperature display of channel 1.

MP740069 Model Dual Channel Display

XX-XXXX

XX-XXXX

Summary of Contents for MP740068

Page 1: ...1 Model MP740068 Soldering Station and MP740069 Dual Soldering Station...

Page 2: ...parts before the soldering tip has cooled down completely Do not use the product near flammable items Turn the power off when this product is not in use The soldering iron must be placed on its stand...

Page 3: ...y indicating system version number the LCD will display the last set temperature for each channel 1 Channel 1 power bar product working status abnormal code 2 Channel 2 power bar product working statu...

Page 4: ...temperature setting 2 6 Quick access preset temperature setting 1 7 Soldering tool model identification 8 Set temperature display 9 Actual tip temperature display MP740068 Model Single Channel Display...

Page 5: ...er setting menu the passkey is cleared and operation is unlocked Channel Setting The tool you wish to use on the channel must be connected then press button 1 or 3 for 2 seconds to select the channel...

Page 6: ...available for users to quickly call subject to the temperature lower limit and temperature upper limit settings 8 Fix Temp After this mode is activated the tip temperature is locked at this preset val...

Page 7: ...temperature set a positive matching value or a negative value if the tip temperature is higher Press ENTER to save the value for that channel TROUBLESHOOTING CLEANING Cleaning should only be done whe...

Page 8: ...P740068 MP740069 Voltage 230V 50Hz Power 150W 200W Fuses T 2 5A 230V AC T 2 5A 230V AC Temperature Range 150o C 480o C 302o F 896o F depends on tools attached Temperature Accuracy 8o C 15o F Temperatu...

Reviews: