background image

9.1 - Unit assembly 

 Adding the Raspberry Pi board 

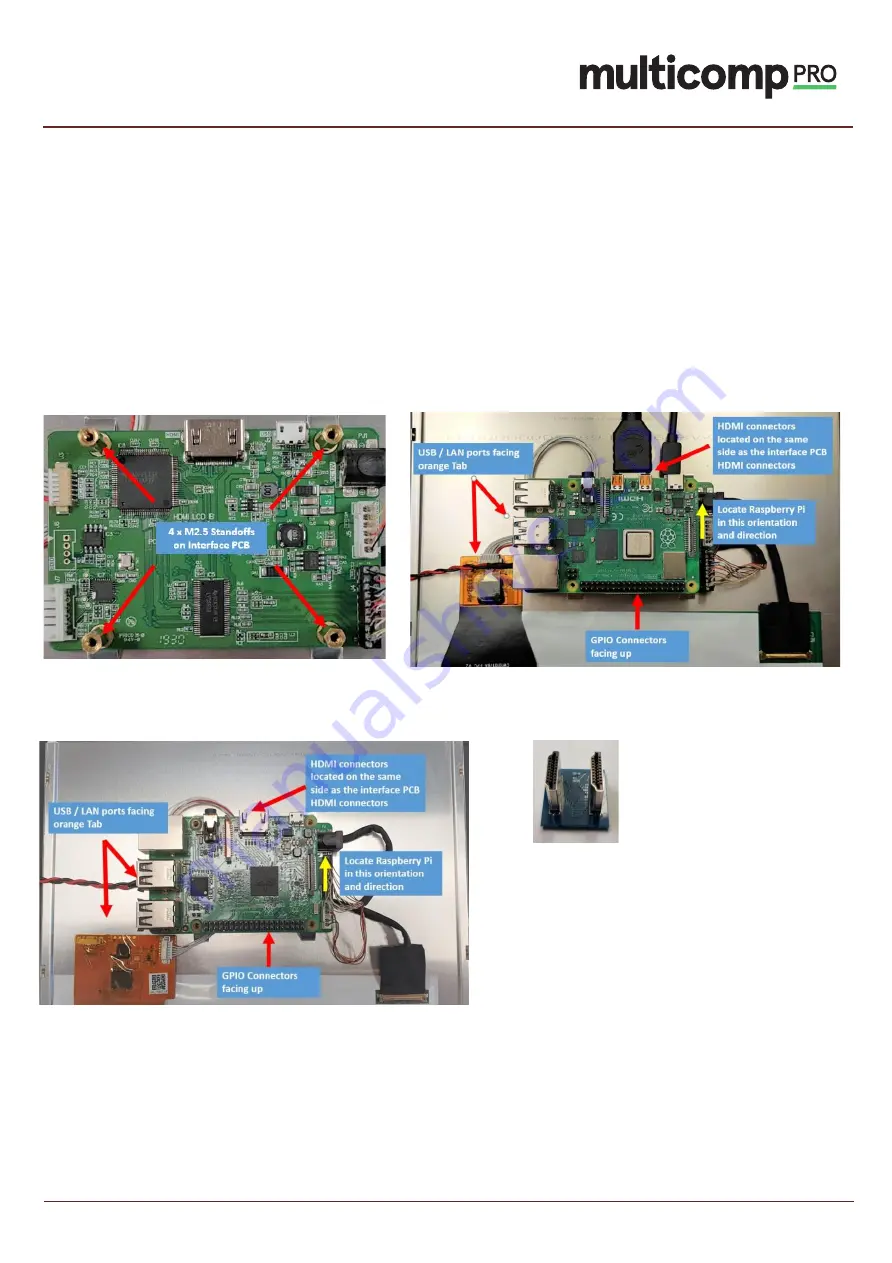
Locate your Raspberry Pi on top of the 4 standoffs on the HDMI Board. (see #1 image below) 

The HDMI Ports on the interface PCB and Raspberry Pi should be facing the same direction. This will position the 
USB/LAN ports for the PI facing the Orange Flexi and the GPIO Connectors towards the bottom Edge of the screen (See 
image #2 below) 

Note: If you are using a PI3 instead of Pi4, simply orientate the PI3 in the same position as the PI 4 shown below and use 
the supplied mini HDMI PCB connector (item#7) in place of the Micro HDMI Cable (item#4), to connect from the TFT 
Panel HDMI connector to the HDMI connector on the Pi3 Board. (image #3 below) 

Standoffs x 4 location on interface PCB (#1) 

Top View position with PI4 mounted (#2) 

Top View position with PI3 mounted (#3) 

PI3 HDMI PCB Connector (item#7) 

10.1

 IPS HD Resolution Touchscreen 

Display for Raspberry Pi

P6

Summary of Contents for TOUCHSCREEN 10.1

Page 1: ...ASSEMBLY GUIDE TOUCHSCREEN 10 1 10 1 IPS HD Resolution Touchscreen Display for Raspberry Pi P1...

Page 2: ...3 Pi4 Models 5 9 1 Unit assembly Adding the Raspberry Pi board 6 9 2 Unit assembly Securing the Pi Board 7 9 3 Unit assembly Connecting the Raspberry Pi 7 9 4 Unit assembly Connecting the Raspberry Pi...

Page 3: ...ble 1 6 I2C Interface Cable optional 1 7 HDMI HDMI PCB Pi3 assembly 1 8 M2 5 Screws 4 9 Standoffs assembled to TFT Display 4 Note You will need to purchase a suitable Raspberry Pi and a recommended po...

Page 4: ...it comes part assembled with item 9 Standoffs already attached to the rear of the TFT Display interface PCB For a Raspberry Pi3 assembly you will require item 7 HDMI HDMI PCB In this case item 3 is no...

Page 5: ...e SD Card into the Raspberry Pi board as per images below The SD card is located on the rear of the Raspberry Pi Figs A B show the location of the SD Card viewed from the top and bottom respectively F...

Page 6: ...of the screen See image 2 below Note If you are using a PI3 instead of Pi4 simply orientate the PI3 in the same position as the PI 4 shown below and use the supplied mini HDMI PCB connector item 7 in...

Page 7: ...rface PCB to the Raspberry Pi board as follows Item 3 micro HDMI connector to HDMI 0 Item 4 USBA connector to one of the PI USB Ports Item 3 Micro HDMI Connector Item 4 USB A Connector For PI3 install...

Page 8: ...nit assembly Setting up the system for single power connection To allow the PI to be powered by the TFT PCB and one power source you will need to connect an internal power link cable between the PI an...

Page 9: ...ting the Power supply Plug the 12 VDC power supply to the mating barrel connector on the HDMI interface PCB on the rear of the TFT Display assembly see images below 10 1 IPS HD Resolution Touchscreen...

Page 10: ...age below CAUTION This product should be placed on a stable flat non conductive surface before power is applied and when in use Plug the power supply into your mains outlet and turn on Once power is a...

Page 11: ...ed must offer adequate insulation protection and operation in order that the requirements of the relevant performance and safety requirements are met for the intended country of use TO AVOID MALFUNCTI...

Reviews: