background image

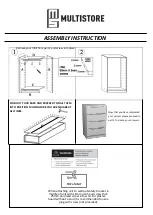
ASSEMBLY INSTRUCTION 


When attaching unit to wall put safety bracket in 

middle of unit with 16mm pan head screw then 

25mm pan head screw into wall. For plaster-

board without a stud it is recommended to use a 

plug with screw (not provided).


TOP of UNIT


F


Retrieve your Infill from part 2 and screw into place.


FOLD OUT YOUR BACK AND PROCEED TO NAIL THEM 
INTO  POSITION  MAKING SURE YOU ARE SQUARE AT 
ALL TIMES.


Now that you have completed 
your carcass please proceed to 
part 2 to create your drawers.


Summary of Contents for Compact Series

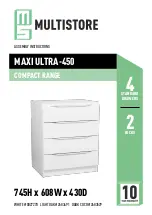
Page 1: ...Assembly Instructions WHITE 0027270 Light Oak 2683491 Dark Coco 2683529 745H x 608W x 430D Standard Drawers 4 PACKs 2 Compact Range MAXI ULTRA 450 ...

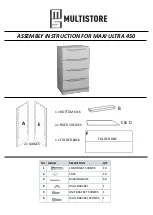
Page 2: ...K 1 x FOLDED BACK C D B 2 x GABLES ASSEMBLY INSTRUCTION FOR MAXI ULTRA 450 6 WALL BRACKET SCREWS 1 5 UNIT BRACKET SCREWS 1 A E NO MODEL DESCRIPTION QTY 1 CONFIRMAT SCREWS 10 2 CAPS 10 3 BACKING NAILS 60 4 WALL BRACKET 1 FOLDED LINE F ...

Page 3: ...l For plaster board without a stud it is recommended to use a plug with screw not provided TOP of UNIT F Retrieve your Infill from part 2 and screw into place FOLD OUT YOUR BACK AND PROCEED TO NAIL THEM INTO POSITION MAKING SURE YOU ARE SQUARE AT ALL TIMES Now that you have completed your carcass please proceed to part 2 to create your drawers ...

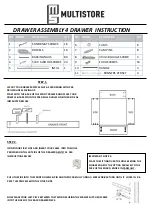
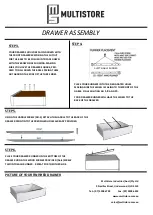
Page 4: ...REWS 16 2 DOWELS 16 3 BACKING NAILS 80 4 5 8 X 6 WOOD SCREWS 24 5 INFILL 1 STEP 2 GRAB YOUR FIRST SIDE AND INSERT YOUR CAMS INTO THE HOLE PROVIDED ON THE OUTSIDE OF THE DRAWER GENTLY AS PER INSTRUCTIONS BELOW PUSH THE SIDE INTO THE FRONT DOWELS PIN AND THEN CAREFULLY USING A SCREW DRIVER TURN UNTIL IT LOCKS IN RE PEAT THIS PROCESS WITH THE OTHER SIDE NOW PLACE YOUR LAST PIECE BETWEEN THE TWO SIDES...

Page 5: ...G TO THE FRONT OF THE GABLE Hole position no 1 8 and 15 YOUR DRAWER RUNNER WILL HAVE THE WHEEL TO THE BACK OF THE DRAWER STEP 4 STEP 5 USING THE HANDLE SCREW NO 5 ATTACH THE HANDLE TO THE BACK OF THE DRAWER FRONT INTO THE PREDRILLED HOLES ALREADY PROVIDED STEP 6 PLACE YOUR DRAWER RUNNER ON THE BOTTOM OF THE DRAWER USING THE WOOD SCREWS PROVIDED No 4 SCREW TWO INTO EACH RUNNER REPEAT FOR THE OTHER ...

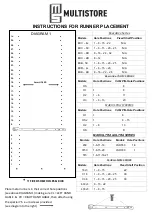
Page 6: ... H3 1 8 13 20 MAXI MSM SERIES Models Hole Positions Fixed Shelf Position 16J3 1 8 15 22 C16 1 8 15 20 25 30 C06 1 8 15 20 25 30 600J3 8 15 22 400J3 1 8 15 Executive Series Models Hole Positions Fixed Shelf Position EXC 4J 1 8 15 22 N A EXC 5C 1 8 15 20 25 N A EXC 4B 8 16 24 32 N A EXC 2B 8 14 N A EXB 5C 1 8 15 20 25 N A EXB 4J 1 8 15 20 N A EXB 4B 8 16 22 28 N A INSTRUCTIONS FOR RUNNER PLACEMENT F...

Page 7: ... Industries Aust Pty Ltd 9 Nevilles Street Underwood QLD 4119 P 61 7 3208 6799 sales multistore com au For easy assembly instructions please refer to video on our website www multistore com au Versatile Storage Units for any room ...

Reviews: